Showing posts with label China Glaze. Show all posts

Sunday, 6 April 2014

GOT Polish Challenge: Pastel

Well, it's not Thursday today but I can reassure you this post has been in planning since Wednesday night last week. I knew I wanted to use Sweet Hook by China Glaze, my first pastel polish after much resistance from my part, but didn't know how I would use it. After some frustration research, I end up with some saran wrapped, drippy nails. It took me three goes to create the mani you see below from having to do and redo the drips; they would come out crooked, too fat or too chunky. This was an OK try but I actually liked the second one better didn't take photos of it but never mind, I'm happy with the result.


For my last attempt, I started with two coats of China Glaze in Sweet Hook, which has been used a lot in this blog, and let it mostly dry. I then applied one thin coat of Australis' Aqua (please don't judge, it was an early time for this blog) and saran wrapped it off while it was still wet. I then dotted a line of Butter London's Union Jack Black along the tips of the nails and two dots at different levels of the nails to create the drops' base. I let that dry for a few minutes before taking the Topshop Nail Art Pen in Black, tool that I have used almost to the bottom of its container, to smooth out the dotted lines and creating the neck of the drops. It turned out super chunky so I waited for it dry for a while before creating the highlights on the drops with the white Nail Art Pen from Topshop. Once all that was done, I finished with one coat of HK Girl top coat.


This nails were chunky on the tips, I could feel them and it bother me a little but I kept them on overnight. When I woke up, they were a lot smoother and looked nicer, unfortunately I had to go to work before the sun had come up so I couldn't take new photos (mostly from tiredness). When I finished work I had a tiny little bit of tip wear and was tempted to cover it and take new pics but the day got on the way and that thought went out the window. What I figure is that the thick tips protected this mani and allowed me to keep it for a few days before it peeled off in thick, black chunks.


The thing about this mani, even though not perfect, has shown me that I have come a long way in nail art. I used to get frustrated because I couldn't come up with acceptable stuff and would just take it all off without posting anything on this blog. This time, I had basic tools, knowledge of how to use them, better colour theory and most important of all, a lot more patience and persistence to create a funky mani (from afar, it looked better from afar). Who would have thought painting nails would have so many benefits?

Till next time, 

Laura


Friday, 18 October 2013

33 Day Challenge: A Pattern In Your House

Well... Day 12 of the 33 Day Challenge called to use a pattern in your house to do some nail art. I looked around mine and all I could see were the plain bright or earthy colours but no patterns, even the towels and sheets are all one single colour. I found this pillowcase that colourful that I bought ages ago at the back of the cupboard and saw the manicure for today straight away. 


 The polishes I used are: Sinful Colors in Hazard, Sally Hansen Xtreme Wear in Pacific Blue and White On and finally China Glaze in Sweet Hook. Topped it all off with Seche Vite before letting it all dry for the next step. I hadn't shown striping tape in a mani for a while so I decided to do the smaller stripes of the pillowcase with it. I have 20-ish rolls of this tape and I'm sure that's almost a life time supply; I guess I better start using it.  


The execution and clean up wasn't great but it served its purpose. This mani reminds me of a school sports shirt or flag, at least the three middle fingers do. Maybe if I could reuse the polish base for another mani... 


Here's the pillowcase. I just realised I should have turned the pillow around so the colours would correspond to the ones on my nails but you get the idea. 


Check out the other talented ladies in the challenge.


Thursday, 26 September 2013

September Tri-Polish Challenge Day 4

Today is the last day of the September Tri-Polish Challenge and I was tempted to skip this post. I did some sugar spinnning for the first day of this challenge last week  but managed to smudge it badly before it was completely dry. I thought I could try it for the last day of the September challenge and there wouldn't be much problem. I went to work on some sugar spun nails again this morning but they were terrible!!! 

I'm not one to give up easily so I had to come up with a new design quickly. I remembered we could used black, white, silver and gold as well as our three chosen colours. I figured I could use a nail art pen I've had laying around for a while but hadn't used. To be completely honest, I have never tried free hand nail art. Today seemed like a good day to start. 

Here's what I came up with. I used two coats of Essence in Absolutely Blue on my index finger and pinky, two coats of China Glaze in Sweet Hook on my ring finger and one coat of Sally Hansen Insta-Dri in Sonic Bloom on my middle finger and thumb. I then used one coat of OPI Matte Top Coat on all my fingers. This was mostly done for the black nail art pen to grab onto the base as I have found that it slides right of anything slightly smooth. I taped my ring finger off to create the diamond shape using Layla in Metal Chrome. I used the same polish to create two dots on  my index finger and pinky. Then, my masterpiece (Haha! I wish) came to life. I created two diamond outlines using Sally Hansen Nail Art Pen in Black but managed to push it a little to far into the base polishes, which created uneven lines. 


I couldn't quite figure how to take photos of my hands upside down and make them look good so I just flipped my normal pose photos on Picasa. I guess that's a skill I'm gonna have to acquire.


If you've ever used a nail art pen from Sally Hansen, you may know they are basically acrylic paint in a handy package.  If you've used it without a top coat, you'll know they can smudge easily or wash away with some soap and water. I had to bring out my clear top coat to seal it as I wanted to wear this for a few days. I also know the black can smudge quite easily if the top coat is not applied correctly so I dabbed on some Sally Hansen Insta-Drip topcoat finish the mani. Unfortunately, I ended up with bubbles from the thickness of the last coat but it's hardly noticeable in real life.


Putting my rough lines aside and top coats bubbles, I quite like this mani. I'll just have to keep practicing this free handing business.

Check out the other entries to this challenge.


Till next time, 

Laura

Tuesday, 24 September 2013

September Tri-Polish Challenge Day 3 AKA Nail Fail

Don't forget to enter our giveaway here!


Day three of the September Tri-Polish is upon us a lot quicker than I realised. For some reason I thought I had a post ready for today but turns out I didn't. I had to come up with a quick and simple mani that would use all three colours. I haven't done a lot of gradients in my polishing life but I knew they were easy enough to me to tackle in no time and the pink I've been using was perfect for stamping. So a stamped gradient it was.

I started with two coats of Essence in Absolutely Blue as a base and let it dry. I then painted three coats of Absolutely Blue and China Glaze in Sweet Hook with a sponge to create the gradient. This is where it started to turn into a fail. The sponge I used was too rough and left little holes on the wet polish, which after three coats of coloured polish and two of Sally Hansen Insta-Dri topcoat, turned into BIG, chunky bubbles. 


I soldiered on and stamped over the gradient with Sally Hansen Insta-Dri in Sonic Bloom, which dried a little too quick on the stamper. Lack of foresight from my part there. :( I redid three of my fingers but they still didn't turn out great. Sealed it all off with two coats of Sally Hansen Insta-Dri. 


Not only are they B-A-D, they are also chunky. All those layers of polish and topcoat aren't making this mani look any better.


I thought of doing a different mani altogether but then remembered I have a life to attend to. Here are other good manis that you can look at after my fail. :)


Till next time, 

Laura

Thursday, 19 September 2013

September Tri-Polish Challenge Day 2

Don't forget to enter our giveaway here!

I'm trying to keep this challenge simple so I don't end up frustrated and quit before I even begin. For Day 2 of the September Tri-Polish Challenge I decided to go with some easy chevrons after my base got smudged. Yes, I have a problem with smudging my polish because of impatience and lack quick drying topcoat!!! 

For this attempt, I used two thin coats of China Glaze in Sweet Hook, let it dry and then used striping tape to create the chevrons with Essence in Absolutely Blue. I finished it all off with a coat of Ulta3's Clear polish.


I've noticed that pastel colours can look my hands look a bit lobster-ish in photos and in real life but I'm still loving the softness of mani. 


Hold on. Aren't I supposed to use three colours for this challenge?  Well, I am but the third one is hidden. I've been wanting to do Louboutin nails for a while but my nails never reached a workable length. I know I won't be able to grow them much longer than these as I will be going back to work and when I go back to work, they tend to break. I also figured the pink I was using was close enough to red, right?


They required a bit of preparation, patience and clean up but I love the way they look. I only wish I could have taken better photos but they were so tricky to capture correctly!


So that's my entry for today but don't forget to check others below.


Till next time, 

Laura

Wednesday, 18 September 2013

September Tri-Polish Challenge Day 1

Don't forget to enter our giveaway here!


My attempt at this challenge didn't work out quite as good as I was hoping as it was done in a rush after my first attempt got majorly smudged. I had thought of doing a saran wrap with the blue, pink and lilac colours for the first day of the September Tri-Polish Challenge so I stayed with the idea as it would be quick and easy. 

I used Essence's Absolutely Blue as a base and then added Sally Hansen Insta-Dri in Sonic Bloom and China Glaze in Sweet Hook with some cling wrap. It didn't quite have the oomph! factor I was looking for so I added a coat of OPI's I Juggle... Men. Still didn't look great so as a last resort I added a coat of Ulta3's Stop The Press. 

This is what this mani looks like. The pink looks redder than it is and the lilac is too sheer to stand out against the blue. They kinda remind me of zombie nails with the wrong colours.


This is pre-Stop The Press and it looks plain as anything.


Check out the entries from the other ladies participating in the challenge.


Till next time, 

Laura

Friday, 6 September 2013

Pastel Stud Wheel by Born Pretty Store

I'd consider myself a fan of Born Pretty Store but I haven't gone past ordering the basic gold studs and glequins from them even though they have a MASSIVE range of nail art supplies and they are so cheap. A month ago, I placed an order for a heap of different rhinestones, a textured polish and colorful studs, all which I believe are recent additions to the website.

Today, I wanna show you the Pastel Stud Wheel, which actually has a much longer name here, that I have fallen in love with. I can be indecisive when it comes to handing over my cash for products, i.e. shopping, and I have to make sure I'm getting the best deal. I was particularly happy with this wheel because it has two shapes in six different colours each for US$7.59. If I was to buy a one colour and one shape I'd have paid  US$2.99 on special (US$4.99 otherwise), but there would be no variety and I wasn't guaranteed to like them. 

I'm loving this idea of doing skittle manicures to show more colors and it almost makes me feel like I have created nail art :) . Here's my latest.


The accent nail was supposed to be covered in the pastel studs but I started to get slightly frustrated so I kept it simple.


I start to believe photo spamming is the way to go for this blog, so please click on the page break for more photos and materials used. :)

Friday, 2 August 2013

Dior Inspired: Or How I Had A Little Breakthrough

I have so much stuff to put up I wanna show you guys, including new nail polishes, nail art that I've created and a few random nail related items. I thought I would start at the beginning of my list and show you some nail art that I'd been thinking of executing for a little over a month. Well, I actually did execute it but I wasn't very happy with the results so I had to start over a couple of times.

This mani is based on a dress by Christian Dior from his Fall 2013 Couture collection. I wanted to recreate the textures and line of the dress along my four fingers.


Close?

Photo 13 from Christian Dior
Source
For the satin finish, I started with three thin coats of Sally Hansen Xtreme Wear in White On and let them dry thoroughly before applying two coats of OPI's I Juggle... Men. I've had the latter for a little over a year and the formula has thickened and I think (...think) that the coverage of translucent glitter  is a better because of that.


To mirror the sequins from the dress, I tried creating a my first ever franken but for some reason or another, it didn't turn out as good as I hoped and its glitter coverage was poor. I bought a multi-coloured glitter that had the colour range that I was looking for but then again the coverage left a lot to be desired.


I decided to layer the glitters instead to make the 'sequins'. After sticky taping my fingers in the different designs. I sandwich a coat of China glaze in Electrify within two coats of Sally Hansen Xtreme Wear in Rockstar Pink. I removed the tape immediately after applying the last coat of glitter and the lines still came up acceptably crisp.


After the three coats of glitter, I applied one coat of Seche Vite to even it all out. I tried to be very careful to make sure I wrapped my tips with glitter to have a full coverage but it seems like the Seche Vite caused some shrinkage and pulled the glitter back.


As a final step, I used Rimmel Pro Matte Finish top coat on the white to give the finishes a little bit more contrast. 


Yes, my pinky is looking chunky. In my first try, it looked like a thin french tip and not like the dress. I had the idea of taping my finger again closer to the cuticle and painting over it, thinking that it would dry a little flatter. :( It looked better than it would have otherwise so I let it be.
  

Now for the little breakthrough. I'm particularly happy with this manicure for the reason that I managed to clean up white polish AND keeping the edges tidy and wearable. It took a lot of patience and time but I did it!!! 


The above photo shows my second attempt but it felt incomplete, I had tip wear after about half an hour after finishing the mani and look at the clean up on my ring finger... I had to re-try it. I'm very glad I did. My first attempt was majorly smudged and wasn't even worth photographing.

I hope you guys enjoyed this mani. It was really fun to do, even if it took me three tries to come up with something I was satisfied with.  

Till next time, 

Laura

Saturday, 30 March 2013

Doticure and a New Born Baby

Yesterday was a day of waiting and as we all know, painting one's nail is a very good pastime, especially when you consider drying time. I'm still trying to keep my nail art simple to avoid frustration and, while trying to think what I could paint on my nails, the thought that I hadn't done a dot manicure ever jumped at me.

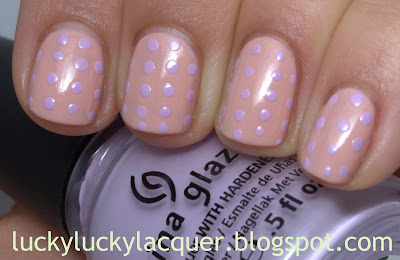
I started with four coats of Mirenesse's Forever pearl, a pinky nude that has a good formula  but it can be a tad streaky. 


I used a toothpick to apply the dots with China Glaze's Sweet Hook. So far so good, but there wasn't a lot of contrast between the two colours.


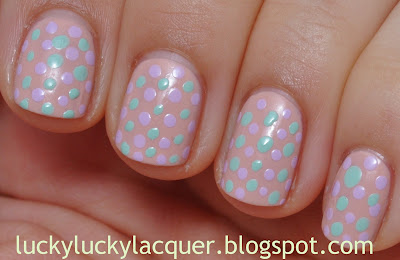
Lastly, I added some dots with with American Apparel's Office, trying to fill in the spaces between the purple dots.

So here it is, my first ever doticure.


As soon as I finished putting the last dot on my pinky (see the giant blob of green?), my family got a call from my brother-in-law saying my sister had gone into labour and that they were at the hospital. I didn't really bother to fix my nails and quickly snapped up one picture of the mani, as I would be needing the camera and memory card for new baby photos. 

This is my sister's first born, which in turn makes me a first time aunt. I've never wanted kids and babies made me uncomfortable, but this little one is the most adorable thing in the world. No, I'm not getting clucky. It's just really good to see my sister and her husband have a baby that was very much wanted and, it seems, will be very loved.

Till next time, 

Laura


Wednesday, 20 February 2013

Australis Milky Way: It's Almost A Trap-Eze dupe

It's been a while but instead of making excuses, I'm getting straight onto the post.

Indie polishes have always caught my attention but I was always demotivated by their high prices, inaccesibility (eg. not being able to be posted to Aus) or the long postage times. I would rather turn up to a shop and get the polish then and there or get it from a seller on eBay that I know will arrive in my postbox in 5-7 days.

When China Glaze came out with their Cirque De Soleil collection and introduce the indie look to the masses, I was pretty happy to know that I would be able to go for the look without the wait or price tag. Unfortunately for me, my trustworthy eBay seller has had It's A Trap-Eze, the one that caught my attention the most, out of stock for a while. 

I was ready to patiently wait for it be restocked as I wasn't really in a hurry to purchase it. However, a few weeks back, I went into Priceline and found this little beauty. Australis' Milky Way from their A Galaxy of Nails Collection. Close enough, I thought and took it home.

The swatch below is four coats and the formula was a little gloppy, you can see it on my pinky, but was still rather managable. No top coat used for the photos below.


I ended up using my trustworthy Rimmel Pro Matte Top Coat and I liked the way it looked much better. It made it look smoother and the layers of glitter were a tad more visible. 


The thing that I like about Australis is that they keep up with up-to-the minute trends and create similar, if not exact, dupes of popular polishes. They are available in more than one place; Kmart, Priceline, Target and Big W all stock this brand and unless you live in the middle of the Australian desert, they'll be near you. Lastly but not least, they are very affordable. I picked up this bottle for $7.95 out of complete impulse but I'm sure if I had waited a week or two, I could have gotten at least a couple of dollars less. 

Bottle shot for show.

Even though Milky Way is not an exact dupe of China Glaze's It's A Trap-Eze, I'm very glad with my purchase and I might give It's A Trap-Eze a miss.

Til next time, 

Laura

Monday, 14 January 2013

China Glaze Sweet Hook Toughened Up

It's been almost four weeks since my last post. I'm not even gonna try to make excuses as to what happened, I'm just hoping you guys can still be entertained.

In the last four weeks, I have made a rack for my polish bottles (post to come) so I could see what colours/finishes I have and what I can still justify purchasing new bottles. It happened that I was buying the same colour in different brands, mostly because every time I bought a new polish, I would use it a couple of times and store it in a filing box and I couldn't really see what I already had. 

This post is about one of those polishes that I justified as I had nothing remotely similar. If you haven't guessed from the title of the post, it's China Glaze Sweet Hook from the Electropop collection that was released in the States in February 2012. I'm going to thank Tasha for this colour being added to my collection for two reasons. First, she has it on her stash and has let me use it a couple of times, each time in only one finger though (because i was using one colour/finger to create a skittle not coz she wouldn't let me), I fell in love nonetheless. Second, she pointed me towards eBay as the place to get cheap China Glaze. I got mine from this seller for about $7 bucks. 

I present to you my version of Sweet Hook. This polish was sooo sweet, it got me hooked... Bad joke, I know. It was almost like a dad joke.


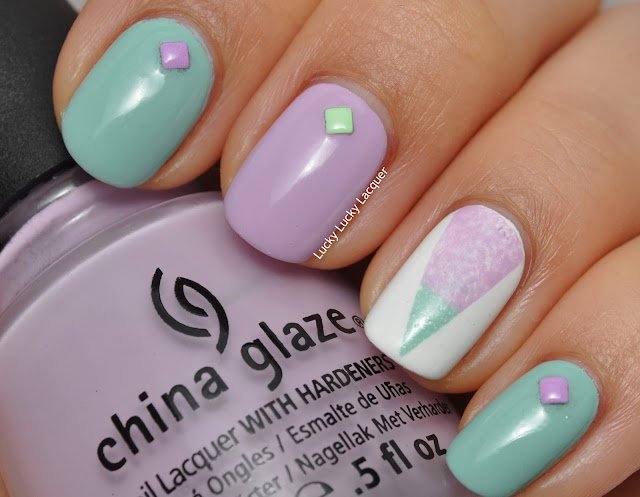
I've mentioned before I'm not usually a fan of pastel and light colours but I'm warming slowly to them. The swatch above was done with two coats of this almost flawless formula. I felt like I needed to take some of the sugary goodness of this colour away and added some 2 mm square studs from Born Pretty Store. I used Manicare's Hi-Shine Top Coat to stick the studs and to finish off the mani. I really like the combination of the lilac and gold. What do you guys think?

One other thing that I have managed to do in this post is to take close-to-accurate colour pictures. The photo below shows fairly closely the actual colour of the bottle. I'm really proud of that! Woohoo! I have to admit, I have been trying to make my skin look paler that it actually is. I guess it's like looking at glossy magazines and having their expectation of beauty to  match reality.


I hope you guys can stick around. After building the polish rack, I discovered I have close to 300 bottles, which need to be put to good use.

Til next time, 

Laura 

Wednesday, 12 December 2012

Glitter Skittle

Not sure if you guys have noticed but skittled manis rock my boat. In this occasion, I ended up with a heap of different coloured glitters thanks to Tasha's stash. I would say Tasha has a very different taste in polishes that I do. She tends to go for pastels and lighter colours while I usually go for bright colours and in your face finishes. It's actually quite refreshing to see (and use) someone else's stash to try something different and expand the my colour horizons. Or I could say I just got more lemmings.


Pointer finger: Mirenesse in Forever Pearls and DBP in Jane
Middle finger: Colour club in (I think) Harp On It
Ring finger: OPI in The Living Daylights
Pinkie: China Glaze in Sweet Hook and glequins from Born Pretty Store

I can't actually remember the name of the polish on the thumb so I'll get back to you guys soon with that one.

For the top coat, I used Tasha's Seche Vite. It was my first experience with this top coat and I can see why it is so popular. All the glitters that I used are completely smooth and I wanna see how long they last. I guess I'll keep you posted on that one too.

Till next time, 

Laura

Saturday, 7 July 2012

Nude Gradient Mani

I've finally got around to posting! Here's a gradient mani that I gave myself today. This blog has taught me that there's an art to photographing nail art and swatches, so please forgive the pictures.


Nude to lilac gradient. 

The gradient isn't obvious in this picture, but it's a great shot of the nude colour.


I went for a subtle nude effect, and I think that's what I got! I used Essence Nude Glam in Hazelnut Cream Pie as the base and sponged China Glaze Sweet Hook, a pretty pastel lilac, on the tips.

I've been buying lots of nail polish lately. I've been stocking up on Essence from my local Target, they're really cheap and the colours are awesome. They can be a little hard to work with, but for $2 a bottle, it's not really a big deal.


This week's haul. I bought a few more bottles of Essence after this picture was taken.

I also got some new make up brushes this week. I really love Nic and Sam Chapman from Pixiwoo, and I've been lusting after Sam's Real Techniques brushes for a while. I was super happy to learn that they are now stocked at Priceline, so I went and bought some. Australia is a great place to live, but the range of cosmetics here is nowhere near as good as in the US or Europe, and everything is twice the price (including the brushes, boohoo). Are you interested in a review of the brushes I bought? Let me know!

LinkWithin

Related Posts Plugin for WordPress, Blogger...