Showing posts with label 33DC. Show all posts

Thursday, 31 October 2013

33 Day Challenge: Artwork With Favourite Brand

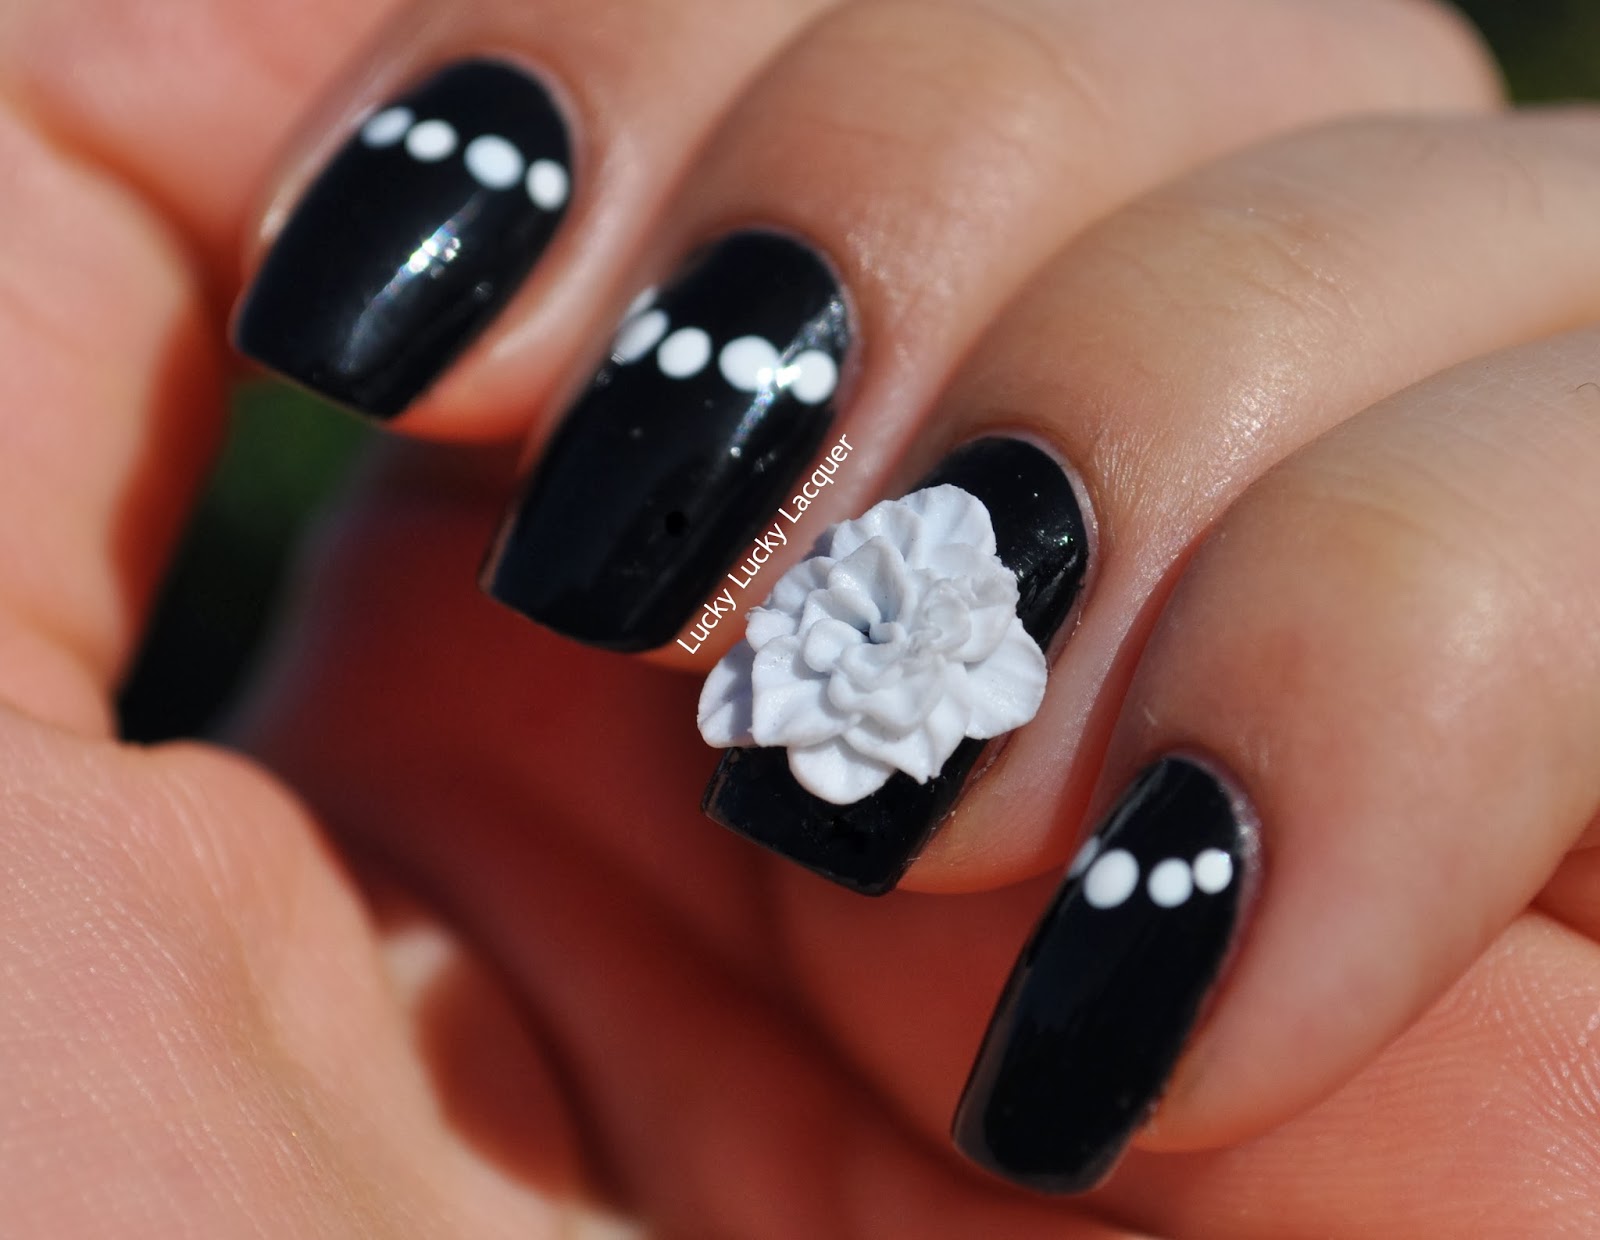
Like most lacqueristas, I cannot pick a favourite brand. They all have their qualities and that's why we have them in our stash, right? However, when I quantified the qualities of some of my polishes, I decided Topshop came out a winner. Their polishes last forever on my digits, they hardly chip, they are reasonable priced for Australia and they tend to keep up with polish trends, sometimes even invent their own to-drool-for colours. I think the main reason why I chose this brand is because Topshop polishes mean a holiday for me. There is no Topshop in my city so every time I get a bottle is because I'm somewhere away from home; as I have gotten them in small batches, each one has a special time an d memory attached to it. 

 
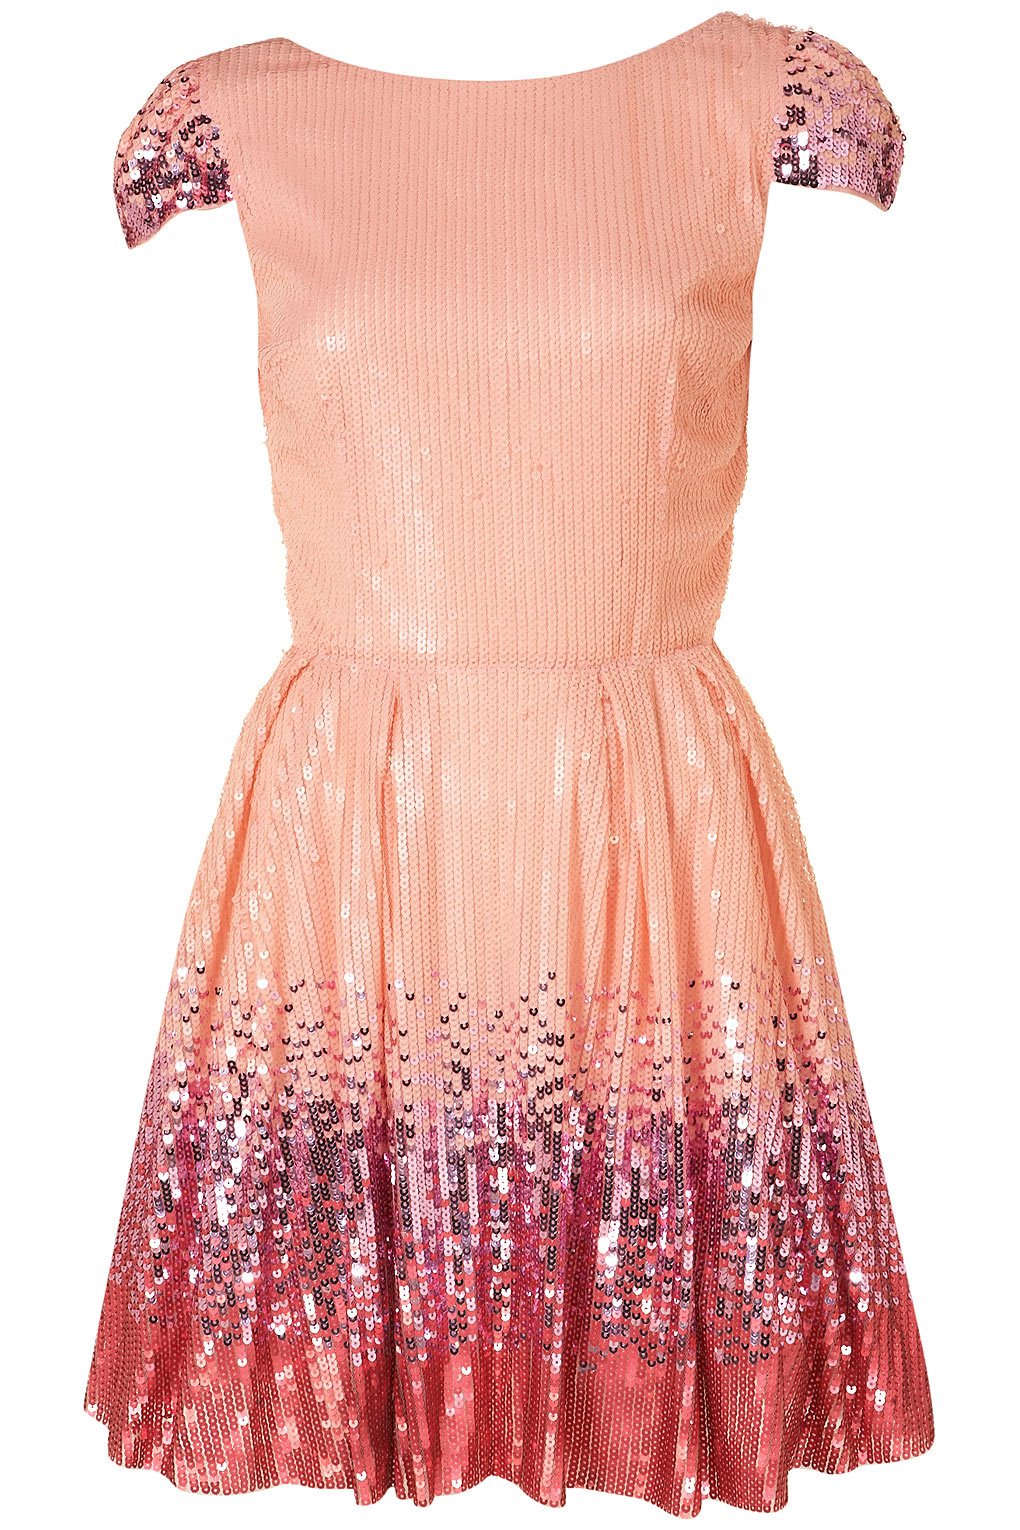
I am aware I'm a day late for today's challenge but c'mon, I prioritised my uni work over nails for once. I had to come up with something quick and settled to loosely base my mani on this dress from Topshop, just to keep going with the theme. I figured dressmaking and designing is art, right? So I'm still responding to the prompt for the challenge.


Source
I used High Voltage (pink creme) as a base, then put Plume (glass flecked purple) and Blitz (gold shimmery pink) on a sponge to create the gradient and slowly tapped it on my finger. I repeated the sponge on process three times on each finger. Sealed the gradient with one coat of Seche Vite.


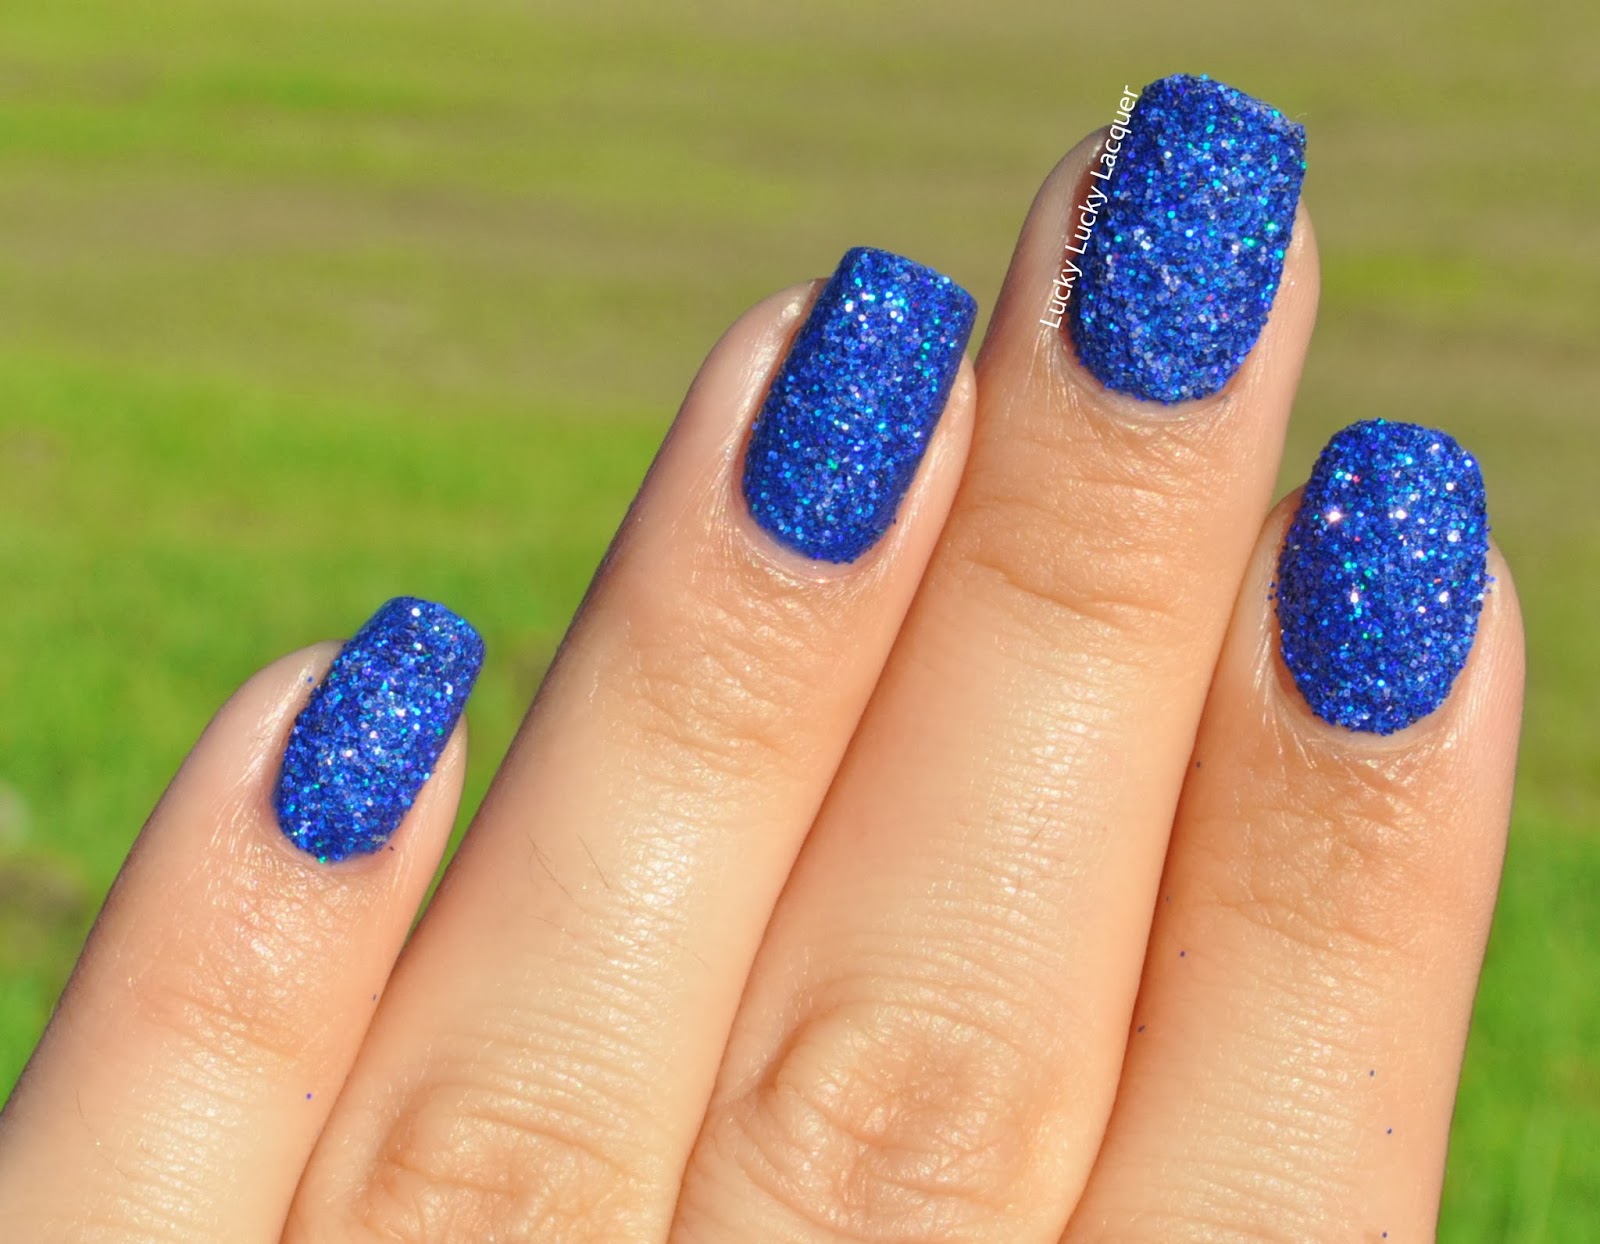
As soon I was ready to take the photos, the sun hid behind some clouds. This gradient is ssssparkly so I waited about 15 minutes in my backyard waving my arms around telling the clouds to go away. I wish this was a joke but I actually did it *Laura looks away slightly embarrassed*. The sun came out for about two minutes so I had to take photos quickly. 


I was concentrating on getting the sparkle to show and not so much on the colour accuracy. The next photo is not flattering but it shoes a much better representation of the  light spectrum reflected from my nails.


I actually did the gradient on my thumb first to see how many coats Plume would need as it can take four coats of the polish on the nails to look opaque. I was quite happy with the way it turned out because generally my gradients turn out super thick and uneven; I guess using the sheerer polishes helped me out.


I really like this mani and I wanna keep it for a long time, it's so pretty and sparkly. I know I didn't show it very well on the photos but take my word for it. It also reminds me of the half moon/french tip trend that was happening at the beginning of the year and it was completely unintentional.


Random photo that I took when I was waiting for the sun to come out. Anyone know what flower this is?


Check out the other 33DC participants' manis. 


Till next time,

Laura

Monday, 21 October 2013

33 Day Challenge: Chinese

It's day 13 of The Crumpet's 33 Day Challenge and here I am, still sticking to it. For today's prompt, Chinese, I was inspired by so many things but unfortunately I had no time to execute any of them so I went for something simple that stuck to the theme. I also want to start using my ever growing collection of nail art supplies. I've stalled my polish shopping lately but now I've moved on shopping on eBay and Born Pretty Store for anything that can be stuck to my nails.

To tackle the challenge and start using some of these supplies, I came up with this mani. 


Which was roughly based on this vase. I googled Chinese vases and this one screamed out at me. I'm not sure of the authenticity of the claim that this is Chinese but it seemed to look like other Chinese pottery I have seen.

I started with two coats of Essence in Grumpy over a base coat and once dry, I stamped over it with Essie's Penny Talk using one of the new Bundle Monster Plates, BM-404. I got some eBay-bought flower water decals ready and started layering them on the blue and gold base but they were too see-through to show up on the darker blue base. I quickly painted my ring finger an thumb with two coats of Sally Hansen in White On and applied a coat of Seche Vite on all my fingers. I could just have applied it on my ring finger to get the white drying quicker but I thought I might as well do them all at that time.


Once that was all dry, I started overlapping the flowers and leaves on the white base and applied one final coat of Seche Vite to seal in the decals.

I really like how my thumb turned out but I didn't want to show another awkward thumb photo, so I tried two thumb poses. I like this one better...


... but this shows a lot more detail. I think. What do guys reckon?


You can sort of see the blue base on my ring finger under the white. I also managed to bump it on something so the blue flower looks  somewhat shapeless. 


Considering my past experiences with water decals, none of which have been documented in this blog... thankfully, I'm pretty happy with the way this mani came out. It makes me wanna play with all the new sheets I have just received. Stay tuned.


Check out the other talented ladies' manicures.


Till next time, 

Laura

Friday, 18 October 2013

33 Day Challenge: A Pattern In Your House

Well... Day 12 of the 33 Day Challenge called to use a pattern in your house to do some nail art. I looked around mine and all I could see were the plain bright or earthy colours but no patterns, even the towels and sheets are all one single colour. I found this pillowcase that colourful that I bought ages ago at the back of the cupboard and saw the manicure for today straight away. 


 The polishes I used are: Sinful Colors in Hazard, Sally Hansen Xtreme Wear in Pacific Blue and White On and finally China Glaze in Sweet Hook. Topped it all off with Seche Vite before letting it all dry for the next step. I hadn't shown striping tape in a mani for a while so I decided to do the smaller stripes of the pillowcase with it. I have 20-ish rolls of this tape and I'm sure that's almost a life time supply; I guess I better start using it.  


The execution and clean up wasn't great but it served its purpose. This mani reminds me of a school sports shirt or flag, at least the three middle fingers do. Maybe if I could reuse the polish base for another mani... 


Here's the pillowcase. I just realised I should have turned the pillow around so the colours would correspond to the ones on my nails but you get the idea. 


Check out the other talented ladies in the challenge.


Wednesday, 16 October 2013

33 Day Challenge: 3D

Oh yes! Day 11 of the challenge has come. I love sticking stuff to my nails and when I came across this manicure at the beginning of September, I knew I wanted to recreate it. And recreated it I did. Everything minus the zebra nail. I also did this a couple of weeks ago, which means I won't be late for the 3D prompt. Yay!


I used two coats of Sinful Colors in Blue By You and one coat of Seche Vite as a base. On the ring finger, I applied one coat of Ulta3 in Clear and got myself sticking differently shaped rhinestones at random. I made sure the 6 or 7 colours I used were distributed on the nail and that I didn't end up with the same colour rhinestone adjacent to each other.


I got really picture heavy in this post but there is another version of the manicure after the break.

Tuesday, 15 October 2013

33 Day Challenge: Flowers

I'm sooooo late for a lot of things in this blog! I'm gonna try to tackle a few on one post see how I go. I must say the last three weeks of uni have taken over my life!!! Rant over. Back to the blog...

First, my 100th Post Giveaway has ended, a week ago to be exact, *looks down to the ground in shame* and both winners replied within a few hours of emailing them. Congratulations to Kirsten on getting a $30 Ninja polish voucher and to Roshwill for being the winner of the $30 Born Pretty Store voucher! Thanks to everyone for sticking around after the giveaway finished. I've seen followers disappearing after giveaways are done on other blogs so I was really glad the number of people that are still willing to see my nails has still pretty much stayed the same *warm and fuzzy feelings to everyone*.

Now to the challenge. I'm late by one day in Australian Eastern Time but the plus of being on this side of the world is that there are still 22 hours on Tuesday before Monday is finished somewhere in the world. Mwahaha! Technically, I'm still on time.

I opted for a quick manicure due my lack of time so I looked through my nail art supply stash saw these silicone flowers that I got from Born Pretty Store a few weeks ago. As most of my posts at the moment relate to the challenge, I thought today would be a good day to take them out for a play. Looking at the white flower, I realised I had never done a white and black manicure. In this blog or ever. So here it is, my first black and white mani. 


I know, I know. Black and white is not the theme of the challenge but a white flower on a black base sort of is. I started with one coat of Ulta3 in Black Satin on all my fingers and used Sally Hansen Xtreme Wear in White On to dot some half moons. On the ring finger, once Black Satin had dried, I applied a coat of nail foil glue and let it dry. Once it became clear, I stuck the silicone flower. 


I had originally tried clear polish to stick it on but it fell off after I washed my hands, completely random, right?  I tried washing my hands after I applied the glue and the flower hasn't come off. Shouldn't glue wash off and not polish? I'm not sure what happened there but I'm sticking to the glue for now on. 


The silicone flower was really easy to work with and its flexibility is really great for not snagging it on everything. If you've ever worn large flat 3D nail, err..., items (is there another word?) you would know what I'm talking about. Did I mention they are super detailed. Check this out.


Another plus, they can be reused. This is what it looked like after I carefully peeled it off the nail glue. 


Born Pretty Store is having a 20% off everything sale for two days, 15th and 16th Oct,  and the flowers are currently retailing at $1.99. If you haven't found a discount code for BPS, you can use LUCKYG10 to get 10% off.


These type of mani is not something I would wear everyday, even though I'm very much in love with it. The flower is very out there and big but that's the fun part of it. I would wear this instead of a ring on a night out... I f I had time to go out.

Check out the other timely ladies that have participated in today's (yesterday's?) challenge. 


Friday, 11 October 2013

33 Day Challenge: Indian

I had all these wonderful ideas for today's challenge prompt but none of the great ones turned out great or made it to the nails. I chose to interpret Indian as 'from India' and considering how rich the culture is, I had no problem coming up with ideas (after a bit of Googling). There was going to be tigers but that didn't work, I moved on to flowers then jewelry but I had to settle for a fabric pattern I found on Pinterest. It turned out better when I close the browser before saving the pin and I had no way of showing you. Anyway, this is my interpretation of Indian. 


I started with two coats of CoverGirl's Wine To Five and BADLY free handed some gold reeds with A Piece Of Forever from Essence. To stick the studs, I applied a coat of Ulta3 in Clear but as I mentioned before, this dries up way too quickly and I have to keep applying coat upon coat. I had a look at my very small stash of topcoats and saw my nail foil glue. I figured it would work for the smaller studs as it would stay sticky for a while anthe adhesive was strong enough. Oh goodness! Why didn't I think of this earlier? I applied all the studs on my middle finger without having to reapply the glue. When I was done, I applied a top coat to seal all the studs in and get rid of any stickiness that was still lingering around.

I liked the way it looked without top coat better but I managed to get some fluff stuck on the glue on my ring finger. You can see below. At least I learnt to work continuously when I'm working with it. I applied one coat of Seche Vite on all my fingers.


I'm not in love with the design from up close, it's a bit crooked and the little round studs bled their colour when I applied top coat but I discovered another use for nail foil glue in nail art. Oh! And the need to keep practicing my free handing skills.

Check out the other ladies participating in the challenge.


Till next time,

Laura

Wednesday, 9 October 2013

33 Day Challenge: Chevrons

I'd like to think I'm pretty good at doing chevrons. I love tape, I've done chevrons heeeeaps of times with it, I even free-handed some not long ago and they looked decent. So when I had to have four, maybe five goes, at today's prompt, I was a bit surprised with myself.  I decided to take the extremely simply road of stamping and stud-sticking. Could this wrong too? Thankfully, it did only a hardly noticeable bit.

I used two coats of Sally Hansen's Scarab and one coat of Seche Vite as a base. I stamped the chevron pattern with Bundle Monster's plate in BM-201 (did I need to state that?) with Essence in A Piece Of Forever. Simple enough? I managed to miss the tip of my index finger but I just kept going. I applied a coat of Ulta3 in clear and started sticking these 2 mm square studs from Born Pretty Store in a chevron pattern. At this point, I top-coated the stamped nails but not the ring finger. After my last attempt top-coating studs, I've learnt to take photos before I do. I have now top-coated it because well, no one wants nail studs in their dinner, do they?


So there you have it, my interpretation of the chevron pattern. I would call it Rustic Studded Chevrons. Any imperfections *cough*crooked studs*cough* just add to the rustic feel of this mani, like vintage jewelry...


Close-up because I wanted one and that studded chevron was too... rustic. That one is better appreciated from afar.


I actually have (what I think is) a good idea for the next prompt, Indian. Until then, check out some of the other ladies from this challenge. There are some good manis below.


Til next time, 

Laura

Monday, 7 October 2013

33 Day Challenge: Art With Oldest Untried

Are you ready for some bad nail art, dodgy lines, topcoat shrinkage and colour inaccurate pictures? if you're not, you may wanna stop there. 

It's day seven of the 33 Day Challenge, which called out for art with your oldest untried and I may have struggled a bit with it because:
  1. I smugly thought I didn't have untrieds, but oh boy! I was wrong.
  2. I'm pressed for time.
  3. The post I had originally prepared didn't work for some reason or another.
  4. The formulas of my oldest untrieds was pretty bad.
  5. I had no inspiration at such short notice. 

I have this habit of trying on polishes as soon as I get them to test them out and relish on the fact that I have new pretties. That's why I thought I had no untrieds until I went through my stash and discovered three of the 5 ml Essence polishes that I had no recollection of wearing. I know they are my oldest because I went through a period some time in the middle of last year where I bought a heap of Essence polishes because I was amazed at their price. 


However, when I put on C'est Le Vie!, the peachy orange creme, I remembered why they had been sitting in my rack for so long untouched. I had tried them but the formula for C'est Le VIe! was pretty thin and took four thins coats to reach full opacity and even with a coat of Seche Vite, it took forever to dry. I even dented my middle finger but managed to patch it up. I soldiered on an decided to do a tape mani with Let's Get Lost, a blue creme that sometimes looks teal, and Break Trough, a purple creme. The formula for these two polishes is thicker but it drags and it can pool on the nail. 


I topped it all off with a coat of Seche Vite, which made it all smooth and kinda looked better until I got massive shrinkage from it on my index and middle fingers.


Closeup of the nail, I though looked good. My cuticles might be telling me otherwise.


At the end of the day, this is still wearable and it looks good from a distance. Go check out the other ladies' manicures. There are some good ones there and you may even forget about the bad experience you just had.


I'm hoping chevrons turn out better. 

Till next time, 

Laura

Friday, 4 October 2013

33 Day Challenge: Texture

I'm going to keep it super short today after my massive blab on the last post plus the space bar on my keyboard only types when it wants to. Day six of the challenge calls for a textured mani and I knew exactly what I was going to do as soon as I saw the prompt. I've been wanting to do glitter nails for ages and I had even bought a tube of glitter from the craft store, but for various reasons, I  hadn't gotten around to it.

I started with one coat of Sinful Colors in Blue By You, the closest colour I had to the glitter, let it dry and applied a second coat to one finger first but only let this one dry for about 30 seconds. After this  time, I pressed my finger onto the fine glitter and brushed off the excess with an old foundation brush. I repeated the process with the rest of the nails.


That's it. Easy as pie. I didn't quite realise at the time of purchase but the name of the colour of the glitter is Holo Royal, so of course I had to bring these little babies out to the sun.


Look at the sparkle.


And the pretty holo glitter.


I must say, even after brushing all the excess glitter, there was still a  lot of it that came off during the afternoon that I wore these and mostly onto my hands. You may see some stray glitter on my cuticles and fingers. 


A few close ups, just because I can.


I didn't mind the glitter going everywhere because they were so pretty and sparkly!


Check out the other participants in the challenge.


Till next time,

Laura

LinkWithin

Related Posts Plugin for WordPress, Blogger...