Showing posts with label Essie. Show all posts

Friday, 25 April 2014

The Neverending Pile Challenge: Had To Have It, Still Haven't Worn It

About a year and a half ago, Tasha let me try her Warm & Fozzie polish from the Muppets Collection by OPI and I fell in love instantly. I looked for it in a lot of  places but they seemed to be sold out and I didn't want to pay $20 for a bottle of polish at the department store. Eventually, I found it at a particular shop (that I will not mention because the bottle turned out to be a fake OPI!!!) and paid $17 (yes, $17 for a fake!!!) for one of the most beautiful polishes I had seen until then. And it sat in storage for a while, then more bottles came into the stash and Warm & Fozzie stayed in its place, almost forgotten.

When it came to today's prompt, I had to think which one fitted the category the best since I have a lot of polishes that I bought because I really wanted them but I'd  worn them on at least a finger for a day. Warm & Fozzie didn't even get that kinda treatment so I figured today would be the best day to bring it out and wear. 


I love all the tiny bronze, rose gold and gold shimmer particles of this polish, how they glisten in the sun and how reflective they are. My camera was freaking out a bit at the sight of all the reflected light so I brought the camera inside and used the light box. It's still very pretty. How did I go so long without using it?!!!


And because I can never leave good things alone, I decided to bring out an unused stamping plate to go with the polish. I even had to peel off the blue plastic film off the plate for this mani, I can say it was satisfying. 


I used the tribal pattern from BM-402 and Penny Talk, Blue Rhapsody and Good As Gold all from Essie's Metallic Mirrors collection (which have been used previously). 


I realise this looks kinda Easter-eggy down to the crinkling of the metallic polish over Warm & Fozzie but I was going for a tribal look.


I'm still quite pleased with the way this turned out and I'm glad to be back on the challenge.

Till next time, 

Lautra


Thursday, 24 April 2014

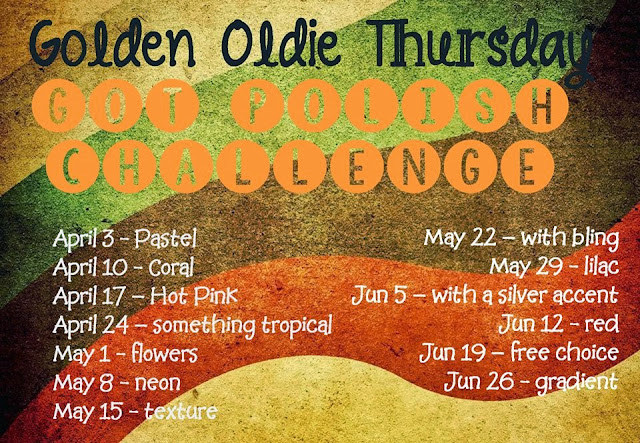
GOT Polish Challenge: Something Tropical

I'm back after week and half long blogging break. I didn't go on a holiday or had a emergency pop up, I was feeling overwhelmed and disappointed with my lack of imagination for innovative manis and the pressure (put on me by me and me only) to keep up with the two challenges I decided to take up on recently. I'd usually see it as a lack of professionalism to just leave for a while without notice but I was just not feeling it. This is supposed to be a hobby that I ENJOY and trying to keep up when my mind shut the creative side out temporarily makes this pastime everything but.

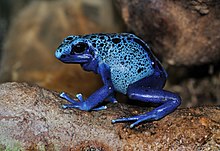
But the break helped and now I'm back with what I feel is a clear head and itchy fingers to get some nail art happening. When the 'something tropical' prompt popped out, I knew I didn't want to just do palm trees or a sunset because well, I'd be too difficult for me to do and I didn't want to get tired on my first post. So I googled tropical and after a few clicks here and there, I decided to do a blue poison dart frog skin pattern on my nails, which live in the tropical forest of Central America.


I started with two coats of Absolutely Blue by Essence and one of HK Girl top coat for the base and let that dry. I then used a wedged make up sponge and created a rough triangular gradient with Essie's Aruba Blue by tapping the sponge lightly over the base and building up the colour (I reeeally need to learn to break up my sentences). Once dry, I used Topshop's Celestial to do the outline of the spots and used American Apparel's Hassid for the black spots. Finished by cleaning my cuticles and with one coat of HK Girl top coat.


Frog used for inspiration. 

Source

This was super quick and easy to do, I would generally have to repeat at least one step in my manis but not with this one. Woohoo!


I'm really happy with the way this turned out so I could almost say i'll be back next week. Maybe... I can't promise anything. 

Till next time, 

Laura


Wednesday, 9 April 2014

The Neverending Pile Challenge: Pastel

I almost thought I wasn't gonna post on the second day of the challenge because I had the idea that I didn't have any untried pastel polishes. Pastel colours don't really complement my skin tone so if I buy one of these hues, I do it for a reason and I will use it. After I had a good look in my stash, I came across a Nails Inc polish that I had bought as a gift but for some reason or another, I never ended up giving it away. So it sat on the rack for year and a half without even having been opened until today.

I present to you Little Miss Sunshine by Nails Inc, a peachy, nude creme that has a very nice, quick drying formula for a lighter polish. It got it opaque in three coats but it would have been fine with two if I had done been a little more careful with the application. To tell you the truth, I wasn't expecting much from this polish from previous experience with this type of colour but I was pleasantly surprised and couldn't stop looking at it for a while. As mentioned,  three coats and no topcoat for the swatch below.


I always get itchy fingers... (that was me trying to be funny, just in case you missed it) when I have plain nail polish and this time was no exception. The image that I thought of when I saw the colour on my nails was one of the many manicures that float around on Pinterest of metallic overlapping triangles over a nude base. I've seen them a lot (but I cannot find one of them right now!!!) and I knew exactly what colours I wanted to use. 

I brought out the striping tape and created one long triangle per nail with OPI's Goldeneye, let that dry and repeated the same process with Essie's Nothing Else Metals. I topped it all off with one coat of HK Girl Top Coat. 


Unfortunately, Some of the Goldeneye polish came off with the tape when I tried to create the purple triangles, then took too long to remove the tape when I was working with Nothing Else Metals, all which left the triangles a little rough. I tried to patch up the missing bits taken off Goldeneye with a dotting tool and it sort of worked but there was nothing I could do with NEM.  I'm tempted  to tag this as nail fail but it looks nice and sparkly from afar and I've learnt that next time, because there will be a next time, to make the triangles longer to help with the overall look and work within appropriate tape removal times with each polish.


I went for the best angles of the mani hence the lack of photos and different poses. :)


I already have the next prompt's mani ready to go and I'm roaring to dive into this challenge fully.

Till next time, 

Laura


Friday, 21 February 2014

Revlon Parfumerie in Espresso

I'm kinda bummed. I did this awesome mani for the GOT challenge last night and it was so sparkly I knew I had to wait until this morning to take photos in the sun. I'm not great with alarms and mornings so my plan of photographing nails went out the window. I went on with my day and by the time I was ready to snap some pics, I had some major tip wear on all my fingers. No crying over spilled milk, right? I'll recreate it again later when I feel super uninspired.

After that little episode today, I decided to keep showing you guys the Revlon Parfumerie polishes I bought recently. I chose Espresso out of the 23 I now own from that line, a black creme with green undertones that is opaque in two coats, the formula and drying time are fairly average. From the name, one could gather that this would smell like coffee and being a lover of the brewed beverage scent I was super excited to try it out. When the polish dried and the scent popped through, I could only smell rubber-burnt sugariness. Not at all what I was expecting... or pleasant, to the point of being nauseating. 


I also had some issues with bubbling but that could be contributed to me not waiting for my base coat to dry or the second thicker coat I applied on some fingers.


The one good thing I can say about this polish is that it dries fairly shiny. I am showing it with a coat of Seche Vite out of habit but it's OK without it. I think the top coat had better smell than the polish and luckily it toned it down a bit.


I know swatches of a black polish wouldn't make for a very interesting post so I added some of Ulta3 in A Lister on the tips for the glitter gradient and combined some of Essence's Let's Get Lost and Essie's Blue Rhapsody on the stamping plate. I used MoYou's plate 4 from the Sailor Collection and I think the design didn't quite come as crisp because I tried to mix the polish on the plate and not beforehand. Lesson learnt.


I never say 'don't go buy that polish' because everyone has different tastes but this not worth the money for a black creme that we all know can be bought for way cheaper than $15.95 they retail for. Unless you are into smelling burnt rubber... then maybe, but that's probably not healthy. 

I really don't know what I am going to do with it, if anyone wants to try it let me know. I'll be happy to send it anywhere in the world.

Till next time, 

Laura

Friday, 24 January 2014

GOT Polish Challenge: Blue

Blue polish has always had a special place in my heart, especially if it's a shimmery royal blue polish. When I saw the GOT blue prompt, I immediately knew I wanted to bring out Aruba Blue, which was my first Essie and its purchase marked the beginning of my polish hoarding habits around mid 2012. I painted my digits with the polish but then I remembered I had purchased Maybelline Mini Colorama in Electric Blue, another royal blue shimmer, back in 2010, so that one should take the crown as the Golden Oldie blue. I'd always worn unusual shades in my lifetime (greenish gold polish at 13, anyone? Yes, it was the 90's) but Electric Blue was my first fashion colour. I wasn't just a kid playing with colours anymore, I was a grown woman making a fashion statement with my nails in a world of nude pinks and black. Yes, I chose to be different. Haha! Polish has been in defining times of my life and I may be reading too much into it. :)

I'm actually using both polishes on the photo below for comparison, Aruba blue on the index and ring fingers and Electric Blue on the pinky and middle finger. Not only was the former my first Essie, it turned out to be my first stash dupe. Even worse, I ended getting Sally Hansen's Azure last year without having memory of why I bought it and now have three royal blue shimmers. At least I won't run out any time soon...


I wanted to make truly old school, so I brought out OPI's beautifully coloured Turquoise Shatter and tried to create a lightning bolt/tape mani. Once upon a time, I tried to reuse this shatter by applying it directly to the nail, without base coat, so it wouldn't crack and after two coats it looked opaque. I top coated it and happily went on with my day but when I removed it I ended up with the brightest blue nails I had ever seen. I took out the bicarb soda and lemon straight away and scrubbed and scrubbed thinking that I was gonna have blue stains for a while. It eventually came off and a big lesson was learnt. Crackles are done unless you are doing an golden oldie mani. Btw, when I said once upon a time, I meant yesterday... :/


I'm gonna have to face it, even though I love these two colours together, this wasn't my best work for a number of reasons. 
  • I used a crackle that was lumpy. 
  • I painted my dominant hand as I broke three of my blogging nails baaaaaaadly over the last five days. I have little round nubbins at the moment and I don't think they look bad, they're just too short. 
  • There are awkward hand poses and fluff in one of my photos. 


Next week, I'm up for dots and know exactly what I'm gonna do. Hopefully my nails are ok by then

Check out the rules for the challenge and some more awesome blue manicures below.


Until next time, 

Laura

Tuesday, 7 January 2014

January's Tri-Polish Tuesday

I'm back on The Crumpet's Tri-Polish Challenge for this month. The rules have changed slightly from last year allowing a little more flexibility. Different polishes can be used as long as one sticks to the month's colours and only one mani has to include all three colours, the rest of the month's manis need to include at least two colours. Also, as the name suggests, instead of doing the manis on the last two weeks of the month, they will be posted on Tuesday. 

Why not start with the one with all three colours? I wanted to do a mani that would mirror the colours and curve from the pinky and index fingers on the middle and ring fingers. So this is what I came up with...


Polishes used:

Orange:  Sally Hansen Xtreme Wear in Sun Kissed
Yellow:  Ulta3 in Honolulu
Red:      Essie in Silken Cord
Black:    Sally Hansen Xtreme Wear in Black Out

I used a dotting tool to create the leopard spots and striping tape to create the concave lines. The lines on the middle and ring fingers were free handed. Topped it all off with two coats of Seche Vite. 


This is a very out there mani for me but I really like the combination of colours and the way the lines on the pinky and index fingers frame the spots. However...


I did a mani with leopard spots a little while ago here and I remember them being a very easy to not get wrong. I don't think some spots are terrible but there could have been a bit more separation between the black edges to have a little more definition. Like the from my index finger


I'm looking forward to creating more manis for this challenge so much, I already have a few things lined up.

Till next time, 

Laura

Monday, 6 January 2014

It Was On A Starry Night...

You may be familiar with 'Dia de los Reyes Magos' or Day of the Three Wise Men, which is celebrated in some Latin American countries and parts of Europe on the 6th of January, as far as I know. The Wise Men would be the ones that would bring presents to kids instead of Santa Claus, however, the custom has changed, depending on who you ask and some kids get presents on Christmas and today. The adults get to eat 'rosca de reyes', a cake in the shape of a ring with crystallized/glazed fruit and whatever other food the host of the wants to serve. On the nails, I figured showing the star that guided the Three Wise Men to Baby Jesus to give them the gifts would be suitable for the occasion. I must be honest though, I intended to post this at Christmas time but never got around to writing up the words for the photos but it turned out for the better.

I  started with two coats of Butter London's Union Jack Black and saran-wrapped one coat of Max Factor's Extra Frost to create the night sky. I let that dry and used striping tape to create a thin triangle along three of my fingers to create the tail of the star... or comet, whatever you wanna call it, and used Essie's Good As Gold to colour it in. Topped it all off with one coat of Seche Vite.


I had some gold star studs but the mani would looked a bit odd with two different tones of gold so I painted the star with the Essie polish and let it dry for about half an hour. I had to bend the star a little bit so it would fit properly on the nail without snagging onto e v e r y t h i n g like some larger studs tend to do if left flat. I attached it with a drop of Seche Vite but I did it when it wasn't quite dry/tacky so I got some of the Good as Gold on the base. 


That could be considered star dust from the comet... Yeah... It could.


I had a bit of trouble photographing the prettiness of this mani so I tried it with sunlight (photos above) and in the lightbox (photo below). Oh! I also dented my index finger twice, once with a ring because I thought it would be a good idea to take off a ring while the polish was still tacky, and the second from moving my hands around normally.


I was really happy with the way this mani looked, the depth of the 'sky' and the continuity of the comet's tail did it for me. I even kept this for FOUR days. 

Hope you guys have had a good and safe holiday season. Here in this part of the world we've been having 40 degree days, which feels totally like summer.

Till next time, 

Laura.

Friday, 3 January 2014

Happy New(ish) Year!!!

Happy New Year everyone! Thank you everyone that has clicked on anything that has led to this blog for the last year, it's very encouraging when you guys not only visit our page but also comment and seem to like what we do in this little corner of the internet. I hope everyone had a good and safe start for 2014... 

I know. I know, I'm late for the wishes. I really feel like I have lost some of my nail art mojo and whatever I attempt looks very simple, unfinished or too rough. I created a few New Year's manis but they weren't outstanding so I gave it another go after a quick getaway and I think this attempt it's simple but OK.

I started with three coats of OPI's Emotions and stamped over it with Essie's Nothing Else Metals using images from the BM-404 for the flowery pattern and BM-420 for the mask. No base or top coat used.


I was really impressed on how clear the mask came out; it could be that my stamping skills are now awesome or the newer set of plates from Bundle Monster is really well etched... It could be both. :)


Since it's a new year and all, I wanna put out there two blog related thoughts that have been hanging around my head for a while.  

1. I'm gonna post at least 3 times a week on Sunday, Tuesday and Thursday. There are a few challenges that should help me keep this up and leave me with a free day to do whatever I want. Doable, I think.

2. I'm not buying any more stamping plates until I have peeled the blue plastic film off all the ones I currently have. Plus I just put an order through for some MoYou plates so I should be set. Otherwise, I'll just be hoarding plates and not using them. That's not the spirit, is it? 

I'm looking forward to 2014, I hope you guys are too!

Till next time, 

Laura


Monday, 2 December 2013

33 Day Challenge: 3 Favourite Polishes

It's the third last day of the 33 Day Challenge and I'm gonna make this super quick because I am tired but didn't want to miss another prompt from this challenge that is about to finish. Here we go...

Narrowing down the stash to bring out my three favourite polishes wasn't an easy task, they are all so pretty and each has its own qualities. I decided on the ones that were my first favourites of a certain type and that I still love. I started with a coat of Essence's Snow White (my first and only jelly), let it dry and stamped Essie's Penny Talk (my first one coater metallic that has been featured in this blog plenty of times) using the plate BM-417 and then created a french tip gradient with Snow White and B Collection by Bloom in Dubai (the first polish that lasted about 10 days on me with top coat and had an awesome formula, no longer on sale but I have three bottles of it :) ). Topped it all off with one coat of Seche Vite to smooth out the gradient. 


These nails were super hard to photograph because of how shiny they were and my camera was freaking out when I was trying to take photos in the sunlight. I brought the nails into the light box but the shine was still too much and I couldn't figure out what settings would work. 


Anyway, this is what I came up with and I'm in love with this stamped jelly sandwich. It's shiny, the colours work well and I came to realise I hadn't done something similar before.


Quick note, this is how the jelly sandwich looked like in the sun. Yep, I cropped the only half decent photo I took but it shows some of the pretty light that was reflected from my nails.


Don't forget to check out the other particpants' manis for today's prompt.


Monday, 25 November 2013

33 Day Challenge: Lines

Day 28 of The Crumpet's Challenge called to create a 'lines' mani. A line mani could be anything and seeing some of the manis that have been done with this prompt, I figured it'd be good to get myself inspired. After some (quick) online research, I decided to create a tangent lines mani with some new polishes I got last week. I was almost gonna use a very similar palette to the geometric mani from last week so I figured I better change it to keep things interest in this blog. I'm a bit undecided in the end result, it looks good from afar in real life but the colour scheme doesn't rock my boat that much. Plus there's no oomph element to it... And I just didn't know what to add to it.

So, I started with one coat of Essie's Good as Gold (got it for $12; about six months ago they retailed for $19 in AU) and let it dry completely. I put on a circular sticker on my index finger and used striping tape to create the tangent line. The green polish is Essence's The Green & The Grunge and the coppery one is Mister Rusty by the same brand (paid $1.65/each which is SUPER cheap for polish anywhere, yeah?) and tried to be really quick at taking the sticky bits off my fingers. I continued to repeat the process one finger at the time and topped it all off with one coat of Seche Vite when I was done colouring my digits in.


The index finger turned up pretty crisp on my first go and that's what got me going with the rest. I had to redo my ring finger twice due to ripping the base off with the sticker and a smudge. 


I'm thinking I could have done some stamping on the gold base or used different colours.  I really don't know; I could say I'm a little stumped creatively. :(


I just had a thought of putting tiger/zebra stripes in the circles and did try it but I just made it worse... Not a good nail day for me. Is that worse than a bad hair day? Thought for you. In the meantime, check out the other talented ladies' manis for today.


Till next time, 

Laura 

LinkWithin

Related Posts Plugin for WordPress, Blogger...