Showing posts with label Maybelline. Show all posts

Tuesday, 18 February 2014

YouTube Inspired...

Hello, hello! I'm sporting a couple of broken nails and it might be a while before they recover to a bloggable length so I'm bringing out some manis from the vault. 

We all love nail art, right? That's the reason why we are here on this wonderful thing called the internet right now. Not to be left behind, big cosmetics companies have jumped on the bandwagon and created YouTube channels to promote their products. I enjoy watching beauty/nail vloggers on the video-sharing website but all the Google algorithms have caught up on this preference of mine so I'm constantly bombarded with the aforementioned companies' ads and videos. I usually skip them as they lack the genuineness and creativity of the vloggers and they seem over-stylised which really puts me off; there's a reason why I'm on YouTube and not on your site!

For some reason or another, I ended up watching one and liked the colours they had shown together. Being the rebel I am (teehehe), I didn't go buy their products but instead used some older polishes from different brands to recreate the very simple tape mani they had presented.

I started with one coat of Maybelline Mini Colorama in Peach Cocktail, let it dry then taped off half my ring finger nail and applied one coat of Max Factor Mini in Purple Haze. I added a coat of Seche Vite to all my fingers and let it dry before applying stripe of Sally Hansen's Big Money over the very rugged edge I created on my ring finger. 


Tadah! Super awesome and original. 


The highlight of this mani was actually reusing Peach Cocktail. When I bought it a few years ago, I had no idea what a good formula was but I remember it being runny and having to use a 2-3 coats to get it completely opaque. This time it applied in one beautiful, buttery coat and the flakies/shimmer still showed up within the depth of the polish. Man... this polish has turned out so good, I didn't even have to clean up. I can just hope all my bad formula polishes do the same in a few years.

Is that shimmer on my thumb? At least you know, I don't retouch my pics...


If anything came out of watching that nail-polish-company YouTube video was the rediscovery of some cool polishes. And also having some vault manis for rainy days. I'm still gonna avoid them as much as I can though.

Till next time, 

Laura


Monday, 10 February 2014

Witty Titles Are Hard To Come Up With But I Like My Layered Stamped Mani

At the lack of a good title, I'm just gonna jump right into today's mani. I started with yesterday's base, Rimmel Pro Get  A Nail Tan, and stamped the triangle pattern from BM-423 with Topshop's Gilted. I knew I wanted to layer stamps but choosing a colour and a stamp took me a while, I ended up choosing a half nail, leafy stamp from BM-309 and my oldest polish Maybelline in Succulent. I topped it all of with one coat of Seche Vite.


I'm pretty happy with the result and, at closer inspection, I'm loving how Gilted shows through Succulent, even though the latter is fairly opaque.


Excuse the smudges near the cuticles...


My mum looked at my nails and she mentioned this reminded her of henna tattoos. Looking at it now, it reminds me of the packaging of a particular Australian apple cider. That's how you know where you mind is. :)

Till next time, 

Laura

Friday, 24 January 2014

GOT Polish Challenge: Blue

Blue polish has always had a special place in my heart, especially if it's a shimmery royal blue polish. When I saw the GOT blue prompt, I immediately knew I wanted to bring out Aruba Blue, which was my first Essie and its purchase marked the beginning of my polish hoarding habits around mid 2012. I painted my digits with the polish but then I remembered I had purchased Maybelline Mini Colorama in Electric Blue, another royal blue shimmer, back in 2010, so that one should take the crown as the Golden Oldie blue. I'd always worn unusual shades in my lifetime (greenish gold polish at 13, anyone? Yes, it was the 90's) but Electric Blue was my first fashion colour. I wasn't just a kid playing with colours anymore, I was a grown woman making a fashion statement with my nails in a world of nude pinks and black. Yes, I chose to be different. Haha! Polish has been in defining times of my life and I may be reading too much into it. :)

I'm actually using both polishes on the photo below for comparison, Aruba blue on the index and ring fingers and Electric Blue on the pinky and middle finger. Not only was the former my first Essie, it turned out to be my first stash dupe. Even worse, I ended getting Sally Hansen's Azure last year without having memory of why I bought it and now have three royal blue shimmers. At least I won't run out any time soon...


I wanted to make truly old school, so I brought out OPI's beautifully coloured Turquoise Shatter and tried to create a lightning bolt/tape mani. Once upon a time, I tried to reuse this shatter by applying it directly to the nail, without base coat, so it wouldn't crack and after two coats it looked opaque. I top coated it and happily went on with my day but when I removed it I ended up with the brightest blue nails I had ever seen. I took out the bicarb soda and lemon straight away and scrubbed and scrubbed thinking that I was gonna have blue stains for a while. It eventually came off and a big lesson was learnt. Crackles are done unless you are doing an golden oldie mani. Btw, when I said once upon a time, I meant yesterday... :/


I'm gonna have to face it, even though I love these two colours together, this wasn't my best work for a number of reasons. 
  • I used a crackle that was lumpy. 
  • I painted my dominant hand as I broke three of my blogging nails baaaaaaadly over the last five days. I have little round nubbins at the moment and I don't think they look bad, they're just too short. 
  • There are awkward hand poses and fluff in one of my photos. 


Next week, I'm up for dots and know exactly what I'm gonna do. Hopefully my nails are ok by then

Check out the rules for the challenge and some more awesome blue manicures below.


Until next time, 

Laura

Wednesday, 23 October 2013

33 Day Challenge: Abstract

Abstract: Thought of apart from concrete realities, specific objects, or actual instances.


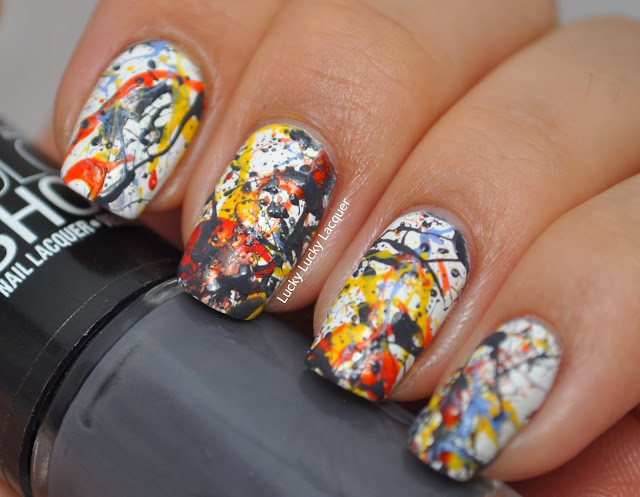
Well, that left the prompt for today on the 33 Day Challenge extremely open for interpretation. I had lots of ideas after I looked up the definition for this prompt on the dictionary. I knew what abstract meant and was aware of the heap of art/music/scientific models that are considered as such but there's something about looking up the meaning of the word to leave no doubt on the mind. I ended up going with one of my first ideas which was to recreate the abstract painting Blue Poles by Jackson Pollock. Or at least use the colour scheme and splatter the polish on my nails. 


There are a few reasons why I chose to base my manicure on this painting. Blue Poles resides in the National Gallery of Australia and was bought in 1973 for about $1.3 million, which at the time caused outrage. 

'How could you pay that much money for something that is not even art?' 

Jackson POLLOCK, Blue poles
Source

I've been wanting to go to the NGA for a while but Canberra, the city where the gallery stands, doesn't have much else to offer me at the moment and there are other places I'm saving up to go to. I will go soon and look at this 2.12m x 4.89m beauty. I might even cry a little... from happiness of course. 


Another reason is the technique Jackson Pollock used to paint his canvas by laying them on the floor and dripping the paint with various instruments. This is said to reflect the realms of unconscious experience but also respond to contemporary life. I'm quoting him here, 'The modern painter cannot express this age, the airplane, the atom bomb, the radio, in the old forms of the Renaissance or of any past culture'. To me that's a way of looking forward, a point of view that acknowledges the past but recognises the need to move on. I'm guessing saying that while everyone criticises your 'art' either takes a lot of confidence... or arrogance. I find it all so inspiring either way. That's why I would cry from happiness when I stand in front of it. *shakes off the emotion a little*


Back to the nails, the last reason why I wanted to have a little Blue Poles in my nails is that I have never done a splatter manicure before. I have tried but using a straw never gave me any splatter, it only gave me blobs of paint onto paper not my nails. I came across this Spanish-speaking Mexican beauty Youtuber, Yuya, that did a splatter manicure with a bobby pin and it seemed a little more controlled. *Edit* I originally couldn't find the video where she showed the splatter manicure but thanks to Brethil from Druid Nails, I have searched high and low and found it. Click here to watch the video. The splatter manicure starts at about 2:30 and Yuya recommends blowing into the bobby pin as if you wanted to blow bubbles *Edit*.


I gave it a go with this manicure and I'm happy with the way they came out. Mind you, the paper I had underneath my nails ended up with more polish than I did. 


Have I mentioned what polishes I used? Started with a two coats of Sally Hansen in White On and the splattered the coloured polishes in the following order:
  • Maybelline Color Show in Impeccable Greys
  • Maybelline Color Show in Fierce N Tangy
  • Ulta3 in Crazy
  • Essence in Absolutely Blue
I finished it off with one last splat of Impeccable Greys to have a closer representation of the painting. I had a mess all over my hands so I grabbed a cotton round and cleaned them up with pure acetone. I managed to clean up around my cuticles with the cotton round and I'm thinking this was easier than sticky taping all my fingers and then trying to remove it. 

I smudged my middle finger and tried to patch it up with extra grey splatter but it's jut making look messy.


I'm happy with this splatter mani and I hope I have made some justice to the painting. Please check out the other ladies' abstract manicures.


Friday, 27 September 2013

33 Day Challenge: Tape Mani

Don't forget to enter our giveaway here!

A tape mani was my introduction to nail art about 15 years ago and I haven't looked back since. They're easy, quick and the amount of designs that can be created is endless. I even created my first post for this blog with a tape mani. I know I've had to restrain myself from creating 33 different tape manis for this challenge and just sticking to it when absolutely necessary. Luckily for me, the third prompt called for a tape mani. Yay!

I wanted to create a skittlette manicure using Maybelline Color Show Sequins in, er, Sea-Quins as a base and Models Prefer in Midnight Madness. There's a bit of a story about Sea-Quins after the page break but I'll explain how I did the mani first. I started with two coats of Sea-Quins, topped it off with two coats of The Awesome Topcoat to make the glitter smooth, taped my middle and ring fingers and applied one medium coat of Midnight Madness. I took off the tape immediately after, let the two fingers dry and finished them with one coat of Sally Hansen Insta-Dri topcoat. 


For my short polish story and a matted version of this mani, click on the page break.


Tuesday, 2 July 2013

Matte Glitter Gradient and the Terrible Smudge

It stopped raining around this neck of the woods and I thought, 'Fast, go out to enjoy it before the sun sets!'. It sort of happened coz I jumped into the car and went to the local shopping centre to run some errands. In said shopping centre, there is a Priceline and we all know how dangerous going in there can be when one is sucked into that place. I went in anyway and I came across a new-in-Australia Sally Hansen range. If you haven't seen the bottles, the Fuzzy Coat range is a dupe to Nails Inc Feathers collection at a more affordable price. Surprisingly enough, I resisted buying it for a multitude of reasons, including the lack of price on the display, even though I've been looking the top coats for a while.

Another reason I decided not to buy it was my realisation that I have a lot of un-blogged polishes and that need a go before I start buying polishes that you can only show once. Originally, this was going to be a splatter manicure but my first try was a disaster  and I ended up smudging it so much I couldn't save it.

Instead, I went for a simpler technique like a glitter gradient that I had never actually tried, successfully or otherwise. I started with two thin coats of Maybelline's Electric Blue and one coat of Seche Vite for quick drying. For the glitter gradient, I used a Leighton Denny polish in I Am Diva  and put a drop of this dense glitter near the cuticles and brushed it up the nail with the polish brush. I stamped my ring finger with Bundle Monster's plate in BM-206 with essence's Silver Twister. Topped it all off with Rimmel and Essie matte top coats, each in two fingers (can you tell the difference? I still can't!).


There are a lot of things wrong with this manicure. For starters, I was impatient with the Electric Blue and touched it to see if it had dried. It hadn't and I created a massive smudge. Second, the glitter gradient is very sparse to be considered such and lastly, the stamp is crooked and not centred, even though I tried really hard.

A much better angle for this mani.


I couldn't bear having two unsatisfactory (in my standards and probably a lot of others') manicures  in one day and decided to still post this. 


Squint your eyes and it doesn't look that bad.

Anyway, this is what happened when, after touching the wet polish, I tried smoothing with my fingers AND applying a coat of Seche Vite. I have found this topcoat can fix mistakes if applied quickly after the smudge has happened, unfortunately, it didn't work for me this time.  


I have come across a few pages in Pinterest where they recommend licking your polish into place. I always had the idea that polish shouldn't go anywhere near your mouth so I skipped that one.

Do you have a fail-safe fix for polish smudges? If you can't fix them, would you rather leave them or start over?

Till next time,

Laura

Tuesday, 25 June 2013

Maybelline Impeccable Greys and Ozotic 528

Super quick post tonight. 

A couple of weeks ago, I went to a shop. Yes, I am being vague but I do not remember where I went, so I can't say. I think it was the Chemist Warehouse and they were having a half price sale and I kept thinking, 'What polish colour don't I have that I can buy because this Maybelline Color Show bottles are really cheap?'. It was that moment that I realised that I had only one light grey that is not actually a grey, so I got Impeccable Greys for about $3. 

Impeccable Greys is a dark grey creme that is opaque with two coats and the formula is very manageable. When I applied the first coat I saw it was very sheer and that it would take a few coats to reach opacity but turns out the second made it dark and even throughout. I didn't take any photos of it by itself because I was impatient and wanted to do some nail art with it. I thought it'd be cool to create a glitter skittle with Ozotic 528  but the execution wasn't great as you can see below. Topped it all off with a coat of Seche Vite.


I know it's terrible but I love this Ozotic polish. Tasha did a small review of the polish here when she first started the blog and that's the main reason I ended up buying it. I thought I didn't really have much to add to it but then I took this photo.


Most swatches show the green/purple duochrome of the glitter but the flash of my camera ended up showing all the colours in the spectrum between the green and purple. This shift is visible in real life if you are paying heaps of attention and try to see the orange/red/blue colours that appear with some lights.

For some reason, I thought this polish had been discontinued from the piCture pOlish website but turns out you can still get here and, for overseas buyers, through their international network. I'm nowhere near done with my bottle but it's good to see that I'll be able to still get it when I run out.

Till next time, 

Laura
Monday, 29 October 2012

Are you ready for another one?

This is the mani I did today. Going to keep this blurb short and simple and show you what I've done straight up.


As a base I used one of the new essence bottles called Boho Chic. It's a beautiful peachy base with gold flakies. To tell you the truth it doesn't look that awesome in the bottle but the main reason I got is because I saw it in Oooh, Shinies! and this girl can make anything look good. I even added the matte top coat to make it look like hers. I also added the fan from BM-204 stamping plate with Maybelline Wet Shine in Succulent. I've had this polish for about six years and it does a pretty good job at stamping. Then again, I don't think they're sold anymore!!!

To seal in the stamp I used Sally Hansen Insta-Dri for the first time and I can tell you it blew my mind on how quickly it dries. However, the gold flakies made the manicure look kinda dirty, so I then followed the steps of Oooh, Shinies!. Have a look.


It looks waaaaaaaaay better matte. What do you reckon? Shiny? Matte? Let me know.

Until next time, 

Laura

LinkWithin

Related Posts Plugin for WordPress, Blogger...