Showing posts with label Rimmel. Show all posts

Monday, 10 February 2014

Witty Titles Are Hard To Come Up With But I Like My Layered Stamped Mani

At the lack of a good title, I'm just gonna jump right into today's mani. I started with yesterday's base, Rimmel Pro Get  A Nail Tan, and stamped the triangle pattern from BM-423 with Topshop's Gilted. I knew I wanted to layer stamps but choosing a colour and a stamp took me a while, I ended up choosing a half nail, leafy stamp from BM-309 and my oldest polish Maybelline in Succulent. I topped it all of with one coat of Seche Vite.


I'm pretty happy with the result and, at closer inspection, I'm loving how Gilted shows through Succulent, even though the latter is fairly opaque.


Excuse the smudges near the cuticles...


My mum looked at my nails and she mentioned this reminded her of henna tattoos. Looking at it now, it reminds me of the packaging of a particular Australian apple cider. That's how you know where you mind is. :)

Till next time, 

Laura

Wednesday, 2 October 2013

33 Day Challenge: Mexican

I had high hopes and lots of inspiration for this prompt. I don't think I've mentioned it but I was born in Mexico and lived there for more than half my life (just!) before moving to Australia. This should have been my scene!!! I thought of a lot of possible designs I could create and settled for one idea  but the execution was poor. Actually, it was OK until I added top coat. Have a look for yourselves. 

I based my design on my home state's traditional dress called 'China Poblana'. The (short version of the) legend says there was a Mongolian princess that was kidnapped at the age of 8 by 17th century Portuguese explorers and eventually taken to Mexico to be sold as a slave. Due to her beauty, she was originally going to be sold to the viceroy of New Spain but a higher bidder came out of Puebla where she was finally taken. She was given the Hispanic name Catarina de San Juan and was sort of adopted, but remained a slave, by the Soza family and was taught how to saw, among other things. Even though the origin of  the dress is very hazy, most versions of the story say that Catarina was the designer of the dress, which was a fusion of her natal Mongolian attires and Mexican influences. When the patriarch of the family died she was sent to a convent and after she died at the well into her 80's, she was worshiped as a saint in Puebla until the church banned popular saints. There are as many variations to the legend as there are variations of the dress and I don't claim to be an expert. That's the story I remember from school and bits I researched on the world wide web.


Back to the nails, I used a heap of polishes and tools so I'm just going to list them.

Light Green:  Ulta3 in Jelly
Dark Green:   Ulta3 in Frog Prince
Red:             Revlon in Fire Fox
'Skirt' glitter: Rimmel in Disco Ball 
White:          Sally Hansen Xtreme Wear in White On
Yellow:         Ulta3 in Honolulu
Gold:            Sally Hansen in Golden-I
Light Brown:  Essie in Hot Coco
Topcoat:       Seche Vite

Smallest and small dotting tools and striping tape from eBay. Sticky tape from the supermarket. :)

This is one of the many versions of the dress. 

Source
I also included my thumb to represent the ribbons that are braided on the hair. I find thumb shots awkward so please excuse the following bad photo.


Before I added a topcoat of Seche Vite, there was a bit of texture on my index and ring fingers, which looked a lot better than the smooth versions. I added a final coat of Rimmel Pro Matte Finish to try and save it but it just made my mani chip very quickly. :(


I'm not sure what to think of this mani. I kinda like it because it made me think outside my comfort zone, especially the index that represents the shirt, but it doesn't look great altogether. If I hadn't applied topcoat, I would've been happier. I guess that teaches me to photograph every step of the mani!!! 

Check out the other talented ladies of the challenge.


Till next time,

Laura

Saturday, 24 August 2013

Topshop Marble Accent

I'd like to think I'm not terrible at marbling so I decided to give it a go today with some Topshops polishes I had yet to publish in this blog. Today was as good as any other time so here we go.

I started with the idea of marbling all my fingers but only the first finger worked. The water and polish weren't cooperating in the following attempts and, as I wanted to keep the mani as no-frills as possible, I decided to only paint my digits with the colours I had used for the marble. On my middle finger and thumb I used Wisdom and Gilted for the index finger and pinky. The pink from the marble is Glitz, which is not quite as glittery as the other two but it still worked with the other two colours. Topped it all off with a coat of Rimmel Pro Matte Finish.


I'm having some trouble describing the qualities and composition of these polishes as I have found there aren't a lot of mainstream brands that do this sort of finish. I would describe them as jammed-packed superfine glitters/shimmers suspended in a similar colour base that you can't even see from how dense the glitter is. There at least two colours of glitter in each polish, which gives them a multidimensional colour and the ability to show different colours in different lights. Did I mention they're all almost one-coaters if applied carefully? What about the fact that the formulas are so amazing I didn't do any clean up? No? Like most Topshop polishes, the drying time is longer than average but they are DURABLE. They spread nicely in the water but then again, took a little longer to dry on the surface and I think that's where I failed with the rest of the fingers.


I'm enjoying this thing called photo-spamming, so click on the page break for more photos. 

Friday, 2 August 2013

Dior Inspired: Or How I Had A Little Breakthrough

I have so much stuff to put up I wanna show you guys, including new nail polishes, nail art that I've created and a few random nail related items. I thought I would start at the beginning of my list and show you some nail art that I'd been thinking of executing for a little over a month. Well, I actually did execute it but I wasn't very happy with the results so I had to start over a couple of times.

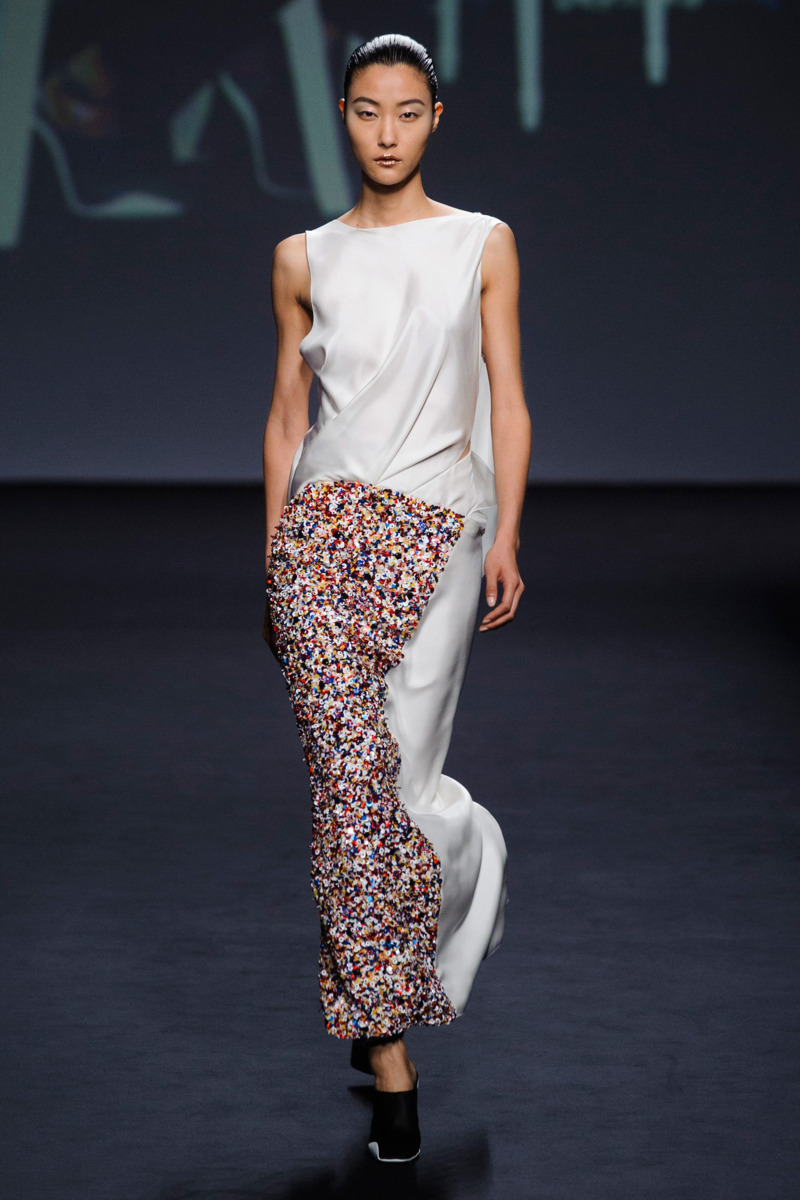
This mani is based on a dress by Christian Dior from his Fall 2013 Couture collection. I wanted to recreate the textures and line of the dress along my four fingers.


Close?

Photo 13 from Christian Dior
Source
For the satin finish, I started with three thin coats of Sally Hansen Xtreme Wear in White On and let them dry thoroughly before applying two coats of OPI's I Juggle... Men. I've had the latter for a little over a year and the formula has thickened and I think (...think) that the coverage of translucent glitter  is a better because of that.


To mirror the sequins from the dress, I tried creating a my first ever franken but for some reason or another, it didn't turn out as good as I hoped and its glitter coverage was poor. I bought a multi-coloured glitter that had the colour range that I was looking for but then again the coverage left a lot to be desired.


I decided to layer the glitters instead to make the 'sequins'. After sticky taping my fingers in the different designs. I sandwich a coat of China glaze in Electrify within two coats of Sally Hansen Xtreme Wear in Rockstar Pink. I removed the tape immediately after applying the last coat of glitter and the lines still came up acceptably crisp.


After the three coats of glitter, I applied one coat of Seche Vite to even it all out. I tried to be very careful to make sure I wrapped my tips with glitter to have a full coverage but it seems like the Seche Vite caused some shrinkage and pulled the glitter back.


As a final step, I used Rimmel Pro Matte Finish top coat on the white to give the finishes a little bit more contrast. 


Yes, my pinky is looking chunky. In my first try, it looked like a thin french tip and not like the dress. I had the idea of taping my finger again closer to the cuticle and painting over it, thinking that it would dry a little flatter. :( It looked better than it would have otherwise so I let it be.
  

Now for the little breakthrough. I'm particularly happy with this manicure for the reason that I managed to clean up white polish AND keeping the edges tidy and wearable. It took a lot of patience and time but I did it!!! 


The above photo shows my second attempt but it felt incomplete, I had tip wear after about half an hour after finishing the mani and look at the clean up on my ring finger... I had to re-try it. I'm very glad I did. My first attempt was majorly smudged and wasn't even worth photographing.

I hope you guys enjoyed this mani. It was really fun to do, even if it took me three tries to come up with something I was satisfied with.  

Till next time, 

Laura

Thursday, 27 June 2013

Essie Matte About You. Or How I Thought I Was Living In a Lie

If you were to look at the matte tag in this blog, you may notice about a third of all my posts have been matted. I love the matte finish and the soft light it reflects. So far I've been using Rimmel Pro Matte Finish and I was in love. After reading a few blogs, I discovered that the this matte top coat was actually giving my manis a satin finish and not the full on matte effect. I decided to do some research and look for the best matte top coat to ensure I was actually in love with the matte finish and not the satin one. 

This is how I came across essie's Matte About You. I'd read in various places that essie MAY and OPI's Matte Top Coat gave the best results so off I went to this trustworthy eBay seller and only found MAY for sale. I got the bottle of polish today and I had to try it out straight away. 

I knew exactly what mani I wanted to try it with to have a truly matte finish. I started with two coats of Topshop in Celestial, a beautiful periwinkle blue creme that is no longer on sale. There are plenty of dupes out there but the quality of Topshop polishes is impressive so I stuck with this one. Please excuse the crappy clean up I knew, I would have to clean up the rest of the polishes later. They get cleaner, I promise. 


Once Celestial was almost dry, I dabbed one coat of essence in The Huntsman from the Snow White Collection. I even got a long bar glitter that I didn't know the polish included.  Dabbing FTW! This took a while to dry so I applied a coat of Seche Vite to speed up the process. 


This is where I decided to put one coat of Rimmel PMF on first to see it would compare to MAY. Pretty  and soft, right? 


I let the mani dry completely before applying one coat of MAY. 


I didn't really see any difference but the I thought it may have had to do with the layering of matte polishes. So I started again to make sure there was clear difference.

More after the break.

Tuesday, 7 May 2013

Dorothy For The Land Of Oz

Back when I was about 9 or 10 years old, I went to my dad's place where he had a computer game about Leonardo da Vinci, this was back on 1995/96 so it was super exciting. It was basically a game that run you through all of his career paths and all the inventions that came out of that, think the very early stages of helicopters, forts, painting, discoveries in anatomy, scuba diving. He was an painter, sculptor, architect, musician, mathematician, engineer, inventor, anatomist, geologist, cartographer, botanist, planner (source), and who else knows what would run through his head that he didn't put down in paper. Since then, I found the man utterly fascinating and have been jaw-droppingly amazed at what the human mind can do and create. 

Now you may think, why is she talking about Leonardo when I came here for nails? Well, I'm just having a bit of a rant. Skip the next couple of paragraphs if you only came here to see Dorothy. I don't want to put you off. Anyway, I'm finding a tad difficult to think that I have to sit exams and take a lot of pressure for four years to do ONE thing for the rest of my life.  I know I will get bored, I know I will need  a big change every decade or so. I wanna have twenty odd careers in my life, like Leonardo (not saying I'm a genius but it would be nice). I'm really over the fact that I have to pay $40,000 for uni to work for when I could be learning through experience and inquisitiveness. I guess I won't beat the system on this one.

I think I'm just having a shitty time trying to get my assignments done and pushing myself past a mental barrier that's stopping me from thinking freely and getting them done. I can also be a perfectionist with what I do and if it's not great, I'd rather not do it.

In the meantime, I'll keep going with this colourful hobby of painting my nails to cheer me up a little and stop that mental block. 

I present to you Dorothy from Picture Polish, a raspberry red jelly with tiny silver glitter.  the formula was pretty good, if a little thick like Peacock, but still manageable and expected from such dense glitter. Photos done below with two coats and no top coat.


I've checked out other blogs to make sure there's only silver glitter but I swear it looks like there is pink glitter. I had to take some macro photos of the bottle and nail to convince myself that there's only silver. The polish on the nail looks a lot pinker and the glitter may even look golden in some lights.


To be completely sure, I applied some Rimmel Matte Top Coat, which made Dorothy even lighter. I'm still in doubt.


Hmm... Either way it is a beautiful polish that shines and sparkles like you would expect a piCture pOlish glitter to do. I added a tape accent nail with Layla's Mirror Effect in Metal Chrome and dotted Dorothy on top. 


Funny how that perfectionist streak hasn't translated to this blog because I can tell by the above photo, that's not my best work. 

It is still fun and very sparkly, though. Hope you guys can take some enjoyment from the swatches and my tiny rants.

Till next time, 

Laura

Friday, 19 April 2013

Bejeweled: Take 2


I was supposed to have uni this morning but the floor where I was going to have class flooded and the class got cancelled. What is a girl to do with the time she would have otherwise spent commuting? Well, if you're reading this I'm sure you know the answer.

I present to you and uber-speedy manicure. I used two coats of Sally Hansen Gem Crush in Bejeweled, a small purple and larger pink glitter that takes two seconds to dry. Ok, maybe it takes fifteen seconds but you get the gist. I then applied Rimmel Pro Matte Finish topcoat but I didn't see a lot of difference as this polish dries fairly matte by itself.  Finished by stamping with Konad Special Polish in Black using Bundle Monster's BM-212 plate. I'm not sure what the motif actually is but the abstract look can also look good.


What do you guys think? I actually have done a post about 10 months ago with this polish but it was terrible! Think glittery cuticles, awkward hand position, a loooooooong post where I just kept blabbing on. You could say I'm trying to redeem myself with this one and hopefully the other one can be forgiven.

Either way, I love this polish and it's glittery goodness. I'm off to keep studying.

Till next time, 

Laura

Wednesday, 10 April 2013

Gold on Blue Stamping

I have discovered that blogging actually helps me with uni work. Sounds like a massive excuse for procrastination, right? Well, I find that blogging gets me writing and engaged in one particular task for longer than 10 minutes and, luckily,  I am able to transfer that set of mind to other things, in this case uni work.

So here's my 'I really need to read 150 pages of a textbook by next week' manicure. I used one coat of Sinful Colors' Blue By You, a beautiful, opaque, blue jelly full of tiny flakies that reflect light in light blue, aqua and green tones. Did I mention it was opaque in one coat and that the formula was amazing? This is the first time I tried it this polish and I would add it to the favourites straight away. I used Essie's Penny Talk for the stamping using Bundle Monster's plate BM-212.


That's it from me. I really need to get reading.

Till next time, 

Laura

Tuesday, 26 March 2013

DIY Leather Nails


Back at the beginning of December last year, I came across the Nails inc Leather Effect polishes and a new lemming was created instantly. I looked high and low but the prices were absolutely ridculous, e.g., an ebay bottle of the black version would have set me back $46!!! No thanks. I could keep wishing...

Last night, when I was trying to do some tiger nails (which were a complete fail), I ended up sponging on too much colour and, in a fit of frustration, I dabbed the whole sponge on my finger. When I looked down at my nail, I saw what resembled the leather effect. Could I satisfy my lemming with my existing polishes?

After putting my trustworthy Ulta3 Black Satin and Rimmel Pro Matte Finish polishes to the test, this was the result:


I don't own the Nails Inc Leather Effect polish so it's pretty hard to do a comparison but you can check some swatches here, here and here. I'd like to think I'm pretty close. What do you guys reckon?

Since, I actually came up with this all by myself, I wanna show you guys a mini-tutorial after the break.

Enjoy!

Tuesday, 19 March 2013

Welcome To The Jungle

For a small period of time, I was trying to do really hard nail art. Frustration started to set in because it did not look good, which made me come to the conclusion that I didn't have a lot of practice and that maybe I should start with simple nail art.

I present to you, my second attempt at leopard spots on an accent nail, first attempt was a little too even. I started with two coats of essence's Gorgeous Bling Bling, dotted the gold on my ring finger using a Sportsgirl nail art pen and completed the leopard print with a Topshop black nail art pen. I finished it all off with a coat of Rimmel Pro Matte Finish.


Tasha did an awesome version when this blog first started, you can see it here, and I always thought this print would be hard to achieve. I'm so glad to be wrong.

This is the shiny version. Call me boring, predictable or anything else that may come to mind, but I always like the matted version of my manicures better. I feel the lack of shine brings out the colour and effect of the polish better. For example, you can see the flakies a lot better in the matted version as it's not competing with the shine for my attention. One thing at the time for me.


Anyway, I might try some tiger stripes for my next mani. Or zebra, since they're practically the same, just with different colours.

Til next time, 

Laura

Monday, 17 December 2012

Dry Marble with Face of Australia Pastels


 Browsing through YouTube I came across this video from MissJENFABULOUS. I had actually seen it when it first came out back in June but I was browsing through her channel. Yes, I'm a fan of hers and she has some cool ideas.

So as a good 'Monkey See, Money Do'-er that I am, I brought out my lightest coloured polishes and created this mani.


Excuse the lobster-coloured hands and shiny cuticles, the colours of the polishes are the best I've captured and my cuticles have been way too dry from work. 

Polishes used: 
White (as a base): Rimmel London I <3 Lasting Finish in London Clouds


From left to Right: All Faces Of Australia from their Pastels Collection. After Dinner Mint, Boys 'N' Berries, Easy Peasy Lemon Squeezy and I'll Take You To The Candy Shop. 
Top Coat: Sally Hansen Insta-Dri

I'm really happy with the result and the technique is super easy. Including drying time and clean up, this mani only took me about twenty minutes. I also need to say, even though the formula in Face Of Australia polishes isn't generally great, I'm really loving these polishes for their slow drying time. Basically, it means that I can play around with them to create nail art (like this marble) and if I stuff it up, I can take it off without too much trouble. I'm seeing the positive on these polishes... Plus they were $1.65 each when I bought them. :)

What do you reckon? Would you try this technique? Maybe other colours? Oooh, I might try this with some metallics...

There's something really exciting (for me, at least) that I wanna show you guys in the next couple of posts. It might involve a long time lemming... Stay tuned.

Til next time, 

Laura

Tuesday, 27 November 2012

piCture pOlish Kryptonite by More Nail Polish

About a month ago, Cathy from More Nail Polish hosted a giveaway and I was lucky enough to get the fourth out of four prizes. As you may have imagined from the title of this post, the prize was a bottle from piCture pOlish's Collaboration Shades in Kryptonite.


This bottle is my first piCture pOlish lacquer and I will tell you it is amazing!!! The dark green jelly with large flakies has no fault in my eyes. It dries relatively quickly, it is opaque in two coats, it is super shiny by itself and the combination of flakies and jelly gives this polish so much depth. I wanted to do some nail art with it but my limited imagination and the richness of colour/sparkle of the polish didn't give me a lot of options. A swatch wasn't going to be enough, mostly because there are tons of them on the net. So, I just added a coat of my trustworthy Rimmel Pro Matte Finish top coat. We all love matte flakies, right? Or am I too late for that trend?


 Showing off the flakies.


A shiny swatch of this polish can be found here

I loved this polish so much I might go to the piCture pOlish website and get some more.

Ooh, I just checked and they have polishes for as little as $6.50. good thing it's payday today. Or is that bad?

Til next time, 

Laura

Monday, 12 November 2012

essence Marble Mania's Silver Twister


I've had this terrible lemming for two metallic stamping polishes for quite a while. I know Essie's Metallics collection has had some good reviews on their own and as stamping polishes and they have a variety of colours that go beyond the usual gold and silver. Unfortunately, living in Australia means that they won't be available in stores for a few more months at least, if at all. I've also tried eBay, e-tailers, forwarding services from the USA. It's all either too expensive or they've sold out.

I also looked for Barry M Foil Effects and found them in stock at Ninja Polish at a fairly good price but the shipping cost was the same as the polish. So I kept looking and I've  bought  about three pharmacy gold and silver polishes but they're all too sheer for stamping properly.

In one last bout of hope, I went to Target to see if there was anything new. When I came across the essence stand, there was a display of polishes for their Marble Mania collection and saw this little beauty:


From what I see in the Essence website, this collection is mostly about nail art rather than just marbling. There's even a kit with two sponges (for gradients), orange sticks, a striper brush and a booklet with nail art ideas for sale. I didn't see the kit in Target but it doesn't really surprise me as it can be a bonus just having a few of the polishes available. 

I do this thing with bottles to see how sheer they are where I turned them a few times  while on its side and see how well they coat the glass bottle.With all the other polishes that I had bought for stamping (that didn't work out), you could see the polish in the bottle through the glass but not with this one. I had hope again and as I turned the corner I saw the essence Twilight Collection polishes. This collection has a very streaky, one-coater, gold polish that is amazing for stamping. It deserves a post of its own. There was only one bottle of each, so I snapped them up and run to pay for them.


After my little adventure, I started trying a few colour combinations and found out the best ones for the silver polish was a dark, matte base, at least for my skin anyway.


Polishes used:
Purple: B Collection by Bloom in Dubai
Silver: essence in Silver Twister
Top Coat: Sally Hansen Insta-Dri and Rimmel Pro Matte Finish

I did two coats of Dubai followed by Sally Hansen Insta-Dri so it would dry quicker and I could get on with the stamping. Then I applied the Matte top coat before stamping with the silver using Bundle Monster's BM-207 plate. I didn't add any top coat after that and I'm regretting it as there is already some tip wear on the stamping on my thumb.

I don't know if you've noticed but the angle of the hand is different to the way I usually do it. Turns out, I did a terrible job with my stamping and there were bumps and non-stamped edges so I had to turn my hand a little to hide the imperfections.

What do you reckon? Am I overdoing the matte top coat? Should venture into the shiny side?

Till next time, 

Laura

Friday, 9 November 2012

Too Random Skittle

I've had a few terrible manicures in the last couple of days that were not even worth photographing. I'm talking about extremely flooded cuticles that couldn't be fixed, crooked stamping, smudging of such said stamping, terrible colour combinations and bad gradients. 

This is the first one that looked sort of OK, even though I'm not completely satisfied with the result. I tried using differents textures ( a cream, a metallic and a glitter) in blue, green and pink that I thought would look good together as a skittle mani. Tried tying it all up by having a striped middle finger but the job was kinda dodgy and there's a piece of stray glitter on my ring finger that I couldn't remove!!!!

Anyway, I'll do and learn but here are the pictures.


The obliged matte top coat, which in my opinion, makes polish look a million times better. 


Polishes used:
Pink: B Collection by Bloom in Cologne 
Blue Glitter: Essence in Blue Addicted
Metallic Duochrome: Topshop in Eclipse
Top Coat:   1st pic: Sally Hansen Insta-Dri
                 2nd pic: Rimmel Pro Matte Finish

There you have it. I'm gonna Google Colour Theory and maybe learn a little about what looks good together and keep practicing with that tape.

Till next time, 

Laura


LinkWithin

Related Posts Plugin for WordPress, Blogger...