Showing posts with label Bundle Monster. Show all posts

Wednesday, 25 December 2013

Merry Christmas!

Super quick post to wish everyone a safe and merry Christmas and happy holidays! 


Used two coats of Nicole by OPI in Cinna-Man Of My Dreams and stamped with Essie's Good As Gold with the BM-225 plate.

That is all from me. Till next time, 

Laura

Monday, 2 December 2013

33 Day Challenge: 3 Favourite Polishes

It's the third last day of the 33 Day Challenge and I'm gonna make this super quick because I am tired but didn't want to miss another prompt from this challenge that is about to finish. Here we go...

Narrowing down the stash to bring out my three favourite polishes wasn't an easy task, they are all so pretty and each has its own qualities. I decided on the ones that were my first favourites of a certain type and that I still love. I started with a coat of Essence's Snow White (my first and only jelly), let it dry and stamped Essie's Penny Talk (my first one coater metallic that has been featured in this blog plenty of times) using the plate BM-417 and then created a french tip gradient with Snow White and B Collection by Bloom in Dubai (the first polish that lasted about 10 days on me with top coat and had an awesome formula, no longer on sale but I have three bottles of it :) ). Topped it all off with one coat of Seche Vite to smooth out the gradient. 


These nails were super hard to photograph because of how shiny they were and my camera was freaking out when I was trying to take photos in the sunlight. I brought the nails into the light box but the shine was still too much and I couldn't figure out what settings would work. 


Anyway, this is what I came up with and I'm in love with this stamped jelly sandwich. It's shiny, the colours work well and I came to realise I hadn't done something similar before.


Quick note, this is how the jelly sandwich looked like in the sun. Yep, I cropped the only half decent photo I took but it shows some of the pretty light that was reflected from my nails.


Don't forget to check out the other particpants' manis for today's prompt.


Friday, 22 November 2013

33 Day Challenge: Mani with Three Patterns

I'm back on the challenge after neglecting it for the last week. It's not that I haven't wanted to do it, my inspiration just went out the window and I haven't been able to catch it back. Anyway, I didn't want to miss another prompt that I would have to do later so I gave myself a deadline for today's prompt of a mani with three patterns. I wanted to do some free-handed nail art but I knew it was not gonna happen within my time limit and that frustration would be likely to get the better of me so I opted for stamping. 

So here it is, my three patterned mani. I used three coats of Butter London's Disco Biscuit and a coat of Seche Vite as a base. I actually wore this beautiful pink jelly for a whole day by itself before I added the nail art. I tried taking photos of the scattered holo glitter it contains but my camera's battery died as I was pressing the shutter button. :( While the battery was charging, I went on with the mani and taped up sections of my fingers and started stamping chevron, brick and triangle patters from the BM-422 and BM-423 plates with Essie's Penny Talk.


I had a lot of trouble getting the brick pattern to stick to the pink base and had to redo it A LOT of times, however, I didn't have to redo the base because I discovered that I could use fresh sticky tape to remove the half done job of the base. I would just put the sticky side on the nail and it would remove the stamping polish in no time and no acetone. Phew! I don't think it would work with all polishes but it's a handy thing to know...


When I finally managed to get the patterns on my nails (almost) wholly, I used my trustworthy Topshop black stripper and to frame the nails and create lines along the edge of the patterns. They weren't very clear to begin with and I thought the line would make it look better. I'm undecided on that one. I topped it all off with a coat of Seche Vite.


Overall, I'm not blown away by my nail art but this is the first time I have successfully managed to frame my nails with a striper. I'm aware the lines on the inside of the frames are uneven but I know practice would help me out with that one. Maybe if I had a different picture to frame, I would be happier. :)

Check out the other ladies' manis for today's prompt.


If you've been on this blog before, you may notice I have different background and a slightly different layout. The thing that bother me the most with my last background I used was the lack of continuity on mobile devices, like tablets, and bigger, higher resolution  computer screens. I also wanted to add social media buttons to the side bar and the free icons (found here) looked better with the multicoloured chevron pattern. :) I'm not web designer but I'm trying to learn to learn little bits as I go, including what looks good and what doesn't. I really like feedback or suggestions so if you have any thoughts on my layout, please let me know!!!

Till next time, 

Laura

Friday, 1 November 2013

33 Day Challenge: A Mani Using Two Patterns

Day 18 for the challenge. A few things pop into my mind when I think about that number:
  1. I didn't know I had enough creativity to get through to this day 
  2. I don't know how I'm gonna come up with my own ideas when the challenge is over
  3. I'm posting this the day it is supposed to go up
  4. My right hand is an awkward poser or it needs to find its own poses

I didn't want to take off my last mani (if you're in a desktop/laptop and have a keyboard, press the right arrow key to get to it and the left one to get back to this one, you know you want to try it...), so I brought out my right hand to play. Yeah, that means I have different designs on each hand. :)


I started with two coats of the super-buttery, non-streaky metallic polish called Crazy Fancy Love by Essence. It's actually a greenish rose gold multichrome but all the stamping doesn't really let its greatness shine through. Once I let this beauty dry, I stamped a what-I-think-may-be reeds pattern from the plate BM-406 with Ulta3's Frog Prince. I didn't know this could stamp as well as it did but I wanted a green and that was the opaquest one I had so I gave it a go. I stamped the roses with Konad Special Red Polish and the plate BM-323. I sealed it all off with a coat of Seche Vite before cleaning up.


I usually clean up before top coating a mani but I figured if my left hand strayed, the brush would remove the topcoat and not the stamping. Looks like that was the case but the cuticle edge was messy. Better than a half stamped hand?


I think the above photo is a right hand pose, if I tried it with my left my fingers would be super crooked.


Check out what the other talented ladies have come up with for this prompt.


Till next time, which I know I will be late for.

Laura

Monday, 21 October 2013

33 Day Challenge: Chinese

It's day 13 of The Crumpet's 33 Day Challenge and here I am, still sticking to it. For today's prompt, Chinese, I was inspired by so many things but unfortunately I had no time to execute any of them so I went for something simple that stuck to the theme. I also want to start using my ever growing collection of nail art supplies. I've stalled my polish shopping lately but now I've moved on shopping on eBay and Born Pretty Store for anything that can be stuck to my nails.

To tackle the challenge and start using some of these supplies, I came up with this mani. 


Which was roughly based on this vase. I googled Chinese vases and this one screamed out at me. I'm not sure of the authenticity of the claim that this is Chinese but it seemed to look like other Chinese pottery I have seen.

I started with two coats of Essence in Grumpy over a base coat and once dry, I stamped over it with Essie's Penny Talk using one of the new Bundle Monster Plates, BM-404. I got some eBay-bought flower water decals ready and started layering them on the blue and gold base but they were too see-through to show up on the darker blue base. I quickly painted my ring finger an thumb with two coats of Sally Hansen in White On and applied a coat of Seche Vite on all my fingers. I could just have applied it on my ring finger to get the white drying quicker but I thought I might as well do them all at that time.


Once that was all dry, I started overlapping the flowers and leaves on the white base and applied one final coat of Seche Vite to seal in the decals.

I really like how my thumb turned out but I didn't want to show another awkward thumb photo, so I tried two thumb poses. I like this one better...


... but this shows a lot more detail. I think. What do guys reckon?


You can sort of see the blue base on my ring finger under the white. I also managed to bump it on something so the blue flower looks  somewhat shapeless. 


Considering my past experiences with water decals, none of which have been documented in this blog... thankfully, I'm pretty happy with the way this mani came out. It makes me wanna play with all the new sheets I have just received. Stay tuned.


Check out the other talented ladies' manicures.


Till next time, 

Laura

Tuesday, 24 September 2013

September Tri-Polish Challenge Day 3 AKA Nail Fail

Don't forget to enter our giveaway here!


Day three of the September Tri-Polish is upon us a lot quicker than I realised. For some reason I thought I had a post ready for today but turns out I didn't. I had to come up with a quick and simple mani that would use all three colours. I haven't done a lot of gradients in my polishing life but I knew they were easy enough to me to tackle in no time and the pink I've been using was perfect for stamping. So a stamped gradient it was.

I started with two coats of Essence in Absolutely Blue as a base and let it dry. I then painted three coats of Absolutely Blue and China Glaze in Sweet Hook with a sponge to create the gradient. This is where it started to turn into a fail. The sponge I used was too rough and left little holes on the wet polish, which after three coats of coloured polish and two of Sally Hansen Insta-Dri topcoat, turned into BIG, chunky bubbles. 


I soldiered on and stamped over the gradient with Sally Hansen Insta-Dri in Sonic Bloom, which dried a little too quick on the stamper. Lack of foresight from my part there. :( I redid three of my fingers but they still didn't turn out great. Sealed it all off with two coats of Sally Hansen Insta-Dri. 


Not only are they B-A-D, they are also chunky. All those layers of polish and topcoat aren't making this mani look any better.


I thought of doing a different mani altogether but then remembered I have a life to attend to. Here are other good manis that you can look at after my fail. :)


Till next time, 

Laura

Wednesday, 10 July 2013

Valentino Inspired Manicure

I love (virtually) rummaging through the online New York Mag fashion sections for inspiration for manicures. Think all those designer collections that appear on Vogue and Elle but at your, er..., fingertips for free. Today, I've got a manicure loosely based on the one of Valentino's Couture Collection dresses for the 2013 Fall.

Photo 32 from Valentino

I look at the details, colours and textures to see how they can be translated to the nails without being too literal. When I came across the above dress I knew I wanted on my fingertips!!!

I must warn you, the details of the nail art wasn't great but I liked how it all looked together and that's the main reason I'm putting the photos up. I know it's not perfect but this blog is also part of the journey towards amazing manicures... Deep, aren't I? Haha!

I started with four coats of Sally Hansen Insta-Dri in Peatal Pusher for the nude base then stamped the pattern only half way up the nails with Bundle Monster's BM-201 plate using Konad Special Black polish. I sealed it with a coat of Seche Vite to make sure the stamping wouldn't come off when I placed the stickers for the half moons. I don't actually know if that would happen but I wanted to be safe rather than sorry. 


Once the Seche Vite was dry I put on half of a round sticker in each finger and striping tape on the tips as french manicure guides. I carefully painted  Ulta3 Black Satin on and removed the tape and stickers as soon as I was done with each finger. Finished it all off with one last coat of Seche Vite.


There was a lot of smudging, crooked half moons, bad and excessive clean up, major shrinkage on my pointer and the french tip lines weren't as crisp as I had hoped.


The photos weren't turning out either and each of these photos were taken at different times because I just couldn't take a good one. I could keep going about how this was a bad experiment but one thing I managed to accomplish was to get out my comfort zone and think how I could create a mani from a dress. I think this is one of the most creative things I've come up with and that makes me a tiny little bit proud. I would  usually shy away anything that involves creating arty things.

What do you guys think? Do you have sources of inspiration?  I hope you guys enjoyed the mani.

Till next time,

Laura 


Tuesday, 2 July 2013

Matte Glitter Gradient and the Terrible Smudge

It stopped raining around this neck of the woods and I thought, 'Fast, go out to enjoy it before the sun sets!'. It sort of happened coz I jumped into the car and went to the local shopping centre to run some errands. In said shopping centre, there is a Priceline and we all know how dangerous going in there can be when one is sucked into that place. I went in anyway and I came across a new-in-Australia Sally Hansen range. If you haven't seen the bottles, the Fuzzy Coat range is a dupe to Nails Inc Feathers collection at a more affordable price. Surprisingly enough, I resisted buying it for a multitude of reasons, including the lack of price on the display, even though I've been looking the top coats for a while.

Another reason I decided not to buy it was my realisation that I have a lot of un-blogged polishes and that need a go before I start buying polishes that you can only show once. Originally, this was going to be a splatter manicure but my first try was a disaster  and I ended up smudging it so much I couldn't save it.

Instead, I went for a simpler technique like a glitter gradient that I had never actually tried, successfully or otherwise. I started with two thin coats of Maybelline's Electric Blue and one coat of Seche Vite for quick drying. For the glitter gradient, I used a Leighton Denny polish in I Am Diva  and put a drop of this dense glitter near the cuticles and brushed it up the nail with the polish brush. I stamped my ring finger with Bundle Monster's plate in BM-206 with essence's Silver Twister. Topped it all off with Rimmel and Essie matte top coats, each in two fingers (can you tell the difference? I still can't!).


There are a lot of things wrong with this manicure. For starters, I was impatient with the Electric Blue and touched it to see if it had dried. It hadn't and I created a massive smudge. Second, the glitter gradient is very sparse to be considered such and lastly, the stamp is crooked and not centred, even though I tried really hard.

A much better angle for this mani.


I couldn't bear having two unsatisfactory (in my standards and probably a lot of others') manicures  in one day and decided to still post this. 


Squint your eyes and it doesn't look that bad.

Anyway, this is what happened when, after touching the wet polish, I tried smoothing with my fingers AND applying a coat of Seche Vite. I have found this topcoat can fix mistakes if applied quickly after the smudge has happened, unfortunately, it didn't work for me this time.  


I have come across a few pages in Pinterest where they recommend licking your polish into place. I always had the idea that polish shouldn't go anywhere near your mouth so I skipped that one.

Do you have a fail-safe fix for polish smudges? If you can't fix them, would you rather leave them or start over?

Till next time,

Laura

Sunday, 28 April 2013

Rainbow Foils and Waiting on Revolution

I love foils. Love how shiny they are, the variety of colours and effects you can achieve with them and mostly I love the fact that they are super easy to apply. Yes, they can take a LOT practice the get right, but once you get use to applying them they can look amazing. 

Last year I got a heap of them from eBay and Dollar Nail Store and was using them fairly regularly. The only problem, as most people that have used foils would know, is the fact that they wrinkle up like crazy and some of the shine can disappear when any sort of topcoat is applied. If you were like me and wanted to keep the shine/holo/3D/smooth effect, you would go without top coat and only sport the foils for a few hours.

Luckily, piCture pOlish has just come out with a new glitter base coat, Revolution, which also works to seal foils without wrinkling them. When I read about it in More Nail Polish, I almost fell backwards on my chair and ordered this base coat as soon as possible. Unluckily for me, I'm still waiting for my packet as I ordered the day before ANZAC Day. 

I couldn't really wait any longer and I brought out the foils anyway. I'm only going to bed after this, so if they get ruined, their memory will be held in this post.

Rainbow foils. Aren't they pretty?


You may or not be wondering, why I stamped on them without showing you the foil by itself. Well, I thought all the practice I had gotten would carry over even if I hadn't done it for a while, like riding a bicycle or ice skating. Turns out that wasn't the case and the foils looked terrible. I figured a good way to cover them up would be by stamping them. I was pleasantly surprised to see that indeed the mani looked a million times better with the stamp. I used Bundle Monster's BM209 plate with Konad Polish in Black. The stamp also makes them wearable for the day as it makes the mani a tad more subtle.

This is what the foils looked like without the stamp. Still very pretty colours but it was a baaaaaaad job. I might have to keep practicing until Revolution arrives. Very likely afterwards as well so I don't waste any precious top coat.


Anyone else crazy for foils? And so happy Revolution has finally arrived? I certainly will be when the mailman knocks on my door (hopeful with fingers crossed) tomorrow.

Till next time, 

Laura


Friday, 19 April 2013

Bejeweled: Take 2


I was supposed to have uni this morning but the floor where I was going to have class flooded and the class got cancelled. What is a girl to do with the time she would have otherwise spent commuting? Well, if you're reading this I'm sure you know the answer.

I present to you and uber-speedy manicure. I used two coats of Sally Hansen Gem Crush in Bejeweled, a small purple and larger pink glitter that takes two seconds to dry. Ok, maybe it takes fifteen seconds but you get the gist. I then applied Rimmel Pro Matte Finish topcoat but I didn't see a lot of difference as this polish dries fairly matte by itself.  Finished by stamping with Konad Special Polish in Black using Bundle Monster's BM-212 plate. I'm not sure what the motif actually is but the abstract look can also look good.


What do you guys think? I actually have done a post about 10 months ago with this polish but it was terrible! Think glittery cuticles, awkward hand position, a loooooooong post where I just kept blabbing on. You could say I'm trying to redeem myself with this one and hopefully the other one can be forgiven.

Either way, I love this polish and it's glittery goodness. I'm off to keep studying.

Till next time, 

Laura

Sunday, 14 April 2013

CoverGirl's Wine Stain

I have vowed to myself to only buy new polish if I have worked extra hours and the desired bottle has a shade I have nothing close to. Saying that, I still like going into Target and look around at the stands and see what's new. In my last trip, I came across CoverGirl's new range of nail polish which 'Dares to go topless with our new nail polish formula that combines a base coat, high gloss color, and a chip-resistant top coat in one simple step'. I must say their range of colours is not completely unique but there are a lot of pretty shades in the bunch of 45 options.


Since they were half price, $3.47 per bottle to be precise, I decided maybe I should go through the bin the polishes were in and get one or two. I ended up with three. So here's the first of the bunch. I present to you, CoverGirl's Wine Stain. Two coats and no topcoat. 


With a stamp, since this is how I wore it out. 


I don't think any other name could have described it any better. I love the deep colour it holds but that's not where it stops. This polish has an amazing formula that applies like butter and, could you please look at how shiny it is without topcoat? You could almost say it's a jelly but it's highly pigmented, not a lot of light goes through this polish, it just shines!

One other thing this polish promises is that you don't need to use a base coat, which in my case, I use to avoid nail staining since my nails are painted 99.99% of the time. As I was trying to clean up, I noticed this maybe a slight stainer. Ooops! I guess I'll have red bed nails for a while.

 Lastly, it should create a chip-resistant manicure. As I use my hands for manual work, I noticed a tiny little chip on my index finger after a day, but the rest lasted three days before I got bored and had to move on. Not bad either way. I also noticed this polish, even after a day, had a very squishy texture. This meant that there were small dents on the polish that weren't greatly noticeable but dulled the shine a little bit. Not an issue, but I hadn't come across this before, not even with actual jellies.
Overall, Wine Stain is a stunner. After a quick Google search on CoverGirl polishes, I found a lot of lacqueristas telling horror stories of previous polish releases by this brand. I must say I am extremely happy with this polish and would highly recommend it. As previously mentioned, they are ridiculously cheap at Target for $3.47 for 11ml or you can get them 2 for the price of 1 at Priceline. I don't think they've changed the stands to fit these polishes, so you'll find them in bins.

One last thing. I also love the shape of the bottle. It looks a lot like the Chanel bottles and I can tell you I have had a better experience with this.

Bottle shots for comparison.


Till next time,


Laura

Wednesday, 10 April 2013

Gold on Blue Stamping

I have discovered that blogging actually helps me with uni work. Sounds like a massive excuse for procrastination, right? Well, I find that blogging gets me writing and engaged in one particular task for longer than 10 minutes and, luckily,  I am able to transfer that set of mind to other things, in this case uni work.

So here's my 'I really need to read 150 pages of a textbook by next week' manicure. I used one coat of Sinful Colors' Blue By You, a beautiful, opaque, blue jelly full of tiny flakies that reflect light in light blue, aqua and green tones. Did I mention it was opaque in one coat and that the formula was amazing? This is the first time I tried it this polish and I would add it to the favourites straight away. I used Essie's Penny Talk for the stamping using Bundle Monster's plate BM-212.


That's it from me. I really need to get reading.

Till next time, 

Laura

Sunday, 31 March 2013

Happy Easter!

Whatever you were doing today, I hope you guys had a good break. Personally, I spent my day trying to come up with an Easter mani that didn't look too bad. 

Enjoy!

I used three coats of Face of Australia in After Dinner Mint and followed the leather technique to give it texture. Not that you can really make out what the motif is, but I used the bunny on an Easter egg  from the BM-302 stamping plate. I used Essie's Penny Talk, which dried extremely quickly on the stamper and had to attempt this a few times.

Till next time, 

Laura

Sunday, 27 January 2013

Simple Summery Mani


South East Queensland is being hit by ex-cyclone Oswald and as you can imagine the weather is dreadful. Don't get me wrong, it's very good to get the rain considering how dry everything was, I just wasn't expecting to all come down in one day.

Anyway, this mani came about because I wanted something bright compared to this gloomy day. 


Base polish:         L.A. Girl Matte Flat Finish in Matte Raspberry
Stamping polish:  Sally Hansen Diamond Strength in Antique Bronze
Top coat:            essence XXXL Gel-Look Top Coat

*EDIT* I forgot to put the stamping plate I used. Oops! Bundle Monster's BM-225, by the way... 


I know it's nothing too flashy but I like the fact that it is bright yet subtle.

Til next time, 

Laura

Thursday, 17 January 2013

Mimco At Your Fingertips

As you guys may be aware, the Australian brand Mimco came out with a line of cosmetics (think lipstick, bronzers and nail polish) in September last year. Yes, I know I'm late for the party but better late than never, right?

Mimco's description of their polishes, as it is on their website:

Glamour at the tip of your fingers, our Mimco Nail Polish is high performance and high coverage. A superior neon pink gloss finish with a quick drying time and a smooth self-levelling formula will have them eating out of the palm of your hands. Free from Formaldehyde, Toluene, Camphor & Dibutyl Phthalate. 

Not bad, so I just wanna show you a few swatches of the three polishes I acquired from this beautiful brand. 

Jade. A bluish dark green creme, not the most original colour, but it has one of the best formulas I've tried. The polish stays where you've put it, it does it so well I didn't need any clean up on the mani below, plus it dries QUICKLY. Another benefit is that it is almost a one-coater, if carefully applied. However, it is shown below with two coats and no top coat. Can you see how shiny it is? I also find that polishes of this particular shade tend to stain my bed nails. Not this one though. It is amazing! Big tick for this one.


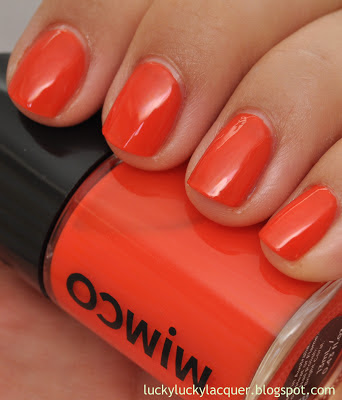
Bright Coral. It is bright but I wouldn't call it a coral. I would say it is more of a tangerine,  but I'm sure like Jade above, there was a reason for the name. This also has an amazing, quick-drying formula, though it is rather sheer, still a creme, just a sheer, shiny creme. If you look at the bottle you can sort of see how sheer it is. The swatch below was done with three thin coats and no clean up. Really shiny without top coat too. Another big tick for Mimco.


Riviera Blue. A very pretty baby blue with the tiny, tiny silver shimmer. If you look at the bottle below, you can see the shimmer just above the second M. Can you see it? Unfortunately, it doesn't show in the nail so I was left with just a plain creme. The formula was a little harder to work with than the two above but still pretty good for a light colour. I used two medium coats had to clean up around the cuticles a little. 


After all the swatching (very rare thing for me), I couldn't just leave Riviera Blue by itself and double stamped each nail with Essie's Penny Talk and Bundle Monster's BM-218 plate. The mani reminded me of Cinderella and her pumpkin carriage. Is that just me?


I bought this polishes just before Christmas for about $11 each at a retail shop when they had a $25% off sale. They are now retailing on Mimco's website for either $5, $9 and $15.95 + postage, depending on the colour and, as far as I've seen, they are still in stock at the shops for $15.95 each. Ooh, I forgot to mention, these polishes are Australian made!!!

Just in case, you are wondering what they look like, I've included a photo below. And in true Mimco fashion, they were given to me in a little black, satin pouch. I am impressed. Apart from the not-so-original colours, I'd put these Mimco up there with the luxury brands. Ok, I don't own a lot of the luxury brands but I could compare it to Illamasqua formulas. Yes, I went there.


So, if you are looking for a little luxury from the renowned brand without blowing the budget (who wants to pay $30 for a hairpin?), I would highly recommend these polishes. 

Til next time, 

Laura

LinkWithin

Related Posts Plugin for WordPress, Blogger...