Showing posts with label XXXL Shine Gel-look Top Coat. Show all posts

Wednesday, 28 August 2013

The Awesome Topcoat: From Almost Trash To This Post

There's a series of events that led me to discover one of the best topcoats I have tried but that unfortunately may not last. Hang on with me for about three minutes and I'll try to keep you entertained.

1. I decided to clean up four old dried up topcoat bottles so I could have them for frankens. I started with Sally Hansen Insta-Dri that had about a quarter of the topcoat and put a similar quantity of acetone. Why I didn't put acetone in all the bottles at the same time is beyond me but I'm glad I didn't and I wasn't trying to be resourceful at this point.

2. A couple of days after, when the topcoat had dissolved in the acetone, I decided not to waste anymore acetone and just added what I had in the Sally Hansen bottle into the essence XXXL Shine Gel-Look topcoat that had dried up to a thick, unusable goop. I left it for a few days before I came back to it.

3. In the mean time, I created my first mildly successful franken using Sally Hansen Gem Crush in Lady Luck and Ulta3 in Black Satin in similar quantities. I mixed it up and came back with this. What do you reckon?


Imagine the silver glitter is actually purple, smaller and denser. Does it remind you of any textured polishes?


Wanna have a guess if I show you a close up? I liked the result even though it wasn't that similar so I should call it Stay For Lunch (I hope I'm being funny here!). This little experiment made me realise that I actually don't own any textured polishes even though I've been lusting after them since December. :(


4. I went to Mecca Cosmetica because I felt like splurging a little on some nail strips or polish. Regrettably for me, the prices in there were a little too splurgy for items or polish I knew I could get cheaper somewhere else. I'm talking specifically about The New Black set that has some studs and 15 ml of polish for $42!!! It looks cool, but really $42?, I don't think so. I also saw 6 diamonte nail bows with nail glue for $15.95. I guess I'm a Born Pretty Store kinda gal rather than a Mecca Cosmetica one. :/

5. After my outing, I decided to use my untrieds, group in which my franken was included. I put it on and enjoyed it for a whole two days before I was itching to do something nail art on top of it. 

6. My Seche Vite was running out and only had enough for a couple of manis left, so I had to be frugal with it.

7. I grabbed the essence bottle and noticed the liquid inside had a similar consistency to a normal topcoat. I tried it on top of Stay for Lunch (have I got you hooked?) and to my surprise it made it smooth and shiny with just one coat and it dried to the touch within the minute. Had I just franked a topcoat too?!  


If you ever used this Essence topcoat you'd know it was a life saviour for topcoat-hungry glitters and it would have a squishy texture when dry but it would take hours and hours and h-o-u-r-s for that to happen. Sally Hansen Insta-Dri dried super quick and prevented chips for a few days but it took a few coats to even out glitter or nail art. Had the best properties of both topcoats came to life when I mixed them up? So far, it looks life it! I've tried it on a few other polishes and it still works fine. My only concern is that the acetone may change the topcoat for the worse in the long run and this topcoat won't be usable anymore. 

So the moral of the moral of the story is I created an comparable-to-Seche-VIte topcoat with a third of dried up Sally Hansen Insta-Dri, a third of goopy essence XXXL Shine Gel-Look topcoat and a third of acetone, roughly. I was just going dispose of the liquid (safely, of course!) if I hadn't tried it. Plus, all those events I mentioned above finally led me to this stamping mani. I know that's not the point of this post and it's not my best work but would you look at how shiny and smooth it is with and extra coat of The Awesome Topcoat. 


This top coat is sooooo squishy but it doesn't leave dent marks like other topcoats and it doesn't make the polish peel off because of the thickness (Looking at you Seche Vite...). Please excuse the dodgy stamping job.


I hoped you stuck around for the three minutes and that I didn't bore you to tears. :)

Have you ever tried mixing topcoats into a same bottle? Any favourable results? Or bad ones? Would I have any luck with the longevity for The Awesome Topcoat? Are you sick of the word topcoat yet?  I almost am. 

Till next time, 

Laura 

Sunday, 27 January 2013

Simple Summery Mani


South East Queensland is being hit by ex-cyclone Oswald and as you can imagine the weather is dreadful. Don't get me wrong, it's very good to get the rain considering how dry everything was, I just wasn't expecting to all come down in one day.

Anyway, this mani came about because I wanted something bright compared to this gloomy day. 


Base polish:         L.A. Girl Matte Flat Finish in Matte Raspberry
Stamping polish:  Sally Hansen Diamond Strength in Antique Bronze
Top coat:            essence XXXL Gel-Look Top Coat

*EDIT* I forgot to put the stamping plate I used. Oops! Bundle Monster's BM-225, by the way... 


I know it's nothing too flashy but I like the fact that it is bright yet subtle.

Til next time, 

Laura

Thursday, 1 November 2012

The Gold Crackle

I'm sure I'm not the only one that got caught in the crackle fad and bought a heap of different colours because the black one was so cool and innovative. Well, now that phase has well and truly passed and I have don't-want-to-count-how-many bottles of crackle, I thought I start getting creative with them. 

I saw this video a few weeks ago and this is what prompted me to get the crackles out and work with them in a different way. I really loved how shiny the glitter in OPI Gold Crackle and decided to work with that one. First I tried to paint it on sticky tape a la The Beauty Department but I found, once dry, the polish was inflexible and would come off the tape. I tried cutting this dried polish into shapes but my hands and scissors were too big for the strip, so I just ended up crushing it and throwing it in the bin.

I also tried stamping with it but it was a major fail. Lesson learnt.

Today I came across this other blog, Konad Addict, where the crackle polish is sponged onto the nail with some rather amazing results. Yes, I am using other people's ideas but I really have no practical creativity, which I guess this blog may help me out with( I hope).

So here it is, my sponged-on crackle over pink. It is so sparkly and shiny in real life I can't stop looking at it. The combination of colours also reminded me of a Disney princess or Barbie colours. It is sooooo cool even though it looks like a normal glitter gradient. I didn't really crack either. There's only two minor ones on my index finger.

Polishes used:

Gold: OPI in Gold Crackle
Pink: OPI in If You Moust You Moust
Top Coat: Essence XXXL Shine Gel-Look and Sally Hansen Insta-Dri


The photos don't do the glitter justice on how sparkly it is and that pink, that pink is  impossible for me to photograph. I've tried every setting and light possible but to no avail. The middle photo would be the closest I managed to get it to the actual colour.

That's all from me today.

Till next time, 

Laura

Tuesday, 3 July 2012

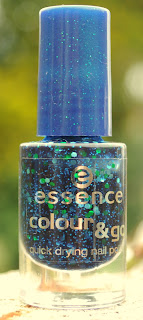
Essence Blue Addicted

Oh, the world of dupes! Lower priced bottles of polish that as look as AMAZING as what you are supposed to, how I love thee!

I acquired my little bottle of Essence Blue Addicted a few months ago. The was no real reason for the purchase, other than the blue and green hexagonal glitter suspended in a dark blue jelly and further mixed with royal blue glitter (descriptive enough?) absolutely blew my mind. And for $3.55, I couldn't go wrong.

When I got it home, it was left on display so I could admire its beauty but I didn't actually use it. Through all my blog stalking, I found  this little shade was actually a dupe for Across The Universe by Deborah Lippmann. I'm not one to stalk brands and pay ridiculous prices just because a brand has come up with something new. If I love the colour, I will buy it. Cheap or not-too-expensive, I'm there. 

However, after I found this out, I was quite happy to know that I could fake a little luxury if I wanted to.

Swatch below was done with three coats of Blue Addicted and one coat of Essence XXXL Shine Gel-look Top Coat.


And a photo of the bottle, even though you know what it looks like.


That's all from me (What? No ranting from me today?). 

Until next time,

Happy polishing!!

Monday, 25 June 2012

No Glitter Jelly Sandwich Here


I think this post will be one of lots of confessions of my nail polish fascination. The first one would be the fact that I loooooooove the way glitter jelly sandwiches look (you know, one layer of sheer polish, one of glitter, one of sheer polish?). Every time one pops up in a blog, I can sit there looking at the pictures and find every sort-of-hidden piece of glitter in that particular manicure. Why haven't I done one? To be completely honest, I have about 30 untried polishes (would that be confession number 2?). I feel like I need to start using those before I revisit any of my older ones that I know would work for that particular look.

While looking through my polish drawers, I found one of my untrieds that was very glittery, Sally Hansen Gem Crush in Bejeweled. I have this sort of compulsion at the moment where, if my nails are bare, I need to apply polish immediately, otherwise... I'm not sure what would happen, since I usually give into the urge. So on the Bejeweled went  without hesitation and I thought I could create some sort of jelly sandwich with it. After applying the first layer, I realised I had the order of the polishes wrong, decided to abandon the idea and just enjoy the one-colour-of-polish-at-the-time experience. 

Once two layers of Bejeweled dried, I looked at my nails and came to the conclusion that such glittery, pale colour didn't suit my skin. I went back to the polish drawers and found a more colourful glitter to put on top, which ended up being Sally Hansen Xtreme Wear in Rockstar Pink. I liked the look but the holographic glitter in Bejeweled got lost with the Rockstar Pink. I applied a last, very thin layer of Bejeweled and this was the final result.


I guess this would be bring me to my third confession. I don't plan what I'm painting on my talons 99% of the time. If I ever do, it turns out completely different or I don't end up liking it, so spontaneity is usually the key for me.


Anyway, we're all here for polish, not confessions. I'm sure you've seen the bottles around but I'll show you again just because I can.


The Gem Crush polishes came with a flat, stiff, medium length that is AMAZING for picking up the glitter. No having to fish for it or lay the brush really flat and hope that the glitter will stick to your nails. Sally Hansen has done a good job with this one. 


Now, after all the blabbing, here's a picture of how the transition of this mani happened. On the left, two layers of Bejeweled, in the middle, one coat of Rockstar Pink over two coats of Bejeweled, and finally on the right the creation of the glitter glitter sandwich (was that a creative name or what?).


This extremely glittery mani was also extraordinarily gritty. I'm hoping the two photos below can show the difference. On my left hand (left photo), I applied three thick coats of Essence XXXL Shine Gel-look Top Coat and the grit could still be slightly felt. On my right hand (right photo), I didn't apply any top coat and I think you can see the difference. 


Not sure if you noticed from the pictures above but my right hands looks a little rugged. This would be confession number four. My right hand usually goes without moisturiser, base or top coat and when I painted them the polish goes all over cuticles and fingers. It's not gonna get photographed, so it can be left untreated, for lack of a better term. Oh no! Not after this pictures. My right hand will be treated with as much love as the left. After all, it does most of the work...


And last but not least, I hate nail polish remover. I dread the moment when I have to take out the cotton and soak it on that smelly, irritating substance that removes the beloved polish.  When I applied all the glitter above, the first thing that popped into my head was the fact that at some point I would have to remove it. Well, that's what happens when one wants to sparkle. No pain, no gain.

Fortunately for me, all the grittiness with no top coat cracked in day at work. The below photo was taken on my lunch break because I felt it wasn't going to last the whole day and I wanted to show you. *Warning: The following image might disturb polish lovers.* 


My shoulders now rest lighter getting all that off my chest and I can breath easily (since I didn't have to unpolish one hand!). I hope I haven't bored you though.

Until next time, 

Happy polishing!!

LinkWithin

Related Posts Plugin for WordPress, Blogger...