Showing posts with label Studs. Show all posts

Thursday, 6 March 2014

GOT Polish Challenge: Skittle

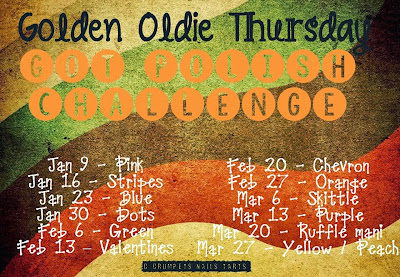
For today's GOT Polish Challenge theme, I brought out all older-than-a-year supplies (minus topcoat) to create a skittle. This design is a variation of one I had done back in Sep 2012, so the whole mani turned out to be an oldie but goldie!


I started with two coats of Revlon's Fire Fox, which was reviewed and praised here, and let it fully dry. I then stamped a flowery motif from a set of Konad-dupe plates from Born Pretty Store with Konad Special Nail polish in Black and top coated all my nails with HK Girl Top Coat. Once dry, I applied three Dollar Nail Art black studs on my middle finger and surrounded them with some gold studs I got from from BPS. I walked around the house for a while with my pinky and index finger bare for about an hour as I didn't know what to add to tie up the skittle and make it look coherent. I finished by adding a small L shape with the same gold studs I'd used on my middle finger.


I got Fire Fox, the set of plates and the studs some time around September 2012 and I actually recreated a similar mani, which I did not photograph or have any record of, but I'm pretty sure it went something like this.


What I liked the most from that similar mani was the way Fire Fox shone through the very opaque stamping polish. Look at all that pretty shimmer! I really couldn't stop looking at it.


I didn't secure the studs with any topcoat so they have already come off and taken chunks of the red polish with it so I'm gonna go paint my nails for next week.

Till next time, 

Laura


Thursday, 9 January 2014

GOT Polish Challenge: Pink

In my endeavour to post three times a week, I have chosen to take part in the Golden Oldie Thursday Challenge from The Crumpret's Nail Tarts group on Facebook (rules at the bottom of the post) as an incentive. I have a lot of polishes that have been left on the back burner as new pretty, mostly textured polishes have come into play, so this challenge seems to be a really good way to re-shopping the stash. 

For this week, I chose two Nails Inc pink polishes I got in a mini-bottle gift pack from some UK Black Friday sales. That's how I know how old they are and that they are both the same age, I also know I have tried them but haven't blogged about them. On my ring finger, I'm wearing three coats of Elizabeth St, a creamy pink nude that is quick drying and one of the better nudes I own. On the rest of my fingers, I wore four coats of Notting Hill Gate, a neon pink, which is nooooot colour accurate in the pics below. I didn't mind doing so many coats as each one didn't take very long to dry and with the help of Seche Vite, all four coats were dry to the touch within 10 minutes. I forgot how good neon colours can look against my skin so I might bring them out more often, plus it's summer on this side of the world. What better time to use them, right?


I knew I wasn't gonna be able to leave the plain colours, as pretty as they are, and I added some water decals and triangular studs I got from eBay. I went for a tough/sweet sort of look and I'm not quite sure if I achieved it but I am happy with the result.


Wanna check out some more pink manis? Click on the links below; there are some talented ladies in this challenge.


Till next time, 

Laura

Monday, 6 January 2014

It Was On A Starry Night...

You may be familiar with 'Dia de los Reyes Magos' or Day of the Three Wise Men, which is celebrated in some Latin American countries and parts of Europe on the 6th of January, as far as I know. The Wise Men would be the ones that would bring presents to kids instead of Santa Claus, however, the custom has changed, depending on who you ask and some kids get presents on Christmas and today. The adults get to eat 'rosca de reyes', a cake in the shape of a ring with crystallized/glazed fruit and whatever other food the host of the wants to serve. On the nails, I figured showing the star that guided the Three Wise Men to Baby Jesus to give them the gifts would be suitable for the occasion. I must be honest though, I intended to post this at Christmas time but never got around to writing up the words for the photos but it turned out for the better.

I  started with two coats of Butter London's Union Jack Black and saran-wrapped one coat of Max Factor's Extra Frost to create the night sky. I let that dry and used striping tape to create a thin triangle along three of my fingers to create the tail of the star... or comet, whatever you wanna call it, and used Essie's Good As Gold to colour it in. Topped it all off with one coat of Seche Vite.


I had some gold star studs but the mani would looked a bit odd with two different tones of gold so I painted the star with the Essie polish and let it dry for about half an hour. I had to bend the star a little bit so it would fit properly on the nail without snagging onto e v e r y t h i n g like some larger studs tend to do if left flat. I attached it with a drop of Seche Vite but I did it when it wasn't quite dry/tacky so I got some of the Good as Gold on the base. 


That could be considered star dust from the comet... Yeah... It could.


I had a bit of trouble photographing the prettiness of this mani so I tried it with sunlight (photos above) and in the lightbox (photo below). Oh! I also dented my index finger twice, once with a ring because I thought it would be a good idea to take off a ring while the polish was still tacky, and the second from moving my hands around normally.


I was really happy with the way this mani looked, the depth of the 'sky' and the continuity of the comet's tail did it for me. I even kept this for FOUR days. 

Hope you guys have had a good and safe holiday season. Here in this part of the world we've been having 40 degree days, which feels totally like summer.

Till next time, 

Laura.

Wednesday, 11 December 2013

33 Day Challenge: Freestyle

This post has been sitting in Blogger waiting to be written up for a few days but I wasn't that keen on the manicure. I wanted to do something amazing for the last day of the 33 Day Challenge so I brought out the foils and tried to create a skittle. Tried, the final result was very underwhelming even from far away. I present to you  a foiled, studded tape mani. Woot!


I started one coat of Ulta3's Black Satin, let it dry then applied one thin coat of nail foil glue on my ring and taped-up middle fingers. I let that dry and did applied a rainbow foil at random to give it a slight grungy look. I topped this two fingers off with one coat of Picture Polish Revolution and finally applied the studs with a drop of top coat. I topped all my fingers off with one coat of Seche Vite. 


The studs moved around when I was applying the last coat of Seche Vite so I had push them back into position with the brush and they ended up a little crooked. :( I'm not gonna go into too much detailed about the taped middle finger but let's say it took me three attempts to have a passable design. 


As underwhelming as this design was, I am super happy to have participated in this challenge. I have seen some amazing nails art, discovered some new blogs and met some lovely people that are encouraging and just absolutely great. I have also managed to push myself through (most of) a challenge and created designs I wouldn't have otherwise. There's also my new found love for nail art, which I want to be the focus of this blog from now on. 


Anyway, check out the other participants' last mani for the challenge. 


It was a pleasure lacquering with you all!


Till next time, 

Laura

Friday, 15 November 2013

33 Day Challenge: Art With The Colour You Own The Most

The colour I own the most? I thought it was gold. I always assumed gold was the most numerous in my collection so I went ahead and created the mani below. After I had a red stage a couple of years ago and after I started this blog, I moved onto gold and then to blue. Well, turns out the gold phase lasted less than the blue one and I have about three more bottles of blue than I do of gold. Considering I have over 350 polishes, I figured that a .09% margin error wasn't a big deal, right?

Once I had eyed my collection and decided that gold was the most prominent one, I took my trustworthy Sally Hansen Xtreme Wear in Golden-I. I've used up about half the bottle but surprisingly (for me, at least), I have only shown in in the blog once before this post and only as part of nail art. 

I wanted to keep this mani simple and I've been wanting to do stud-framed nails for a while so I figured today would be the day to do it. I started with two coats of Golden-I and one of Seche Vite before applying nail foil glue on the edges of my nails. I let it dry and got myself sticking some gold 'laser' studs (I got them from this eBay seller) and luckily they fitted nicely enough around the perimeter of my nails. 


I got a bit photo happy so I'm gonna leave you with some photo-spam. Enjoy.


I know it's nothing spectacular but this was a fun mani to wear for as long as the 85-odd studs stayed on their place. Check out the other participants' manis for today's prompt.


Till next time, 

Laura

Wednesday, 16 October 2013

33 Day Challenge: 3D

Oh yes! Day 11 of the challenge has come. I love sticking stuff to my nails and when I came across this manicure at the beginning of September, I knew I wanted to recreate it. And recreated it I did. Everything minus the zebra nail. I also did this a couple of weeks ago, which means I won't be late for the 3D prompt. Yay!


I used two coats of Sinful Colors in Blue By You and one coat of Seche Vite as a base. On the ring finger, I applied one coat of Ulta3 in Clear and got myself sticking differently shaped rhinestones at random. I made sure the 6 or 7 colours I used were distributed on the nail and that I didn't end up with the same colour rhinestone adjacent to each other.


I got really picture heavy in this post but there is another version of the manicure after the break.

Friday, 11 October 2013

33 Day Challenge: Indian

I had all these wonderful ideas for today's challenge prompt but none of the great ones turned out great or made it to the nails. I chose to interpret Indian as 'from India' and considering how rich the culture is, I had no problem coming up with ideas (after a bit of Googling). There was going to be tigers but that didn't work, I moved on to flowers then jewelry but I had to settle for a fabric pattern I found on Pinterest. It turned out better when I close the browser before saving the pin and I had no way of showing you. Anyway, this is my interpretation of Indian. 


I started with two coats of CoverGirl's Wine To Five and BADLY free handed some gold reeds with A Piece Of Forever from Essence. To stick the studs, I applied a coat of Ulta3 in Clear but as I mentioned before, this dries up way too quickly and I have to keep applying coat upon coat. I had a look at my very small stash of topcoats and saw my nail foil glue. I figured it would work for the smaller studs as it would stay sticky for a while anthe adhesive was strong enough. Oh goodness! Why didn't I think of this earlier? I applied all the studs on my middle finger without having to reapply the glue. When I was done, I applied a top coat to seal all the studs in and get rid of any stickiness that was still lingering around.

I liked the way it looked without top coat better but I managed to get some fluff stuck on the glue on my ring finger. You can see below. At least I learnt to work continuously when I'm working with it. I applied one coat of Seche Vite on all my fingers.


I'm not in love with the design from up close, it's a bit crooked and the little round studs bled their colour when I applied top coat but I discovered another use for nail foil glue in nail art. Oh! And the need to keep practicing my free handing skills.

Check out the other ladies participating in the challenge.


Till next time,

Laura

Wednesday, 9 October 2013

33 Day Challenge: Chevrons

I'd like to think I'm pretty good at doing chevrons. I love tape, I've done chevrons heeeeaps of times with it, I even free-handed some not long ago and they looked decent. So when I had to have four, maybe five goes, at today's prompt, I was a bit surprised with myself.  I decided to take the extremely simply road of stamping and stud-sticking. Could this wrong too? Thankfully, it did only a hardly noticeable bit.

I used two coats of Sally Hansen's Scarab and one coat of Seche Vite as a base. I stamped the chevron pattern with Bundle Monster's plate in BM-201 (did I need to state that?) with Essence in A Piece Of Forever. Simple enough? I managed to miss the tip of my index finger but I just kept going. I applied a coat of Ulta3 in clear and started sticking these 2 mm square studs from Born Pretty Store in a chevron pattern. At this point, I top-coated the stamped nails but not the ring finger. After my last attempt top-coating studs, I've learnt to take photos before I do. I have now top-coated it because well, no one wants nail studs in their dinner, do they?


So there you have it, my interpretation of the chevron pattern. I would call it Rustic Studded Chevrons. Any imperfections *cough*crooked studs*cough* just add to the rustic feel of this mani, like vintage jewelry...


Close-up because I wanted one and that studded chevron was too... rustic. That one is better appreciated from afar.


I actually have (what I think is) a good idea for the next prompt, Indian. Until then, check out some of the other ladies from this challenge. There are some good manis below.


Til next time, 

Laura

Tuesday, 8 October 2013

Born Pretty Store Leaf Shaped Studs

I've been building up a healthy collection of studs lately so when the opportunity arose, I put my hand right up and asked to review these leaf shaped studs from Born Pretty Store. I loved the variety of neon and pastel colours and they seemed versatile enough to create lots of designs. Best bit? They come in a wheel. I'm terrible at spilling studs all over the place when they are in bags. Does that happen to anyone else? No? OK. Either way I'm so very glad they came in this handy little package. 

When I got the my hands on the little wheel, the only design I could think of was flowers. It seemed like an obvious choice so I put some more thought into it and it felt like I had a light bulb moment. Rainbows? There wasn't enough room. Fireworks! It would be awesome to recreate fireworks and I could still use rainbow colurs. Here's my take. Please note that these pictures are colour inaccurate but you get an idea of what can be done with these studs.  


I started with one coat of Models Prefer in Hickory Dickory, a dusty blackened out navy blue, and topped my index finger, thumb and pinky with a coat of Seche Vite. To prevent any smudging/bumping/having-to-redo-any-nails, I waited for the topcoat to dry completely and proceeded to apply Ulta3 Clear on my middle finger. I got myself sticking studs from the bottom in a fan out design without waiting for the clear polish to dry. I picked Ulta3's Clear polish because I thought it would be a slower-than-topcoat drying polish but it dried before I was done with one nail and each nail only took me a little over a minute. I've had topcoats that dried slower than that but I have run out so I just kept adding fresh thin coats of Clear until I was done with the nail. I mirrored the design on my ring finger to simulate the fireworks on a dark night.


Stock image of 'Multi-coloured light sphere on a black background'
Source
Looks the same, yeah? Actually it reminds me of this... Sort of.


Tie Dye Spiral Bandana
Source
I knew that if I didn't topcoat the studs, they would end up falling out within the hour and I really liked the look, so I applied one thick coat of Seche Vite on my ring and middle fingers. This is where the mani went pear shaped. A lot of bubbles started forming around the studs and there was nothing I could do about it!!! I just had to watch it fail...


I went out to the sun to take photos because natural light is very forgiving on those little details. Do me a favor, squint your eyes while looking at the following pic. Doesn't that look good? :)


I still wanted to get a colour accurate picture so I went back to the light box. It still isn't showing the exact colours but it's better.


These studs should glow under black light but I don't have the equipment to test it out. I might have to invest on one. 


Putting the topcoat bubbling fiasco aside, I'm really happy with these manicure and the studs. They are sturdy, the colour doesn't bleed, they are small enough to fit a heap on your nails but big enough to not be fiddly and you get 300 pieces per wheel. I had a tiny bit of tip wear on one of the orange studs on my middle finger after about 12 hours, I'm not sure if it was my application or the quality of the studs. I haven't had any issues with the rest of the studs. The wheel is discounted at the moment for $5.59 here (or you can click on the photo below). 

300pcs 2*4mm Leaf Shape Fluorescent Candy Colors Stud Rhinestones Nail Art Decoration w/box


If you are placing an order and haven't found one in any of the other million blogs that have a BPS store coupon code, feel free to use ours to receive 10% off full priced items.


Till next time, 

Laura


Disclosure: 
Affilliate Link. 
Studs were sent by Born Pretty Store for honest review. 
All other products featured were purchased by me.

LinkWithin

Related Posts Plugin for WordPress, Blogger...