Showing posts with label Sally Hansen. Show all posts

Thursday, 27 February 2014

GOT Polish Challenge: Orange

I'm back on the challenge after a two week hiatus, I'm not super excited about these nail but I knew I had to get myself back on the GOT wagon. 

I actually didn't think I had Golden Oldie orange so I had to have a double look through the rack, which led me to realise I had this beautiful colour Tangelo by Ulta3. I'd also been wanting to do these nails by Pshiiit for a while so today was as good of a day as any to try it out, or so I thought.

I started the base with one coat of Sally Hansen in White On and one of Seche Vite, let that dry and taped off the triangles on the free edge of my nails. I used one coat of Tangelo and ripped off the triangles asap before adding some lines along the inside of the triangle with Sally Hansen's Lustre Shine in Lava. Once all these layers were dry, I used my  black Sally Hansen Nail Art Pen to create the edges and patterns. Topped it all off with a coat of Seche Vite.


After I finished this manicure, I realised my Golden Oldie orange was actually Carrot Top and not Tangelo. They sit next to each other on the rack and Tangelo was the closest to me. Would I call that lazy? Maybe. Then I had to check when I had gotten Lava, turns out I got it about 10 months ago so it doesn't really fall in the category of the GOT. BTW, neither of the two oranges showed to be colour accurate in the photos.


To add to the nail fail of today, I noticed there were some cracks on the black paint. I can't quite remember if that has happened before but I'm sure I will remember now.


So that's my go at orange tribal nails. I know I haven't them any justice so I'm tagging this post as an official Nail Fail. :) Let's hope I can come up with something good for the rest of the challenge.

Till next time, 

Laura


Tuesday, 18 February 2014

YouTube Inspired...

Hello, hello! I'm sporting a couple of broken nails and it might be a while before they recover to a bloggable length so I'm bringing out some manis from the vault. 

We all love nail art, right? That's the reason why we are here on this wonderful thing called the internet right now. Not to be left behind, big cosmetics companies have jumped on the bandwagon and created YouTube channels to promote their products. I enjoy watching beauty/nail vloggers on the video-sharing website but all the Google algorithms have caught up on this preference of mine so I'm constantly bombarded with the aforementioned companies' ads and videos. I usually skip them as they lack the genuineness and creativity of the vloggers and they seem over-stylised which really puts me off; there's a reason why I'm on YouTube and not on your site!

For some reason or another, I ended up watching one and liked the colours they had shown together. Being the rebel I am (teehehe), I didn't go buy their products but instead used some older polishes from different brands to recreate the very simple tape mani they had presented.

I started with one coat of Maybelline Mini Colorama in Peach Cocktail, let it dry then taped off half my ring finger nail and applied one coat of Max Factor Mini in Purple Haze. I added a coat of Seche Vite to all my fingers and let it dry before applying stripe of Sally Hansen's Big Money over the very rugged edge I created on my ring finger. 


Tadah! Super awesome and original. 


The highlight of this mani was actually reusing Peach Cocktail. When I bought it a few years ago, I had no idea what a good formula was but I remember it being runny and having to use a 2-3 coats to get it completely opaque. This time it applied in one beautiful, buttery coat and the flakies/shimmer still showed up within the depth of the polish. Man... this polish has turned out so good, I didn't even have to clean up. I can just hope all my bad formula polishes do the same in a few years.

Is that shimmer on my thumb? At least you know, I don't retouch my pics...


If anything came out of watching that nail-polish-company YouTube video was the rediscovery of some cool polishes. And also having some vault manis for rainy days. I'm still gonna avoid them as much as I can though.

Till next time, 

Laura


Thursday, 16 January 2014

GOT Polish Challenge: Stripes

When I saw the 'stripes' prompt for this challenge I knew exactly what I wanted to do and I did it, but it didn't turn out quite the way I was imagining in my head. I took photos of it and all but I don't think I'm ready for it yet. I'll leave it for later... I started again with naked nails and brought two older polishes that I knew I liked and went well together. 

For the base I used two coats of Ulta3 in Bouquet, a lovely fuchsia crelly with lots of blue shimmer which was purchased at the beginning of 2012 for about 50c. I then brought out the striping tape and created an unintentionally uneven diagonal stripe pattern on middle and ring fingers. I used Sally Hansen in Bejeweled for the textured stripes and created a glitter gradient with the same polish on the rest of my fingers. I topped my pinky and index with a coat of Seche Vite.


Bejeweled was one of the first swatches I did in this blog back in June 2012 but it was so terrible I redid a swatch here. It's always been one of my favorite polishes because of the combination of colours, how quickly it dried, the relative easiness to remove this super packed glitter and the texture. I liked the way the glitter didn't sit smoothly on the nail and I believe this is the polish that started my luuuurve for textured polishes, even though this isn't labelled as one.


This was a bit of a rushed job but I'm still happy with the way it come out, I can't stop running my fingers over this textured stripes. 


Check out the rules for this challenge and other striped manicures below. There are some real winners in the.


Wednesday, 9 October 2013

33 Day Challenge: Chevrons

I'd like to think I'm pretty good at doing chevrons. I love tape, I've done chevrons heeeeaps of times with it, I even free-handed some not long ago and they looked decent. So when I had to have four, maybe five goes, at today's prompt, I was a bit surprised with myself.  I decided to take the extremely simply road of stamping and stud-sticking. Could this wrong too? Thankfully, it did only a hardly noticeable bit.

I used two coats of Sally Hansen's Scarab and one coat of Seche Vite as a base. I stamped the chevron pattern with Bundle Monster's plate in BM-201 (did I need to state that?) with Essence in A Piece Of Forever. Simple enough? I managed to miss the tip of my index finger but I just kept going. I applied a coat of Ulta3 in clear and started sticking these 2 mm square studs from Born Pretty Store in a chevron pattern. At this point, I top-coated the stamped nails but not the ring finger. After my last attempt top-coating studs, I've learnt to take photos before I do. I have now top-coated it because well, no one wants nail studs in their dinner, do they?


So there you have it, my interpretation of the chevron pattern. I would call it Rustic Studded Chevrons. Any imperfections *cough*crooked studs*cough* just add to the rustic feel of this mani, like vintage jewelry...


Close-up because I wanted one and that studded chevron was too... rustic. That one is better appreciated from afar.


I actually have (what I think is) a good idea for the next prompt, Indian. Until then, check out some of the other ladies from this challenge. There are some good manis below.


Til next time, 

Laura

Thursday, 26 September 2013

September Tri-Polish Challenge Day 4

Today is the last day of the September Tri-Polish Challenge and I was tempted to skip this post. I did some sugar spinnning for the first day of this challenge last week  but managed to smudge it badly before it was completely dry. I thought I could try it for the last day of the September challenge and there wouldn't be much problem. I went to work on some sugar spun nails again this morning but they were terrible!!! 

I'm not one to give up easily so I had to come up with a new design quickly. I remembered we could used black, white, silver and gold as well as our three chosen colours. I figured I could use a nail art pen I've had laying around for a while but hadn't used. To be completely honest, I have never tried free hand nail art. Today seemed like a good day to start. 

Here's what I came up with. I used two coats of Essence in Absolutely Blue on my index finger and pinky, two coats of China Glaze in Sweet Hook on my ring finger and one coat of Sally Hansen Insta-Dri in Sonic Bloom on my middle finger and thumb. I then used one coat of OPI Matte Top Coat on all my fingers. This was mostly done for the black nail art pen to grab onto the base as I have found that it slides right of anything slightly smooth. I taped my ring finger off to create the diamond shape using Layla in Metal Chrome. I used the same polish to create two dots on  my index finger and pinky. Then, my masterpiece (Haha! I wish) came to life. I created two diamond outlines using Sally Hansen Nail Art Pen in Black but managed to push it a little to far into the base polishes, which created uneven lines. 


I couldn't quite figure how to take photos of my hands upside down and make them look good so I just flipped my normal pose photos on Picasa. I guess that's a skill I'm gonna have to acquire.


If you've ever used a nail art pen from Sally Hansen, you may know they are basically acrylic paint in a handy package.  If you've used it without a top coat, you'll know they can smudge easily or wash away with some soap and water. I had to bring out my clear top coat to seal it as I wanted to wear this for a few days. I also know the black can smudge quite easily if the top coat is not applied correctly so I dabbed on some Sally Hansen Insta-Drip topcoat finish the mani. Unfortunately, I ended up with bubbles from the thickness of the last coat but it's hardly noticeable in real life.


Putting my rough lines aside and top coats bubbles, I quite like this mani. I'll just have to keep practicing this free handing business.

Check out the other entries to this challenge.


Till next time, 

Laura

Sunday, 15 September 2013

Sally Hansen Kook A Mango

Quick post to show you a NOTD, thing I haven't done before.

Today I'm wearing Sally Hansen Complete Salon Manicure in Kook A Mango, a orange leaning coral with an OK formula. I used two coats with no top coat.


I LOOOOOVE cacti flowers but they ony come out once a year on each cactus for a few hours of each day of the wek or so they bloom. I just happened to be taking photos ou†side (!) of this mani  and thought to include them.

Moral of this post: I lke cacti flowers,coral polishes for quick manicures and spring. I am a hapy woman.

Till next time,

Laura

Follow my blog with Bloglovin

Wednesday, 28 August 2013

The Awesome Topcoat: From Almost Trash To This Post

There's a series of events that led me to discover one of the best topcoats I have tried but that unfortunately may not last. Hang on with me for about three minutes and I'll try to keep you entertained.

1. I decided to clean up four old dried up topcoat bottles so I could have them for frankens. I started with Sally Hansen Insta-Dri that had about a quarter of the topcoat and put a similar quantity of acetone. Why I didn't put acetone in all the bottles at the same time is beyond me but I'm glad I didn't and I wasn't trying to be resourceful at this point.

2. A couple of days after, when the topcoat had dissolved in the acetone, I decided not to waste anymore acetone and just added what I had in the Sally Hansen bottle into the essence XXXL Shine Gel-Look topcoat that had dried up to a thick, unusable goop. I left it for a few days before I came back to it.

3. In the mean time, I created my first mildly successful franken using Sally Hansen Gem Crush in Lady Luck and Ulta3 in Black Satin in similar quantities. I mixed it up and came back with this. What do you reckon?


Imagine the silver glitter is actually purple, smaller and denser. Does it remind you of any textured polishes?


Wanna have a guess if I show you a close up? I liked the result even though it wasn't that similar so I should call it Stay For Lunch (I hope I'm being funny here!). This little experiment made me realise that I actually don't own any textured polishes even though I've been lusting after them since December. :(


4. I went to Mecca Cosmetica because I felt like splurging a little on some nail strips or polish. Regrettably for me, the prices in there were a little too splurgy for items or polish I knew I could get cheaper somewhere else. I'm talking specifically about The New Black set that has some studs and 15 ml of polish for $42!!! It looks cool, but really $42?, I don't think so. I also saw 6 diamonte nail bows with nail glue for $15.95. I guess I'm a Born Pretty Store kinda gal rather than a Mecca Cosmetica one. :/

5. After my outing, I decided to use my untrieds, group in which my franken was included. I put it on and enjoyed it for a whole two days before I was itching to do something nail art on top of it. 

6. My Seche Vite was running out and only had enough for a couple of manis left, so I had to be frugal with it.

7. I grabbed the essence bottle and noticed the liquid inside had a similar consistency to a normal topcoat. I tried it on top of Stay for Lunch (have I got you hooked?) and to my surprise it made it smooth and shiny with just one coat and it dried to the touch within the minute. Had I just franked a topcoat too?!  


If you ever used this Essence topcoat you'd know it was a life saviour for topcoat-hungry glitters and it would have a squishy texture when dry but it would take hours and hours and h-o-u-r-s for that to happen. Sally Hansen Insta-Dri dried super quick and prevented chips for a few days but it took a few coats to even out glitter or nail art. Had the best properties of both topcoats came to life when I mixed them up? So far, it looks life it! I've tried it on a few other polishes and it still works fine. My only concern is that the acetone may change the topcoat for the worse in the long run and this topcoat won't be usable anymore. 

So the moral of the moral of the story is I created an comparable-to-Seche-VIte topcoat with a third of dried up Sally Hansen Insta-Dri, a third of goopy essence XXXL Shine Gel-Look topcoat and a third of acetone, roughly. I was just going dispose of the liquid (safely, of course!) if I hadn't tried it. Plus, all those events I mentioned above finally led me to this stamping mani. I know that's not the point of this post and it's not my best work but would you look at how shiny and smooth it is with and extra coat of The Awesome Topcoat. 


This top coat is sooooo squishy but it doesn't leave dent marks like other topcoats and it doesn't make the polish peel off because of the thickness (Looking at you Seche Vite...). Please excuse the dodgy stamping job.


I hoped you stuck around for the three minutes and that I didn't bore you to tears. :)

Have you ever tried mixing topcoats into a same bottle? Any favourable results? Or bad ones? Would I have any luck with the longevity for The Awesome Topcoat? Are you sick of the word topcoat yet?  I almost am. 

Till next time, 

Laura 

Tuesday, 20 August 2013

Sally Hansen Fuzz-Sea: The Feathered Dupe

**We've got a Facebook page! Please take a second to click on the Like buttton on the right so you get every post in your feed**


Last year, I discovered the beauty of Nails Inc through Beauty Bay and I managed to snap a few bottles before UK postal regulations changed and polish could no longer be dispatched from this seller. I mentioned previously that Nails Inc can be hard to find where I live and when I find it's $20 + postage. When Nails Came out with their Feather Effects line, I knew I wanted to get Brighton. I searched high and low and but even eBay gave me no opportunity to buy it so I left that in the too-hard-too-get lemming basket. 

To my wonder and surprise, other brands started coming out with dupes for this line and it was just a matter of time before they hit Australian shores. The brand that I saw and that was accessible enough was Sally Hansen with their Fuzzy Coat Collection. I know I'm late to the party since this came out over two months ago but I was low on nail polish funds and I couldn't find it at a special price. This is one is Fuzz-Sea, btw.

I can't find a description on the Sally Hansen website, so you'll have get mine. Fuzz-Sea is made up of teal-aqua and pastel yellow satin bar glitters suspended in a clear base. From what I've read in the blogsphere, this is supposed to be a textured polish. The formula is a bit thick but that's expected of glitter polishes that are so jammed packed. 


The lowdown: Formula is OK for a glitter but it has good drying time. It takes three coats to get almost full coverage, but due to foreseen circumstances (work), I didn't have time to take photos of it. It can also be layered for a fuller look. I decided to layer it over similar colours to the polish and each base made its opposite pop. Index and middle fingers have four coats of Nubar in Lemon and ring finger and pinky have three coats of Rimmel's 60 Seconds in Sky High as a base, which I then topped off with two coats of Fuzz-Sea and one of Seche Vite to smooth out the slightly gritty finish. 


This polish had a different application to what you'd expect from a glitter. First coat needs to be dabbed on but the subsequent coats can be applied normally as there and uneven surface for the glitter to get stuck on. Isn't it usually just dabbing or just spreading? With this polish, you get both experiences. 

This is a longish post, so click on the page break for more.

Thursday, 11 July 2013

Sally Hansen Salon Manicure Cuticle Eraser + Balm

When it comes to nail polishing, I've had some ideas very ingrained in my head that I didn't change until I started blogging. For example, I only ever applied two coats of polish, no matter how sheer or opaque it was as I thought that was the rule. When it came to my cuticles, I always pushed them back with a orange stick after a shower. I read that tip in the magazine that started my love for nail art and I have been doing it almost religiously for a few years. That is until today...

I have heard of cuticle removal creams and treatments quite a bit on the blogsphere but have been giving them a miss since I thought my routine was good enough. My adventurous side saw me buying some orange cuticle last year when Terry White had China Glaze treatments for less than $10... and less than a week. I used the oil when pushing back my cuticles and seemed to work OK. This wet and very cold winter has left my cuticles quite dry and the oil just wasn't cutting it anymore.

My budget is quite small and I couldn't justify buying Butter London's Melt Away, which I've heard is one of the most effective cuticle treatments out there. I knew Sally Hansen had a treatment even though I hadn't heard much about it. I went into Priceline today not looking for anything in particular and when I saw the 20% off promotion they had happening for the Sally Hansen range, I figured paying almost $12 for the Sally Hansen treatment was better than $25 for a Butter London product that I thought wouldn't make a big difference to my current routine.

So here it is: Sally Hansen Salon Manicure Cuticle Eraser + Balm. It claims to "remove dry cuticles and moisturize in 1 step". The white tea and cucumber formula loosens and exfoliates stubborn, overgrown cuticles and leaves the skin deeply moisturised.


The instructions are simple, massage the cream into your cuticles until absorbed and use a cuticle pusher, if needed. It is also recommended to use the cream daily for maximum benefits and to wash your hands before applying polish.


The cream feels like a very thick and rich moisturiser but it's not greasy or heavy. It is also slightly scented but the smell doesn't linger for too long. I'm guessing it's supposed to smell like white tea and cucumber but when I smelled it it reminded me of fruity cream and my mum thought it smelt like caramel or those red and white swirly lollies. 

I was skeptical. I really didn't think this cream would "eat" the cuticles away and I thought it would just work as a rich moisturiser. I chose to apply it on my right hand to test it out as it is my dominant hand and it doesn't get as much loving as my left one. I have particular dry spots on the side cuticles on my pointer and middle fingers. Here's my right hand, not looking terrible but feeling very dry.


I applied a very small dab in each finger and started rubbing it in.


After about two minutes, the cream wouldn't absorb into the skin anymore and I took this as a cue to bring out the orange stick to push back those cuticles.


This was the end result. 


I know there's not a lot of difference on the photos but I could see it and feel it, especially when pushing back the cuticles, I felt the cuticles slipping off the nail bed and the ones that had always been stubborn moved back without too much trouble. My cuticles also felt super moisturised and those pesky, little dry spots on the sides of my nails were hydrated, something that I have rarely experienced.

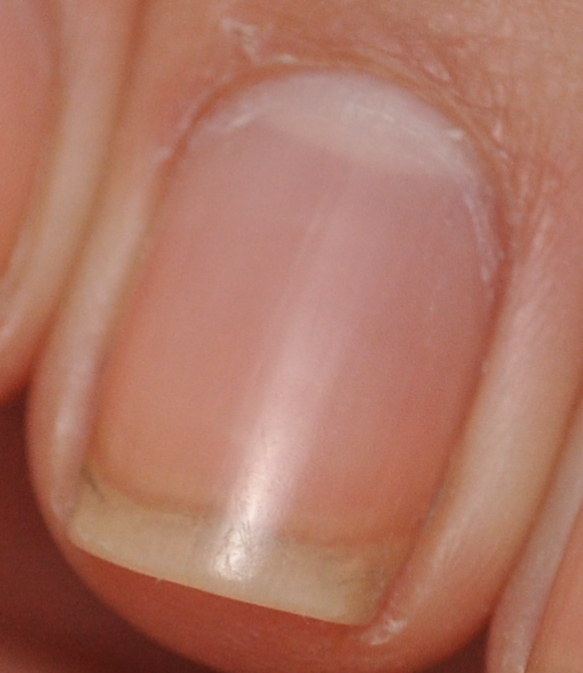
For a dramatic demonstration, I took my nails polish off my left hand with acetone which left my finger like this. Take note of the paper cut at the top of the photo and the dry spot on the bottom where the nail meets the skin.

Before the SH Cuticle Eraser
See the difference?  
After SH Cuticle Cream

I never thought I would be able get rid off that dry spot that lingers on my skin when I have short nails. And that paper cut? almost unnoticeable. Then again, I have nothing to compare this cream to but I'm absolutely blown away by the results. In my experience and for my hands, this is a cuticle saver and I am in love.


I washed my hands after using it to paint my nails and I found that even after using soap, my cuticles were still soft and supple. 


I also noticed the difference tidy cuticles can make to a mani, which give it a very polished look (see what I did there?). Sally Hansen Cuticle Eraser + Balm has become an instant favourite.

Have you tried cuticle remover treatments? Do you have any favourites? Do you have other ways of removing them?

Till next time, 

Laura


Friday, 5 July 2013

Sally Hansen Lustre Shine Azure

At the beginning of this week, I was unpacking a bag of new clothes that I had laying around for almost a month and when I got to the bottom of it, I found a bottle of Sally Hansen Lustre Shine in Azure. I had, and still don't, no memory of the moment when I bought it. I could only imagine I bought it with the last lots of Sally Hansen Lustre Shine bottles I got as the Chemist Warehouse is next to the clothing shop. It must have been an impulse buy because I wasn't really lusting after it and when I saw the colour I wasn't overly impressed.

Azure is a royal blue shimmer with a strange formula. Swatch below done with three thin coats and one coat of Seche Vite.


The first coat went on very sheer but the second and third coats evened the colour out nicely and each coat dried quickly. That's where the good ends. Unfortunately, the shimmer was very streaky and it had some bubbles I couldn't get rid off with the brush. The bottle had been sitting on my rack for a couple of days at room temperature, so I'm not sure what caused the bubbles. 

Considering Lava, Copperhead and Scarab, all from the Lustre Shine range, had duochrome shifts, I was a bit disappointed that this one didn't have the slightest colour change when tilting my nails. :( 


I have similar colours with better formulas but considering this bottle was $4.99, I can see why I bought it. 


Another plus for this polish: When I cleaning this up, the shimmer didn't go everywhere. I'm guessing it's got to do with the sheerness of it.


I didn't just want to wear plain blue so I added some sponged on tips with Sally Hansen's Scarab.


It's a rough gradient, I know. I decided to cut up my trustworthy gradient sponge but it  seems the inside was much more absorbent than the outside so whatever polish I'd put in it, it'd absorb it leaving no polish on my hands. Weird... I'll just have to pop in to the $2 shop for some more.


If I had been conscious of my purchases, I would have given Sally Hansen Lustre Shine in Azure a miss. There are plenty of royal blue shimmers out there that don't streak and are opaque with less coats. I should know, I have at least two others in my stash. ;)

Till next time, 

Laura


Monday, 24 June 2013

Sally Hansen Lustre Shine Scarab

Dear Queensland winter, 

You are so mild that I can see the neighbours running around in their shorts and t-shirts playing water fights at midday. I don't know how you manage to do that to some people considering I haven't escaped my hoodie for longer than five minutes just in case you decided to blow some really cold wind. The short sunlight hours are a bit of  problem too. See I was hanging out with my nephew and sister this afternoon and when I was ready to take photos of my nails, the sun was gone!!! I had to resort to using my flash light which only gave me mildly-colour-accurate pictures.

I've been wearing Sally Hansen Lustre Shine in Scarab since midday and I am loving it. I'd describe it as a power blue/teal/gold shimmer duochrome on steroids.
 .

I know I have not made justice to the polish with these pictures but I hope I can at least let all the lacqueristas out there know how awesome it is. Scarab is almost a coater but it needs two to really come to life, just like its cousin Copperhead, but it has the drying time of Lava, so a coat of Seche Vite was needed to speed up the process.

Unlike Copperhead, the blue, teal and gold shimmers one can see in the bottle translate to the nail. They are not terribly contrasting but you can see the colours change.


From blue...


To the goldish teal. There is some green in there but I couldn't quite capture it with the artificial light. 


I have another three teals in my collection but none as opaque or eye catching as this one.  I may have to add  a photo to this post tomorrow in the sun to show its true beauty. 


Now winter, the usual South East Queensland humidity is gone because you are here. My skin and cuticles are noticing and it seems that I'm finally learning to use cuticle oil more often but it's leaving my fingers too shiny for their photo sessions. I can't win. :(

I'm off to look at my nails for a little longer while I'm trying to fight you off with some warm soup and lots of tea under a blanket and a book. Hmm... Maybe you are not so bad after all.

Till next time, 

Laura

LinkWithin

Related Posts Plugin for WordPress, Blogger...