Showing posts with label Tape Mani. Show all posts

Friday, 18 October 2013

33 Day Challenge: A Pattern In Your House

Well... Day 12 of the 33 Day Challenge called to use a pattern in your house to do some nail art. I looked around mine and all I could see were the plain bright or earthy colours but no patterns, even the towels and sheets are all one single colour. I found this pillowcase that colourful that I bought ages ago at the back of the cupboard and saw the manicure for today straight away. 


 The polishes I used are: Sinful Colors in Hazard, Sally Hansen Xtreme Wear in Pacific Blue and White On and finally China Glaze in Sweet Hook. Topped it all off with Seche Vite before letting it all dry for the next step. I hadn't shown striping tape in a mani for a while so I decided to do the smaller stripes of the pillowcase with it. I have 20-ish rolls of this tape and I'm sure that's almost a life time supply; I guess I better start using it.  


The execution and clean up wasn't great but it served its purpose. This mani reminds me of a school sports shirt or flag, at least the three middle fingers do. Maybe if I could reuse the polish base for another mani... 


Here's the pillowcase. I just realised I should have turned the pillow around so the colours would correspond to the ones on my nails but you get the idea. 


Check out the other talented ladies in the challenge.


Monday, 7 October 2013

33 Day Challenge: Art With Oldest Untried

Are you ready for some bad nail art, dodgy lines, topcoat shrinkage and colour inaccurate pictures? if you're not, you may wanna stop there. 

It's day seven of the 33 Day Challenge, which called out for art with your oldest untried and I may have struggled a bit with it because:
  1. I smugly thought I didn't have untrieds, but oh boy! I was wrong.
  2. I'm pressed for time.
  3. The post I had originally prepared didn't work for some reason or another.
  4. The formulas of my oldest untrieds was pretty bad.
  5. I had no inspiration at such short notice. 

I have this habit of trying on polishes as soon as I get them to test them out and relish on the fact that I have new pretties. That's why I thought I had no untrieds until I went through my stash and discovered three of the 5 ml Essence polishes that I had no recollection of wearing. I know they are my oldest because I went through a period some time in the middle of last year where I bought a heap of Essence polishes because I was amazed at their price. 


However, when I put on C'est Le Vie!, the peachy orange creme, I remembered why they had been sitting in my rack for so long untouched. I had tried them but the formula for C'est Le VIe! was pretty thin and took four thins coats to reach full opacity and even with a coat of Seche Vite, it took forever to dry. I even dented my middle finger but managed to patch it up. I soldiered on an decided to do a tape mani with Let's Get Lost, a blue creme that sometimes looks teal, and Break Trough, a purple creme. The formula for these two polishes is thicker but it drags and it can pool on the nail. 


I topped it all off with a coat of Seche Vite, which made it all smooth and kinda looked better until I got massive shrinkage from it on my index and middle fingers.


Closeup of the nail, I though looked good. My cuticles might be telling me otherwise.


At the end of the day, this is still wearable and it looks good from a distance. Go check out the other ladies' manicures. There are some good ones there and you may even forget about the bad experience you just had.


I'm hoping chevrons turn out better. 

Till next time, 

Laura

Wednesday, 2 October 2013

33 Day Challenge: Mexican

I had high hopes and lots of inspiration for this prompt. I don't think I've mentioned it but I was born in Mexico and lived there for more than half my life (just!) before moving to Australia. This should have been my scene!!! I thought of a lot of possible designs I could create and settled for one idea  but the execution was poor. Actually, it was OK until I added top coat. Have a look for yourselves. 

I based my design on my home state's traditional dress called 'China Poblana'. The (short version of the) legend says there was a Mongolian princess that was kidnapped at the age of 8 by 17th century Portuguese explorers and eventually taken to Mexico to be sold as a slave. Due to her beauty, she was originally going to be sold to the viceroy of New Spain but a higher bidder came out of Puebla where she was finally taken. She was given the Hispanic name Catarina de San Juan and was sort of adopted, but remained a slave, by the Soza family and was taught how to saw, among other things. Even though the origin of  the dress is very hazy, most versions of the story say that Catarina was the designer of the dress, which was a fusion of her natal Mongolian attires and Mexican influences. When the patriarch of the family died she was sent to a convent and after she died at the well into her 80's, she was worshiped as a saint in Puebla until the church banned popular saints. There are as many variations to the legend as there are variations of the dress and I don't claim to be an expert. That's the story I remember from school and bits I researched on the world wide web.


Back to the nails, I used a heap of polishes and tools so I'm just going to list them.

Light Green:  Ulta3 in Jelly
Dark Green:   Ulta3 in Frog Prince
Red:             Revlon in Fire Fox
'Skirt' glitter: Rimmel in Disco Ball 
White:          Sally Hansen Xtreme Wear in White On
Yellow:         Ulta3 in Honolulu
Gold:            Sally Hansen in Golden-I
Light Brown:  Essie in Hot Coco
Topcoat:       Seche Vite

Smallest and small dotting tools and striping tape from eBay. Sticky tape from the supermarket. :)

This is one of the many versions of the dress. 

Source
I also included my thumb to represent the ribbons that are braided on the hair. I find thumb shots awkward so please excuse the following bad photo.


Before I added a topcoat of Seche Vite, there was a bit of texture on my index and ring fingers, which looked a lot better than the smooth versions. I added a final coat of Rimmel Pro Matte Finish to try and save it but it just made my mani chip very quickly. :(


I'm not sure what to think of this mani. I kinda like it because it made me think outside my comfort zone, especially the index that represents the shirt, but it doesn't look great altogether. If I hadn't applied topcoat, I would've been happier. I guess that teaches me to photograph every step of the mani!!! 

Check out the other talented ladies of the challenge.


Till next time,

Laura

Friday, 6 September 2013

Pastel Stud Wheel by Born Pretty Store

I'd consider myself a fan of Born Pretty Store but I haven't gone past ordering the basic gold studs and glequins from them even though they have a MASSIVE range of nail art supplies and they are so cheap. A month ago, I placed an order for a heap of different rhinestones, a textured polish and colorful studs, all which I believe are recent additions to the website.

Today, I wanna show you the Pastel Stud Wheel, which actually has a much longer name here, that I have fallen in love with. I can be indecisive when it comes to handing over my cash for products, i.e. shopping, and I have to make sure I'm getting the best deal. I was particularly happy with this wheel because it has two shapes in six different colours each for US$7.59. If I was to buy a one colour and one shape I'd have paid  US$2.99 on special (US$4.99 otherwise), but there would be no variety and I wasn't guaranteed to like them. 

I'm loving this idea of doing skittle manicures to show more colors and it almost makes me feel like I have created nail art :) . Here's my latest.


The accent nail was supposed to be covered in the pastel studs but I started to get slightly frustrated so I kept it simple.


I start to believe photo spamming is the way to go for this blog, so please click on the page break for more photos and materials used. :)

Tuesday, 16 April 2013

CoverGirl's Midnight Magic

In the last post I showed you guys Cover Girl's Wine Stain, which was absolutely amazing. At the same time, I purchased Midnight Magic by the same brand and of course, I had to show you.

This polish seems to be a gunmetal silver jelly with tiny iridescent flakies and multicoloured glitter. I say it seems because the base can change from a lighter grey to a oil-slick black to almost a mossy green, depending on what light is being reflected. 

Swatches were done with two coats and no topcoat.This formula was great. There were no flooded cuticles, no gloopiness or thickness and it dried quickly and super smooth, which can be unusual for glitters. It was just perfect. Another big tick for the new range of CoverGirl's polishes.

With low flash

With strong flash
I would love to show you what this polish looks like in the sun but as I started writing this, a massive storm popped out of nowhere, taking the sun away with it. Instead, I'll show you the accent I created with striping tape and Sally Hansen Insta-Dri Night Flight. Finished the mani by top coating only the ring finger to smooth the black polish out.


So original, right? I still love the way it looks. I hope you guys like it too.

I'll have to update you with bottle photos as it's looking kinda dull without that sun. Watch this space.

Till next time, 

Laura

Tuesday, 27 November 2012

Cheaper manicure? Show Me


Since there's a minor achievement to celebrate, I wanted to show you a manicure with all my favourite things in a mani; gold, foil finish, bright cremes and the use of tape.


Polishes used: 
Gold: Max Factor Max Effect Mini Nail Polish in Ivory (isn't ivory usually off white?)
Orange: Ulta3 in Carrot Top
Top Coat: Sally Hansen Insta-Dri

I used three coats of Ivory for full opacity but I could have gotten away with two. The Carrot Top is a fairly good one coater, if it is carefully applied. I was inspired by Nailside's tape mani, which I'm sure a lot of us are familiar with. I swear this would have to be one of the quickest manicures I've done in a while.

The best thing about this mani, however, would have to be the price. 


The bottle of the left I managed to snap up for 72 cents at Big W a few weeks back and the Ulta3 I purchased about six months ago at Coles for a whole 95 cents. The grand total for both bottles comes up to $1.67. Not too bad for Australia.

Now, if there's someone out there with cheap manis, let me know. I would love to see them.

Till next time,

Laura

Friday, 9 November 2012

Too Random Skittle

I've had a few terrible manicures in the last couple of days that were not even worth photographing. I'm talking about extremely flooded cuticles that couldn't be fixed, crooked stamping, smudging of such said stamping, terrible colour combinations and bad gradients. 

This is the first one that looked sort of OK, even though I'm not completely satisfied with the result. I tried using differents textures ( a cream, a metallic and a glitter) in blue, green and pink that I thought would look good together as a skittle mani. Tried tying it all up by having a striped middle finger but the job was kinda dodgy and there's a piece of stray glitter on my ring finger that I couldn't remove!!!!

Anyway, I'll do and learn but here are the pictures.


The obliged matte top coat, which in my opinion, makes polish look a million times better. 


Polishes used:
Pink: B Collection by Bloom in Cologne 
Blue Glitter: Essence in Blue Addicted
Metallic Duochrome: Topshop in Eclipse
Top Coat:   1st pic: Sally Hansen Insta-Dri
                 2nd pic: Rimmel Pro Matte Finish

There you have it. I'm gonna Google Colour Theory and maybe learn a little about what looks good together and keep practicing with that tape.

Till next time, 

Laura


Wednesday, 31 October 2012

Layla Mirror Effects Tape Mani *Edited*

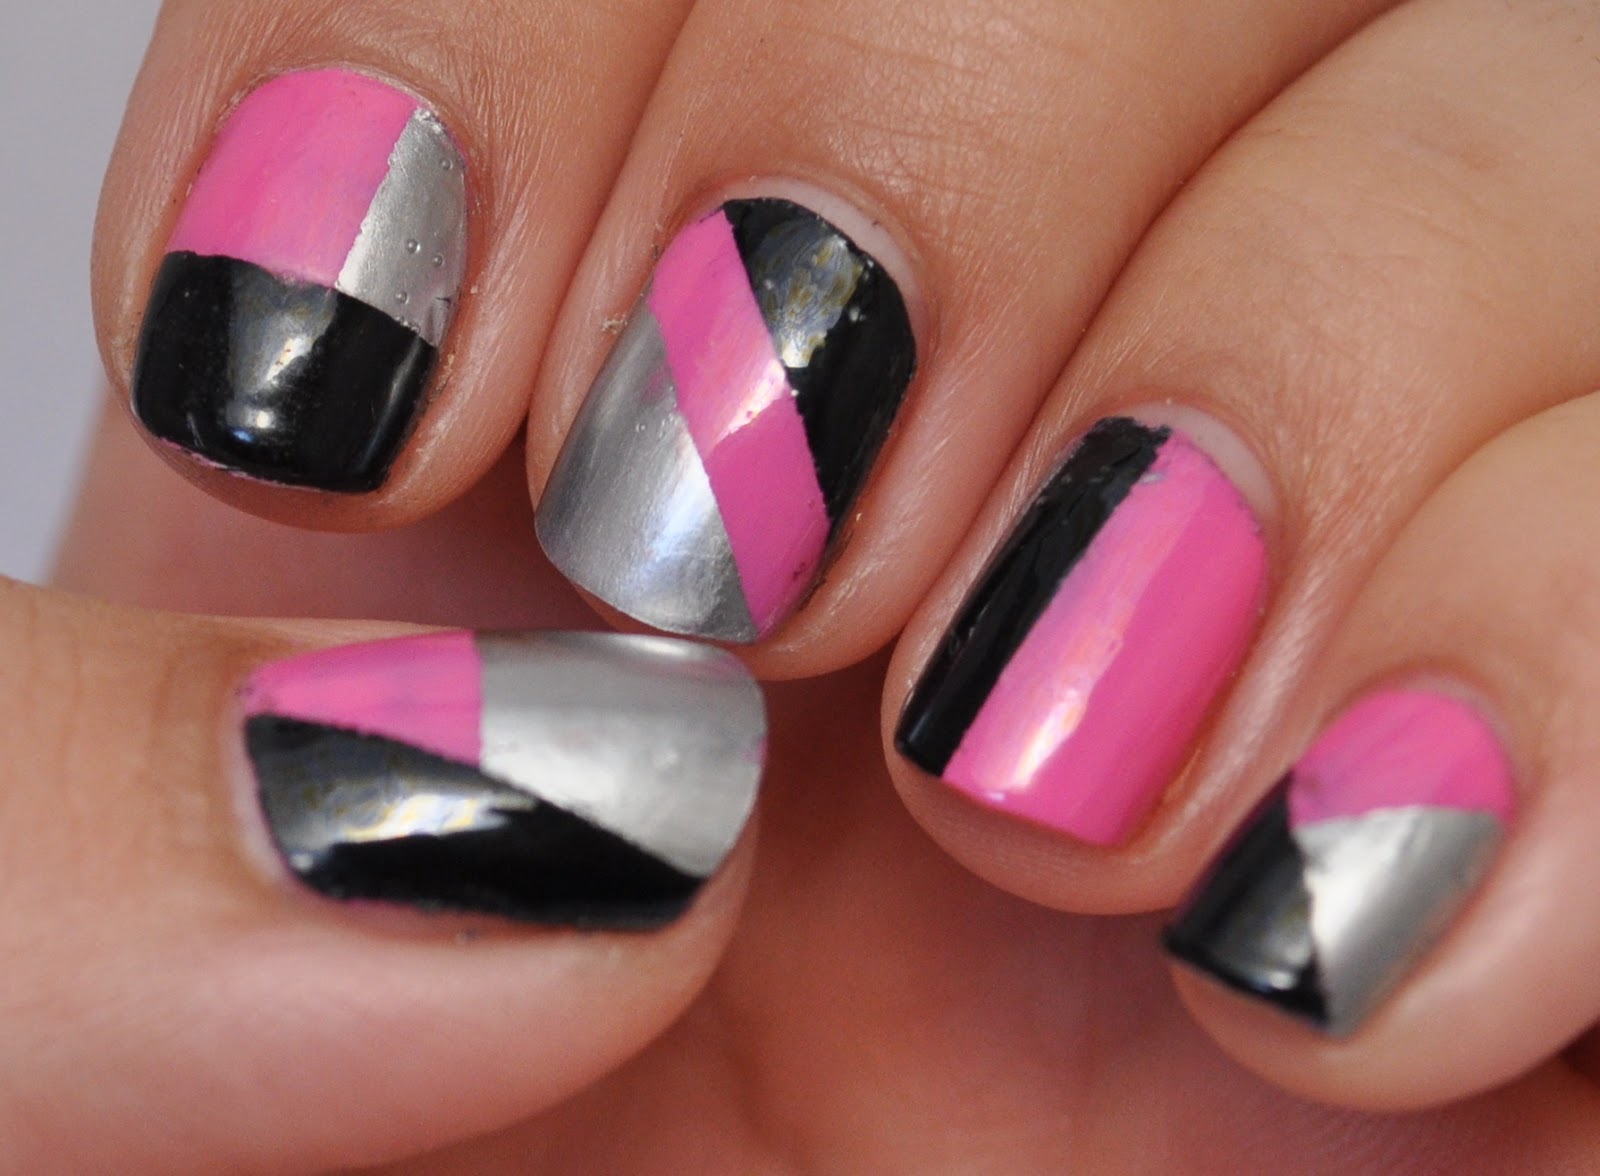
When in doubt, reach out for the sticky tape... Yes, I'm bad at rhyming but the idea stays true. This mani is not my finest work, the lines aren't that crisp, the pink is quite patchy, the clean up left a lot to be desired, the top coat created bubbles. If you squint your eyes, it looks ok. :)

Polishes used:
Pink: OPI in If You Moust You Moust 
Silver: Layla Mirror Effects in Metal Chrome 
Black: Ulta3 in Black Satin 
Top Coat: Sally Hansen Insta-Dri


The pink polish belongs to the Minnie Mouse collection by OPI and I really like the colour. 
I originally got a mini bottle  but love it so much that I got a full size bottle. However, both bottles are very streaky and the mini bottle has gotten fairly thick, which didn't help with the application. 

******Edit******
I had to add a matte top coat to this mani. I think I may be in absolute and utter love with Rimmel Pro Matte Top Coat. It looks everything look so... soft and dreamy. and it doesn't streak like every other matte top coat I've tried. 


**************
Leaving it very short today, 

Til next time, 

Laura

Tuesday, 19 June 2012

The Nudes

No, there are no naughty pictures in this post but there are photos of a very new thing for me. Nude colours. 


I've always been a fan of bright pinks, scarlet reds, royal blues, deep purples, glittery blacks; whereas pastels, beige and pale brown tones usually went unnoticed and if I ever glanced twice while shopping, they would be put rejected for the more luminous shades. This doesn't only happen with polish but with clothes, shoes, homewares, anything that I would pay for basically.


However, after trying your Butter London Yummy Mummy, I thought I could give this look a go. I went to Target to see if I could score any bargains but I couldn't really find anything I liked within my low budget. To the rescue came that little underrated Essence Cosmetics stand. Essence released a Nude Glam collection for the northern hemisphere's spring for this year, which includes 7 polishes of the nude sort. The one that got my attention was Toffee To Go. It wasn't too pink, too brown or too shimmery and I thought it would be suit my skin tone.  


To be completely honest, I couldn't bear the thought of not having colour or sparkle on my nails, so I added  OPI Save Me from the Nicki Minaj Collectionas an accent on my thumb.


Here it is, my first (and almost) full nude. I used three coats of both Save Me and Toffe to Go. On the thumb, I used three coats of Toffee to Go with a wiggly-lined piece of sticky tape after letting Save Me dry. It was all toped off with two coats of quick drying top coat.


I loved this mani but... The Essence Toffee To Go was a pain in the ass to work with. It was streaky, the formula was thick (how can those two go together?) and it took forever to dry. If you were to zoom on my the above picture, you might be able to see a lot of hair marks on the polish even after I applied two (two!!) pretty thick coats of top coat.


Needless to say, this came right off and got replaced by another sort of nude mani. For this one I used three coats of  OPI DS Classic and a bronze foil for the accent nail.


I was a lot happier with this and, even though the foil didn't last more than two days, I would like to say this is more my kinda nude. 


One last one because I liked it that much.


That's all from me. So until next time,


Happy polishing!!

LinkWithin

Related Posts Plugin for WordPress, Blogger...