Friday 27 December 2013

Abstract New Year's Mani

I don't do festive manicures very well so I figured the best way to start getting better at them was to start doing them... Whatever may come out of those attempts. For my first one, I tried to do a abstract firework inspired mani.


I used two coats of OPI's Skyfall on my index, middel and pinky fingers followed by one dabbed coat of Topshop's Mardi Gras. On my thumb and ring fingers, I used three coats of Essence in the boy Next Door and stamped the what-I-thought-looked-like-fireworks pattern from the BM-213 plate using Topshop's Blitz, Essence's A Piece Of Forever and a polish green shimmer that I can't recall. I topped it all off with one coat of Seche Vite.


A very simple mani and it may not scream 'New Year' but for a first attempt it doesn't look too bad.

Till next time, 

Laura

Wednesday 25 December 2013

Merry Christmas!

Super quick post to wish everyone a safe and merry Christmas and happy holidays! 


Used two coats of Nicole by OPI in Cinna-Man Of My Dreams and stamped with Essie's Good As Gold with the BM-225 plate.

That is all from me. Till next time, 

Laura

Friday 13 December 2013

In Really Old News...

Guys, guys!!! Did you know Mariah Carey released a range of Liquid Sand polishes in collab with OPI? *Insert Slowpoke meme here*. In all seriousness, I avoided buying OPI's Liquid Sand merely because of the AU$20-$25 per bottle price tag and I wasn't sure I was going to like them. When drugstore brands started bringing out textured polishes I jumped out on that bandwagon ASAP and fell in love instantly at the much lower price. 

Recently, I got a $20 Christmas coupon (which are almost unheard of in this country) for a department store and after some deliberation I decided the best way to spend it was on some Mariah Carey's Liquid Sand minis from last year's collection. I only ended up paying $5 for 4 minis! I don't think I could have done any better online. Woot woot!


Plain swatches were going to be boring, so I paired Can't Let Go up with some plastic nail wraps I got from eBay from this seller and some rectangular studs. Voila! 


I started with two coats of base coat because a. I didn't know if the Liquid Sands stained and b. I've had issues with non-polish nail wraps ripping out my nail bed when removed. Can't Let Go was opaque in two coats and even though I wasn't blown away by it, I really like the darker blueish purple matte finish of it. The nail wraps were also super easy to use and malleable but I managed to get a little bit of one stuck on the cuticle of my middle finger and didn't fix it enough for macro photos. :( That issue aside, they look sparkly and overall pretty especially after I applied a coat of Seche Vite on top of the nail wraps. 


I'm pretty happy with this mani and I love those nail wraps. I might have to get some more for Christmas presents... for myself... Or others. 

Till next time, 

Laura

Wednesday 11 December 2013

33 Day Challenge: Freestyle

This post has been sitting in Blogger waiting to be written up for a few days but I wasn't that keen on the manicure. I wanted to do something amazing for the last day of the 33 Day Challenge so I brought out the foils and tried to create a skittle. Tried, the final result was very underwhelming even from far away. I present to you  a foiled, studded tape mani. Woot!


I started one coat of Ulta3's Black Satin, let it dry then applied one thin coat of nail foil glue on my ring and taped-up middle fingers. I let that dry and did applied a rainbow foil at random to give it a slight grungy look. I topped this two fingers off with one coat of Picture Polish Revolution and finally applied the studs with a drop of top coat. I topped all my fingers off with one coat of Seche Vite. 


The studs moved around when I was applying the last coat of Seche Vite so I had push them back into position with the brush and they ended up a little crooked. :( I'm not gonna go into too much detailed about the taped middle finger but let's say it took me three attempts to have a passable design. 


As underwhelming as this design was, I am super happy to have participated in this challenge. I have seen some amazing nails art, discovered some new blogs and met some lovely people that are encouraging and just absolutely great. I have also managed to push myself through (most of) a challenge and created designs I wouldn't have otherwise. There's also my new found love for nail art, which I want to be the focus of this blog from now on. 


Anyway, check out the other participants' last mani for the challenge. 


It was a pleasure lacquering with you all!


Till next time, 

Laura

Thursday 5 December 2013

33 Day Challenge: Shapes

Today's vague 'shapes' prompt was a little bit too much for my over thinking tendencies so I jumped on Google to give myself some direction. One search lead to another and I ended up with an idea completely different to what I had googled but it all turned out for the best. Have any of you girls played with a tangram at some point in your lives? I remember having a couple when I was younger and when I got my first smart phone, one of the first games I downloaded was a tangram. I finished 200 levels of this puzzle in less than a week and went ahead and got myself another app that had different shapes. Thinking about it, it's kinda lame how excited I am about tangrams and doing a mani about them. Well, lame I will be because I really liked putting the shapes of the tangram on my nails.


I started with two coats of Sally Hansen's White On and a coat of Seche Vite and let that dry completely. I then used striping taping on my fingers to create the shapes of the puzzle, one finger at the time. Most of the colours I wanted to use were a bit sheer, so instead of putting layer upon layer of the same polish, I used some undies on all fingers but my thumb. Colours used (base first, top colour second) on each finger:

Pinky:  Sinful Colours in Innocent and Topshop in Eclipse
Ring:    Max Factor Mini in Purple Haze and Topshop Plume
Middle: Essence in Flashy Pumpkin and Sally Hansen Lustre Shine in Lava
Index:   Max Factor Mini in Candy Blue and Sally Hansen Lustre Shine in Scarab
Thumb: Sally Hansen Xtreme Wear in Golden-I and Revlon in Fire Fox 


I didn't use any topcoat after creating the shapes to keep the slight 3D effect they have. 


This is the picture I based the tangram shapes on. There are a lot of variations of this puzzle but this configuration is the one I remember playing with. Disclaimer: The shapes in my manicure are for illustrative purposes only. Scale may vary in real life . :)

Source
Only shot I got in sunlight. I think the colour's a bit off but it shows the shimmer well enough.


In a slightly related note, there is a Topshop opening tomorrow in my city and I am sooooo tempted to go raid their polish display but I'm thinking that may be a bad idea. I may end up poor and I hardly have any  polish rack space as it is... This story will continue.

Check out the other ladies' manicures for today's prompt. 


Till next time, 

Laura

Monday 2 December 2013

33 Day Challenge: 3 Favourite Polishes

It's the third last day of the 33 Day Challenge and I'm gonna make this super quick because I am tired but didn't want to miss another prompt from this challenge that is about to finish. Here we go...

Narrowing down the stash to bring out my three favourite polishes wasn't an easy task, they are all so pretty and each has its own qualities. I decided on the ones that were my first favourites of a certain type and that I still love. I started with a coat of Essence's Snow White (my first and only jelly), let it dry and stamped Essie's Penny Talk (my first one coater metallic that has been featured in this blog plenty of times) using the plate BM-417 and then created a french tip gradient with Snow White and B Collection by Bloom in Dubai (the first polish that lasted about 10 days on me with top coat and had an awesome formula, no longer on sale but I have three bottles of it :) ). Topped it all off with one coat of Seche Vite to smooth out the gradient. 


These nails were super hard to photograph because of how shiny they were and my camera was freaking out when I was trying to take photos in the sunlight. I brought the nails into the light box but the shine was still too much and I couldn't figure out what settings would work. 


Anyway, this is what I came up with and I'm in love with this stamped jelly sandwich. It's shiny, the colours work well and I came to realise I hadn't done something similar before.


Quick note, this is how the jelly sandwich looked like in the sun. Yep, I cropped the only half decent photo I took but it shows some of the pretty light that was reflected from my nails.


Don't forget to check out the other particpants' manis for today's prompt.


Wednesday 27 November 2013

33 Day Challenge: Favourite Pattern

Day 29 of the 33 Day Challenge is here. I seem to have gotten on the 'creating OK nail art bandwagon' again and I'm pretty glad because I'd been looking forward to the favourite pattern prompt for a while. I didn't even have to think about this one. I  love houndstooth anything, even this Lady Gaga ensemble (I wouldn't wear any of it but it's cool) and I'd been wanting to do a nude/neon houndstooth manicure for ages after seeing it in a blog (the name, I cannot remember and I can't find it on Google) and thinking it was the coolest thing in the world. However, I didn't own a good nude or an opaque enough neon colour to recreate what I had seen but thanks to my little haul last week, I have finally created a mani inspired on that one I saw many moons ago.

I started with two coats of My Island Home (MIH), a great-nude-for-my-skin-tone, textured polish from Face Of Australia, and let it dry for about an hour before I started stamping. It didn't need to dry for that long but I find the texture shows a lot better when the polish has fully dried. And I wanted to be absolutely sure I wouldn't have to redo the base from stamper pressure smudges. I have ruined bases many times that way and it looks like I have learnt a lesson. :)


For the houndstooth pattern I used the BM-322 plate and one coater polishes. From green to orange I used: 

  • Essence in The Green & the Grunge
  • Sinful Colours in Blue By You
  • Max Factor Mini in Purple Haze
  • Konad Special Polish in Red
  • Essence in Flashy Pumpkin


Hold on, wasn't this supposed to be a nude AND neon manicure? Well, yes but... The one coater-ish neon pink I have didn't stamp that well and it looked like a greyed out pink over MIH. Plain black houndstooth was gonna be boring so I created a sort of rainbow effect with two of my new polishes and some old ones I knew were one coaters and had the potential to stamp well over the nude. I even gambled a little and brought out the shimmer Blue By You because I wanted sparkle. Look at it below, it worked and it looks so pretty in the sun.


Sun. I finally had the opportunity to do my mani early in the day and come out to the sun to take photos. I get to sit on the grass, enjoy the birds singing, the wind in my face, listen to the peace and quiet of the outdoors and not feel guilty that I'm procrastinating uni work. Yay for summer holidays!


On with the manicure... I didn't use any topcoat because I LOVE the texture of MIH but it makes me sad the stamping will come off quicker because of that. 


Did anyone notice that the pattern on the index finger is upside down compared to the rest of the fingers? Applying the colours to the plate to create the rainbow was sort of automatic but when I thought about it and was about to stamp the index finger, I thought I had it the wrong way on the stamper and redid it. I only noticed it when I was taking photos. I'm gonna say that's an accent finger. That'll work. ;)


I also noticed this mani fitted that prompt for Friday very well but I have no idea what I'm gonna do for that one. I'll have to do some brainstorming. Until then, check out the other ladies' manicures.


Till next time, 

Laura

Monday 25 November 2013

33 Day Challenge: Lines

Day 28 of The Crumpet's Challenge called to create a 'lines' mani. A line mani could be anything and seeing some of the manis that have been done with this prompt, I figured it'd be good to get myself inspired. After some (quick) online research, I decided to create a tangent lines mani with some new polishes I got last week. I was almost gonna use a very similar palette to the geometric mani from last week so I figured I better change it to keep things interest in this blog. I'm a bit undecided in the end result, it looks good from afar in real life but the colour scheme doesn't rock my boat that much. Plus there's no oomph element to it... And I just didn't know what to add to it.

So, I started with one coat of Essie's Good as Gold (got it for $12; about six months ago they retailed for $19 in AU) and let it dry completely. I put on a circular sticker on my index finger and used striping tape to create the tangent line. The green polish is Essence's The Green & The Grunge and the coppery one is Mister Rusty by the same brand (paid $1.65/each which is SUPER cheap for polish anywhere, yeah?) and tried to be really quick at taking the sticky bits off my fingers. I continued to repeat the process one finger at the time and topped it all off with one coat of Seche Vite when I was done colouring my digits in.


The index finger turned up pretty crisp on my first go and that's what got me going with the rest. I had to redo my ring finger twice due to ripping the base off with the sticker and a smudge. 


I'm thinking I could have done some stamping on the gold base or used different colours.  I really don't know; I could say I'm a little stumped creatively. :(


I just had a thought of putting tiger/zebra stripes in the circles and did try it but I just made it worse... Not a good nail day for me. Is that worse than a bad hair day? Thought for you. In the meantime, check out the other talented ladies' manis for today.


Till next time, 

Laura 

Friday 22 November 2013

33 Day Challenge: Mani with Three Patterns

I'm back on the challenge after neglecting it for the last week. It's not that I haven't wanted to do it, my inspiration just went out the window and I haven't been able to catch it back. Anyway, I didn't want to miss another prompt that I would have to do later so I gave myself a deadline for today's prompt of a mani with three patterns. I wanted to do some free-handed nail art but I knew it was not gonna happen within my time limit and that frustration would be likely to get the better of me so I opted for stamping. 

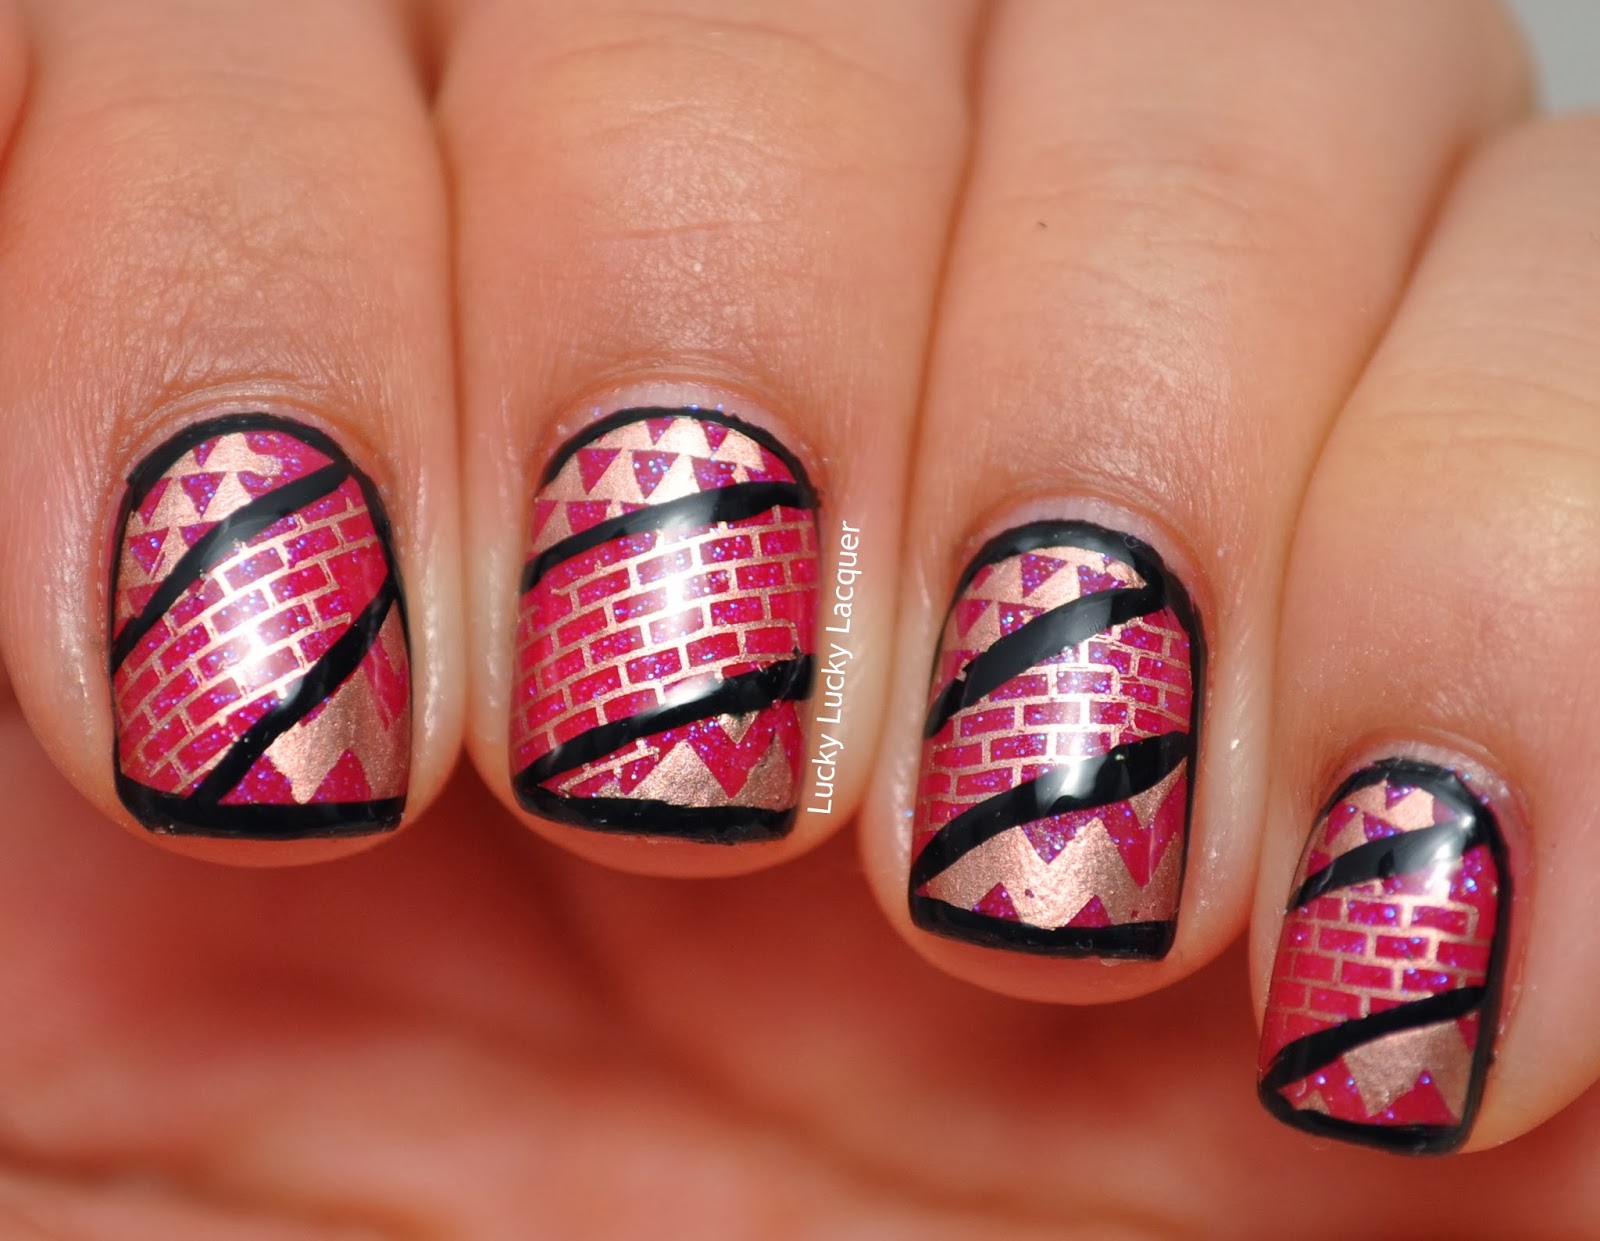
So here it is, my three patterned mani. I used three coats of Butter London's Disco Biscuit and a coat of Seche Vite as a base. I actually wore this beautiful pink jelly for a whole day by itself before I added the nail art. I tried taking photos of the scattered holo glitter it contains but my camera's battery died as I was pressing the shutter button. :( While the battery was charging, I went on with the mani and taped up sections of my fingers and started stamping chevron, brick and triangle patters from the BM-422 and BM-423 plates with Essie's Penny Talk.


I had a lot of trouble getting the brick pattern to stick to the pink base and had to redo it A LOT of times, however, I didn't have to redo the base because I discovered that I could use fresh sticky tape to remove the half done job of the base. I would just put the sticky side on the nail and it would remove the stamping polish in no time and no acetone. Phew! I don't think it would work with all polishes but it's a handy thing to know...


When I finally managed to get the patterns on my nails (almost) wholly, I used my trustworthy Topshop black stripper and to frame the nails and create lines along the edge of the patterns. They weren't very clear to begin with and I thought the line would make it look better. I'm undecided on that one. I topped it all off with a coat of Seche Vite.


Overall, I'm not blown away by my nail art but this is the first time I have successfully managed to frame my nails with a striper. I'm aware the lines on the inside of the frames are uneven but I know practice would help me out with that one. Maybe if I had a different picture to frame, I would be happier. :)

Check out the other ladies' manis for today's prompt.


If you've been on this blog before, you may notice I have different background and a slightly different layout. The thing that bother me the most with my last background I used was the lack of continuity on mobile devices, like tablets, and bigger, higher resolution  computer screens. I also wanted to add social media buttons to the side bar and the free icons (found here) looked better with the multicoloured chevron pattern. :) I'm not web designer but I'm trying to learn to learn little bits as I go, including what looks good and what doesn't. I really like feedback or suggestions so if you have any thoughts on my layout, please let me know!!!

Till next time, 

Laura

Friday 15 November 2013

33 Day Challenge: Art With The Colour You Own The Most

The colour I own the most? I thought it was gold. I always assumed gold was the most numerous in my collection so I went ahead and created the mani below. After I had a red stage a couple of years ago and after I started this blog, I moved onto gold and then to blue. Well, turns out the gold phase lasted less than the blue one and I have about three more bottles of blue than I do of gold. Considering I have over 350 polishes, I figured that a .09% margin error wasn't a big deal, right?

Once I had eyed my collection and decided that gold was the most prominent one, I took my trustworthy Sally Hansen Xtreme Wear in Golden-I. I've used up about half the bottle but surprisingly (for me, at least), I have only shown in in the blog once before this post and only as part of nail art. 

I wanted to keep this mani simple and I've been wanting to do stud-framed nails for a while so I figured today would be the day to do it. I started with two coats of Golden-I and one of Seche Vite before applying nail foil glue on the edges of my nails. I let it dry and got myself sticking some gold 'laser' studs (I got them from this eBay seller) and luckily they fitted nicely enough around the perimeter of my nails. 


I got a bit photo happy so I'm gonna leave you with some photo-spam. Enjoy.


I know it's nothing spectacular but this was a fun mani to wear for as long as the 85-odd studs stayed on their place. Check out the other participants' manis for today's prompt.


Till next time, 

Laura

Thursday 14 November 2013

33 Day Challenge: Geometric

This idea I had of catching up on the challenge this week sort of went out the window and I happen to be running a day late with the prompts that I haven't skipped. Anyway, the prompt for day 23 for the challenge was geometric. I'm trying to stay away from just stamping as much as I can so I was a bit short of ideas. I had this triangular origami box lying around and I thought that would be a good, simple idea to recreate. OK, so the execution wasn't great and I managed to take a chunk of polish of the green part on the index finger as I putting the bottle of topcoat back in its place but I figured it was still decent enough to put it up (and I didn't want to miss another prompt).

I started with two coats of Essence's Piece of Forever, let it dry then used striping to create a triangle. I painted W7's It's Pink, Max Factor's Purple Haze and Ulta3's Frog Prince outside each side of the triangle and used a Topshop black stripper for the inside lines. I topped it all off with one coat of Seche Vite.


This is the box I based the mani on, I couldn't figure out how to photograph the whole box in my tiny lightbox so I'm just showing you the colours. It's also a bit crumpled from handling it for photographs, so excuse the wrinkles.


I wasn't overly happy with the mani but it was fun to wear for a few hours. Yes, I have taken it off already and started on tomorrow's mani, which means that I may be on time.


LinkWithin

Related Posts Plugin for WordPress, Blogger...