Monday 25 June 2012

No Glitter Jelly Sandwich Here


I think this post will be one of lots of confessions of my nail polish fascination. The first one would be the fact that I loooooooove the way glitter jelly sandwiches look (you know, one layer of sheer polish, one of glitter, one of sheer polish?). Every time one pops up in a blog, I can sit there looking at the pictures and find every sort-of-hidden piece of glitter in that particular manicure. Why haven't I done one? To be completely honest, I have about 30 untried polishes (would that be confession number 2?). I feel like I need to start using those before I revisit any of my older ones that I know would work for that particular look.

While looking through my polish drawers, I found one of my untrieds that was very glittery, Sally Hansen Gem Crush in Bejeweled. I have this sort of compulsion at the moment where, if my nails are bare, I need to apply polish immediately, otherwise... I'm not sure what would happen, since I usually give into the urge. So on the Bejeweled went  without hesitation and I thought I could create some sort of jelly sandwich with it. After applying the first layer, I realised I had the order of the polishes wrong, decided to abandon the idea and just enjoy the one-colour-of-polish-at-the-time experience. 

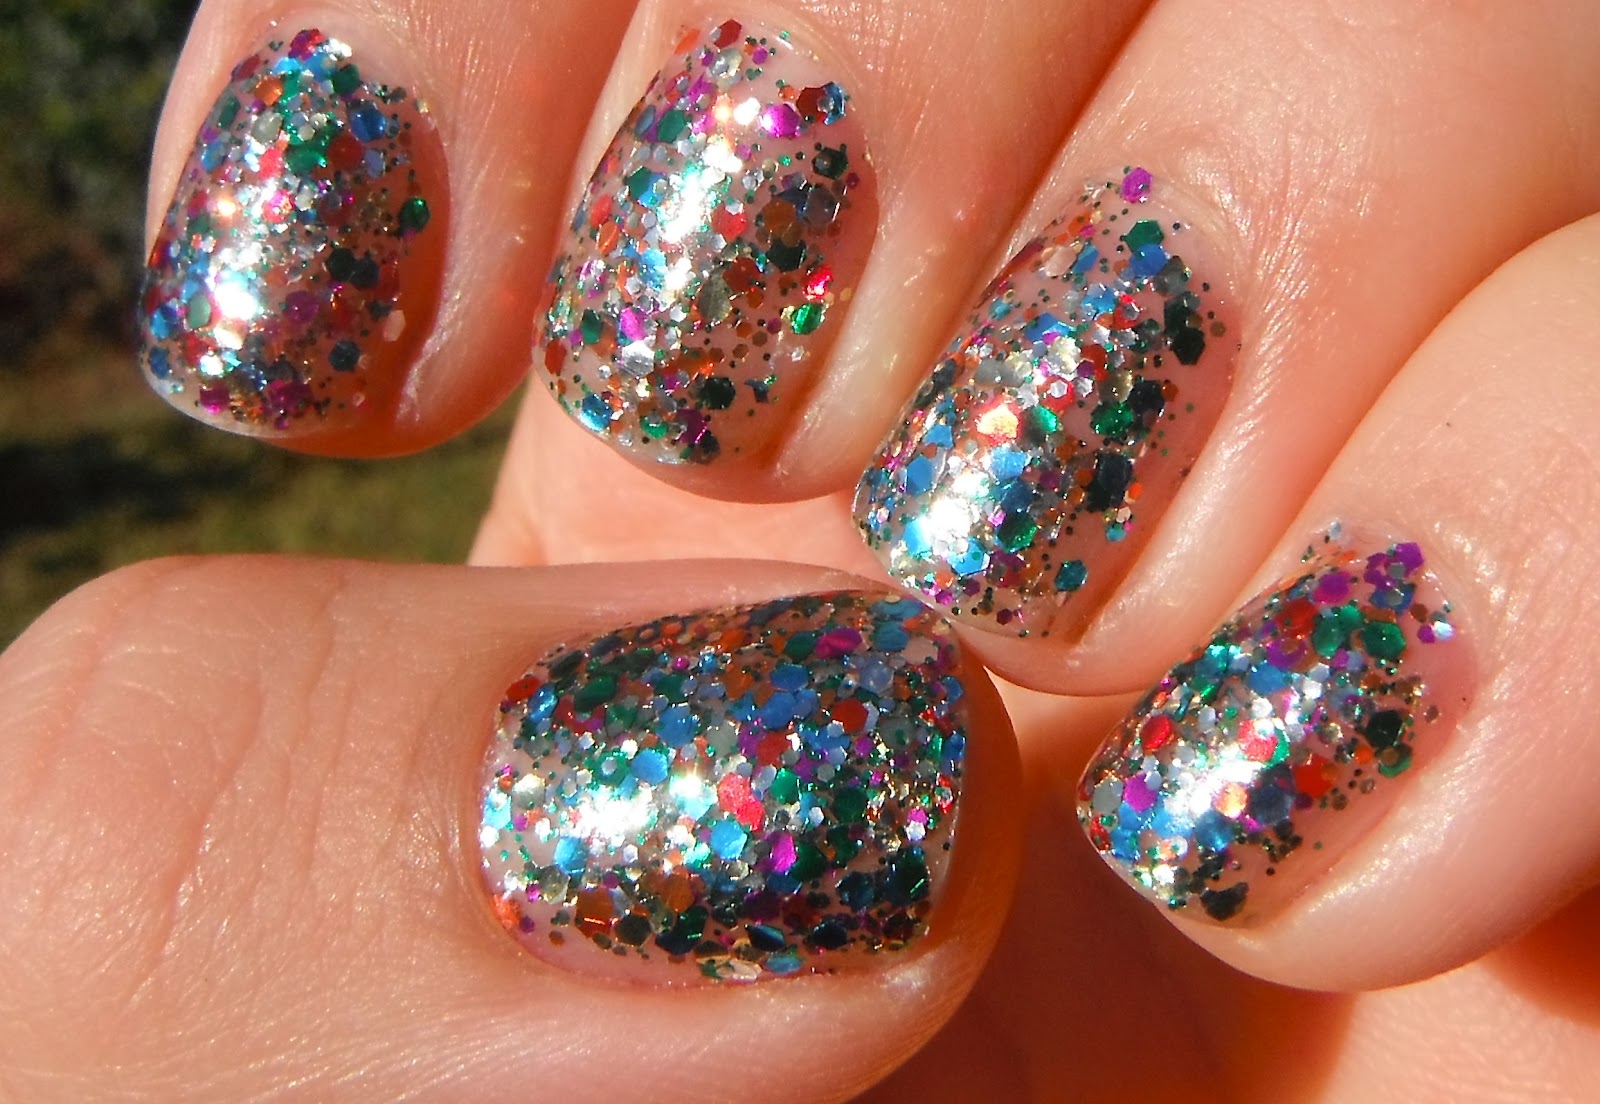
Once two layers of Bejeweled dried, I looked at my nails and came to the conclusion that such glittery, pale colour didn't suit my skin. I went back to the polish drawers and found a more colourful glitter to put on top, which ended up being Sally Hansen Xtreme Wear in Rockstar Pink. I liked the look but the holographic glitter in Bejeweled got lost with the Rockstar Pink. I applied a last, very thin layer of Bejeweled and this was the final result.


I guess this would be bring me to my third confession. I don't plan what I'm painting on my talons 99% of the time. If I ever do, it turns out completely different or I don't end up liking it, so spontaneity is usually the key for me.


Anyway, we're all here for polish, not confessions. I'm sure you've seen the bottles around but I'll show you again just because I can.


The Gem Crush polishes came with a flat, stiff, medium length that is AMAZING for picking up the glitter. No having to fish for it or lay the brush really flat and hope that the glitter will stick to your nails. Sally Hansen has done a good job with this one. 


Now, after all the blabbing, here's a picture of how the transition of this mani happened. On the left, two layers of Bejeweled, in the middle, one coat of Rockstar Pink over two coats of Bejeweled, and finally on the right the creation of the glitter glitter sandwich (was that a creative name or what?).


This extremely glittery mani was also extraordinarily gritty. I'm hoping the two photos below can show the difference. On my left hand (left photo), I applied three thick coats of Essence XXXL Shine Gel-look Top Coat and the grit could still be slightly felt. On my right hand (right photo), I didn't apply any top coat and I think you can see the difference. 


Not sure if you noticed from the pictures above but my right hands looks a little rugged. This would be confession number four. My right hand usually goes without moisturiser, base or top coat and when I painted them the polish goes all over cuticles and fingers. It's not gonna get photographed, so it can be left untreated, for lack of a better term. Oh no! Not after this pictures. My right hand will be treated with as much love as the left. After all, it does most of the work...


And last but not least, I hate nail polish remover. I dread the moment when I have to take out the cotton and soak it on that smelly, irritating substance that removes the beloved polish.  When I applied all the glitter above, the first thing that popped into my head was the fact that at some point I would have to remove it. Well, that's what happens when one wants to sparkle. No pain, no gain.

Fortunately for me, all the grittiness with no top coat cracked in day at work. The below photo was taken on my lunch break because I felt it wasn't going to last the whole day and I wanted to show you. *Warning: The following image might disturb polish lovers.* 


My shoulders now rest lighter getting all that off my chest and I can breath easily (since I didn't have to unpolish one hand!). I hope I haven't bored you though.

Until next time, 

Happy polishing!!

Tuesday 19 June 2012

The Nudes

No, there are no naughty pictures in this post but there are photos of a very new thing for me. Nude colours. 


I've always been a fan of bright pinks, scarlet reds, royal blues, deep purples, glittery blacks; whereas pastels, beige and pale brown tones usually went unnoticed and if I ever glanced twice while shopping, they would be put rejected for the more luminous shades. This doesn't only happen with polish but with clothes, shoes, homewares, anything that I would pay for basically.


However, after trying your Butter London Yummy Mummy, I thought I could give this look a go. I went to Target to see if I could score any bargains but I couldn't really find anything I liked within my low budget. To the rescue came that little underrated Essence Cosmetics stand. Essence released a Nude Glam collection for the northern hemisphere's spring for this year, which includes 7 polishes of the nude sort. The one that got my attention was Toffee To Go. It wasn't too pink, too brown or too shimmery and I thought it would be suit my skin tone.  


To be completely honest, I couldn't bear the thought of not having colour or sparkle on my nails, so I added  OPI Save Me from the Nicki Minaj Collectionas an accent on my thumb.


Here it is, my first (and almost) full nude. I used three coats of both Save Me and Toffe to Go. On the thumb, I used three coats of Toffee to Go with a wiggly-lined piece of sticky tape after letting Save Me dry. It was all toped off with two coats of quick drying top coat.


I loved this mani but... The Essence Toffee To Go was a pain in the ass to work with. It was streaky, the formula was thick (how can those two go together?) and it took forever to dry. If you were to zoom on my the above picture, you might be able to see a lot of hair marks on the polish even after I applied two (two!!) pretty thick coats of top coat.


Needless to say, this came right off and got replaced by another sort of nude mani. For this one I used three coats of  OPI DS Classic and a bronze foil for the accent nail.


I was a lot happier with this and, even though the foil didn't last more than two days, I would like to say this is more my kinda nude. 


One last one because I liked it that much.


That's all from me. So until next time,


Happy polishing!!

Tuesday 12 June 2012

In Memoriam of the Skittled Mani *Edited with photos*

This is a rather sad post for me as I am mourning the massacre I created while trying to revive a four-day-old skittled mani (the one i got with all your awesome nail polishes on Friday night). I thoroughly enjoyed having ten fantastic colours on my nails all at once. I never thought it could be so much fun!!! 

So after the four wonderful days, I noticed there was considerably nail tip wear on the glitters, which accounted for at least three of my digits. I thought a tape mani a la Chalkboard Nails* would hide the tips and give the colours that I was wearing a new life. Off I went to grab my striping tape and carefully pressed it onto my nail, cut it and re-pressed it to make sure it was stuck. I applied a thick-ish coat of Rimmel 60 Seconds in Black Out on the worst tip wear offender and quickly peeled it off. Oh, big mistake. There were no lines, just blobs of black polish over speckles of colourful glitter. 'Oh well!' I though, 'Let's try the next one'. I let it dry for about five seconds but I still ended up with a mess. 

What to do but keep trying? I grabbed sticky tape and tried to do one of these on my ring finger. It seems like I placed the sticky tape bits too close together, maybe there was a bubble in the polish or I didn't wait long enough but the half the black came off with the tape. It looked baaaaaad... Plus there was no contrast with the dark blue I was wearing and it was too far down on the nail for it to look good. I tried the last method once more on my thumb and it worked so well, I almost top coated it. Pity, the rest were so unpleasant to the eye. It all had to come off! I didn't even take a photo of it! 

I shall remember it anyway with this small tribute. 

The colours of American Apparel in Supernova have everything my skittled mani had, lots of colour and lots of glitter!

I need 4 coats to get a (mostly) full coverage and each coat dried surprisingly quick. I was done in about 20 minutes including top coat and by then it was dry to the touch. This polish is surprisingly smooth without top coat and there's no need to fish out the glitter if the brush is inserted into the bottle fully for each application. Enough of my words, I shall leave you with some pictures.


*Chalkboard Nails gives credit to Nailside for the idea of the tape mani, however, I liked the former's idea of using striping tape as I have no patience to cut so many strips of such small width. Anyhow, if my attempts keep failing with striping tape, I might have to follow the sticky tape route.

That's all from me and until next time,

Happy polishing.

Saturday 2 June 2012

My First and Oh-Not-So-Fabulous Marble

Wow!! It's been almost a month since I wrote that first post. I think the blogger in me needs a little more discipline. Mind you, I could argue that I like to be informed about what I am doing and that the last month has been spent 'researching' other nail blogs, looking up for countless hours YouTube videos for inspiration and sussing out the market so this nail hobby is as least detrimental to my bank account as possible. 


So, to show some of my findings, I'll start with something that caught my attention in YouTube for two reasons.The first one being the endless possibilities that this technique can create and the thousand of tutorials found in said website. As you may have guessed from my title, I'll be showing my simple version of the marble.


Ta dah! Here it is. I started with my pinky and finished with my thumb, hence the different pattern in my smaller finger. I firstly tried to use Ulta3 polishes for the marble but the colours would not disperse! Not by shaking the cup, moving the polish with a toothpick or even, may I say? My finger. By the time I finished playing with it I ended with these colourful lines as a pattern and I thought I would give it a go anyway. If you look closely at the pinky it looks like an eye, a very colourful eye though, and that's why I decided to leave it.  

I wanted to keep trying and get the actual marble effect on my nails. From all those YouTube videos that I've watched, I gathered China Glaze and Sally Hansen are really good to try out in this technique. Not even OPI makes the cut, apparently. I was lucky enough to own one (just one) China Glaze in 108 degrees and one Sally Hansen Xtreme Wear in Red Carpet.They a both have very fine glitter but they are noticably different. Phew!

So the process started and went quite well from there. I even managed to create a pretty flower pattern without planning it! 
  

This was a messy process and most bloggers/creators recommend that you sticky tape the skin around your fingers to prevent polish sticking. However, a few others recommend using Vaseline around your nails for an easier, one-quick-wipe sort of clean up. I used the Vaseline as it was easy enough to spread on my fingers, gentler, more accurate and quicker. Once I was done with a toothpick in the water, I would remove the layer of the jelly on my finger and it worked wonders. I did forget to spread it past my distal phalanx (yes, I just Wikipedia-ed that name) on my ring finger, so i had to clean it up with acetone. 


So here it is, once more. I think I am proud of this creation.


I will try this technique again with different colours and patterns, possibly as a accent... Wait, can you hear that? I think YouTube is calling me for more inspiration.

Till then, happy polishing!

LinkWithin

Related Posts Plugin for WordPress, Blogger...