Showing posts with label Purple. Show all posts

Tuesday, 26 February 2013

Max Factor's Fantasy Fire

I'm sure we're all aware of the existence of Max Factor's Fantasy Fire. When I first saw it in real life, I fell in love with its rainbow coloured shimmer and jelly appearance. It was perfect in the bottle and I wanted the effect on my nails. 

I actually purchased this bottle a little while ago for 72 cents at Big W but had waited a loooong time as I couldn't really justify spending $5.95 for such a little bottle. 

Aren't those colours pretty? 


I've tried a few ways to use Fantasy Fire to maximise the amount of colours seen and so far, layering over Max Factor's Purple Haze has worked best. This polish has a very similar to the jelly in Fantasy Fire so there's no streaks or bald patches. I used two coats of Purple Haze and two coats of Fantasy Fire in the swatch below.


I have to admit, the polish in the bottle is amazing but it didn't blow my mind once it was on the nail. You could say I was... disappointed. Only one colour shimmer can be seen from a particular angle and to see the others, you need to move your hands around so the light hits the nail differently. Too much effort in my opinion. 

In one last effort to fall in love with it, I applied my trustworthy Rimmel Matte top coat.
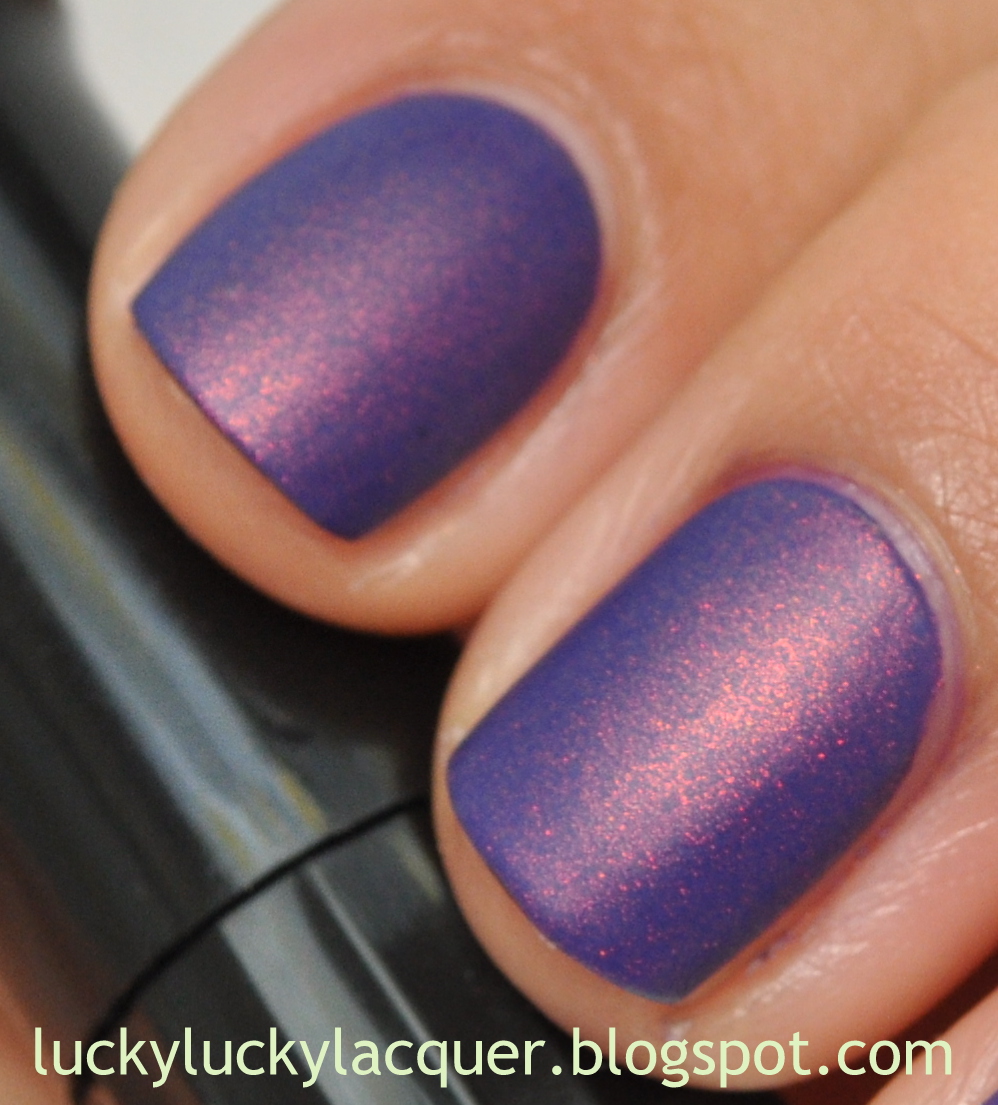

Much better...

I'm sure that if my nails were cubical, all the colours of Fantasy Fire would show like they do in the bottle. Until then, I'll just have to  live with the matted version and hold that little bottle up to the the light to admire its greatness.

Do you guys own Fantasy Fire or any of the many similar polishes out there? Are you in love? How do you wear it?

Til next time, 

Laura

Monday, 17 December 2012

Dry Marble with Face of Australia Pastels


 Browsing through YouTube I came across this video from MissJENFABULOUS. I had actually seen it when it first came out back in June but I was browsing through her channel. Yes, I'm a fan of hers and she has some cool ideas.

So as a good 'Monkey See, Money Do'-er that I am, I brought out my lightest coloured polishes and created this mani.


Excuse the lobster-coloured hands and shiny cuticles, the colours of the polishes are the best I've captured and my cuticles have been way too dry from work. 

Polishes used: 
White (as a base): Rimmel London I <3 Lasting Finish in London Clouds


From left to Right: All Faces Of Australia from their Pastels Collection. After Dinner Mint, Boys 'N' Berries, Easy Peasy Lemon Squeezy and I'll Take You To The Candy Shop. 
Top Coat: Sally Hansen Insta-Dri

I'm really happy with the result and the technique is super easy. Including drying time and clean up, this mani only took me about twenty minutes. I also need to say, even though the formula in Face Of Australia polishes isn't generally great, I'm really loving these polishes for their slow drying time. Basically, it means that I can play around with them to create nail art (like this marble) and if I stuff it up, I can take it off without too much trouble. I'm seeing the positive on these polishes... Plus they were $1.65 each when I bought them. :)

What do you reckon? Would you try this technique? Maybe other colours? Oooh, I might try this with some metallics...

There's something really exciting (for me, at least) that I wanna show you guys in the next couple of posts. It might involve a long time lemming... Stay tuned.

Til next time, 

Laura

Monday, 26 November 2012

Striping tape not only for striping

Every so often I have this idea that it would be great to create a nude mani to have a palette cleanser, sort of thing. The only problem is I only own two nude shades, one being essence in Toffee to Go (see here) and OPI in Barefoot in Barcelona. Toffee to Go takes forever to dry and Barefoot in Barcelona makes my skin look dirty, I think. So I figured if I wanted a nude mani, I would have to get creative with what I had.

This originally was going to be a post about lace nails (my scissors weren't sharp/small enough, ended up too fluffy), then went onto neon/nude stamping (no neon polish of mine was showing enough on the nude polish), after that turned to create half moons with foils (my sticker guides didn't hold up with the foil glue) and ended up, as a last resort, with my 18 pack of striping tape.

After all those attempts, the polish I had on had to come off as there was no rescuing from all the dents left from all the stuff I tried to stick to the nails. I ended up using Barefoot In Barcelona on all my nails. I chose two striping tapes from my lot (from eBay from this seller), one purple and one blue. I almost went for a third one but remembered this was going to be a palette cleanser. I started with a blue stripe along my ring finger and decided to put one purple stripe on each side. For some reason, I decided to keep going and do the whole nail. So it looks like this:   


A close up of the nail.

I applied two coats of Sally Hansen Insta-Dri to make sure my work didn't fall out within the hour, after all, it took me about 45 minutes of patient work to finish the one nail.

Once the top coat started drying, the blue striping tape started fading and heaps of bubbles formed. You can see a how it started below.


 The photo below was after about half an hour and you can see the difference.


I carried on with my activities and after about three hours and a gym class, there was major colour fade on the blue striping tape but not the purple, and pretty bad tip wear. I also noticed my dodgy clean up job. Oops.


It basically looked like a simple nail wrap but I knew the work behind it. Would I do it again? Yeah, it was so much fun, even if it only lasted a couple of hours. I might try it with more colours and combine it with bright, non-nude polishes and see what I can come up with. I think striping tape and I have just become best friends.

What do you think? Would you try it? Or do you have any suggestions?

Til next time,

Laura 

Friday, 23 November 2012

Saran Wrap? Sugar Spun Nails? Not quite...

I watched this video a little while ago and really liked the effect it created. It reminded me of sugar spun nails without too much of the mess. I set off to try it it today with colours different  from below but I turned into a grey, green mess. So the polish came off my ring finger and tried again.

This is what I turned up with. You can see the lines from the fan brush but they're not too defined so it looks like I tried to take some of the polish off rather than put it on.


Polishes used:
Gold: Topshop in Gilted (2 coats)
Ring Finger: Base: American Apparel in T-Shirt (1 coat)
                  Purple: American Apparel Metallic in Violet Panache (3 coats)
                  Pink: Ulta3 in Tahiti
Top Coat: Sally Hansen Insta-Dri

For the ring finger, I had to use a base as the American Apparel metallic polishes are on the very sheer side and would have taken a lot of coats to get it opaque. 

I'm leaving short and sweet today. Going back to work has left me really nappy...

Till next time,

Laura

Thursday, 15 November 2012

kit's Time To Shine... Ooh, yeah!

I looooooooove nail wraps. I suck at free-hand nail art and can be pretty impatient, so when nail wraps started popping out I tried every brand I could get my hands on... and my budget would allow me. I've tried lots of Sally Hansen's wraps, eBay, random Asian brands from the two-dollar shop, I even ventured into full nail water decals. I'm generally happy with the quality, design and time these wraps have stayed on. They have been a life saver when I'm frustrated from dodgy attempts at nail art. 

As you may have guessed, this particular post is about kit's Nail Strips. If you haven't seen them around here's a photo. This design is called Time To Shine.


And they look like this on the nails.


I'm gonna insert a break here because the post is rather long but please keep reading because these strips are awesome.

Monday, 12 November 2012

essence Marble Mania's Silver Twister


I've had this terrible lemming for two metallic stamping polishes for quite a while. I know Essie's Metallics collection has had some good reviews on their own and as stamping polishes and they have a variety of colours that go beyond the usual gold and silver. Unfortunately, living in Australia means that they won't be available in stores for a few more months at least, if at all. I've also tried eBay, e-tailers, forwarding services from the USA. It's all either too expensive or they've sold out.

I also looked for Barry M Foil Effects and found them in stock at Ninja Polish at a fairly good price but the shipping cost was the same as the polish. So I kept looking and I've  bought  about three pharmacy gold and silver polishes but they're all too sheer for stamping properly.

In one last bout of hope, I went to Target to see if there was anything new. When I came across the essence stand, there was a display of polishes for their Marble Mania collection and saw this little beauty:


From what I see in the Essence website, this collection is mostly about nail art rather than just marbling. There's even a kit with two sponges (for gradients), orange sticks, a striper brush and a booklet with nail art ideas for sale. I didn't see the kit in Target but it doesn't really surprise me as it can be a bonus just having a few of the polishes available. 

I do this thing with bottles to see how sheer they are where I turned them a few times  while on its side and see how well they coat the glass bottle.With all the other polishes that I had bought for stamping (that didn't work out), you could see the polish in the bottle through the glass but not with this one. I had hope again and as I turned the corner I saw the essence Twilight Collection polishes. This collection has a very streaky, one-coater, gold polish that is amazing for stamping. It deserves a post of its own. There was only one bottle of each, so I snapped them up and run to pay for them.


After my little adventure, I started trying a few colour combinations and found out the best ones for the silver polish was a dark, matte base, at least for my skin anyway.


Polishes used:
Purple: B Collection by Bloom in Dubai
Silver: essence in Silver Twister
Top Coat: Sally Hansen Insta-Dri and Rimmel Pro Matte Finish

I did two coats of Dubai followed by Sally Hansen Insta-Dri so it would dry quicker and I could get on with the stamping. Then I applied the Matte top coat before stamping with the silver using Bundle Monster's BM-207 plate. I didn't add any top coat after that and I'm regretting it as there is already some tip wear on the stamping on my thumb.

I don't know if you've noticed but the angle of the hand is different to the way I usually do it. Turns out, I did a terrible job with my stamping and there were bumps and non-stamped edges so I had to turn my hand a little to hide the imperfections.

What do you reckon? Am I overdoing the matte top coat? Should venture into the shiny side?

Till next time, 

Laura

Saturday, 3 November 2012

Not So Afraid Of The Marble Anymore

I went to Big W yesterday in search of a new foundation but stumbled upon their massive beauty sale. I found Max Factor's mini bottles for 72 cents. Yeah, that's right. When have I seen such prices for ANY brand of polish on Australia? Never! There were only three colours left so I picked them up and turn around to start running to the checkouts. 

However, in my way, I came across the Face of Australia stand. I'm not a massive fan of their formula as it takes a while to dry but every so often they come up with decent collections and fairly nice colours. Their last one is called Pastels (innovative, right?) and each bottle was $1.94. Woohoo!! I grabbed 6 out f the 7 colours of the collection and ran off to pay. 

When I got home, I took my little $14.52 stash of nail polish and then realised I didn't really like pastels. There was a reason why I never had any before!!! So I had to think of how to use them all at once and the idea of a marble popped up. I brought out my plastic cup of water and started playing with the colours and come up with something I'm actually proud of.


Look at my ring finger. Yeah, I like it.


And some more detail of my index and middle finger (excuse the bubble).


Polishes used:
All Face of Australia
Pink: I'll Take You To The Candy Shop
Purple: Boys 'N' Berries
Blue/Green: After Dinner Mint

I applied the pink polish as a base and added the three colours to the water. The beauty I found with these three polishes is that they took about a minute or so to dry up on the surface of the water so there was quite a bit time to play around with the shapes. I was also really easy to clean up. I didn't use sticky tape or Vaseline to protect my fingers but I managed to just wipe the polish off my skin with some cotton. I found some tiny bubbles from not drying my fingers quickly enough but they're barely noticeable in real life.

I originally intended to use all all six colours for the marble but the yellow and orange polishes from the collection would dissolve in the water by themselves but wouldn't let the other polishes dissolve and dry out really quickly. Really strange considering when when I combined only the yellow and orange, they would play nice and actually create a marble. 

 So, Face of Australia polishes have shown me the beauty of the marble and how I shouldn't be so afraid. Hmm... I wonder what other colours I can try.

Till next time, 

Laura

Monday, 29 October 2012

I'm in a blogging mood...

Two posts in one day? Yes, that's right. Laura is in a blogging mood. And also feels like she needs to do something with her day. So here we go.

A little while ago, I went to Mecca Maxima in the city and the lady that was serving me showed me this beautiful, sunny yellow by Nars but the $32 price tag put me off buying it. When I tried it in-store, the polish had an amazing formula and wasn't too streaky as yellows can be but it wasn't enough to justify it.

So I went looking for another yellow and I came across the discounted bin at Target and found Monte Carlo by B Collection by Bloom for only $5!!! It was a steal and I've had pretty good experiences with this brand. 

I also happened to get two Bundle Monster Nail Stamping Plate Sets and was itching to try them. I applied two coats of Monte Carlo and let them dry. They were fairly thick coats and took a little while to dry but I had patience that day. Generally, I like wearing really bright colours and their boldness doesn't bother me, but I'm glad I decided to stamp over this because it was B R I G H T. 

I have noooooo idea what colours go well together so I jumped on Google and checked out a colour wheel to see what would look with the yellow. According to my understanding of the colour wheel, a purple would look good (Colour theory? Laura has no idea). I grabbed an old SugarBaby in You Rock, I don't even know if they sell them anymore but it's in my stash and I might as well use it. I stamped very sheer and it looked more maroon than purple but I really like the effect it created. I used BM-204 plate for the stamping image and use OPI RapiDry Top Coat. 


I only took one good photo of the mani  but it does it enough justice, I hope.

Till next time.

Laura

End of Semester Manicure

Well... Technically the semester isn't over and still have about four pieces of assessment due in the following two weeks but I couldn't wait to post again. 


I've been wanting to do this fish braid technique for ages but I didn't find the time or I had disastrous attempts at it. As always, I found on YouTube on MissJenFABULOUS channel, and I loved it. Here's my attempt.


I got home on Friday night, after having three assignments due that day, and started making the braid on my ring finger which took  F O R E V E R and painted the rest of the nails on Saturday morning.  

Polishes used:

Purple: Dubai by B Collection by Bloom
Pink: Cologne by B  Collection by Bloom 
Gold: Goldie by Bloom Cosmetics
Top Coat: Rimmel Pro Matte Finish


I've also learnt the very important lesson of cleaning up the cuticles and how much better it can look when the polish is fairly even. I grabbed an old eyeliner brush and tried it out. It's OK but i don't think it will stand the polish remover for much longer. So it'll be my quest to find a good one.

I'll leave it short and sweet for today,

Till next time. 

LinkWithin

Related Posts Plugin for WordPress, Blogger...