Showing posts with label Aqua. Show all posts

Sunday, 6 April 2014

GOT Polish Challenge: Pastel

Well, it's not Thursday today but I can reassure you this post has been in planning since Wednesday night last week. I knew I wanted to use Sweet Hook by China Glaze, my first pastel polish after much resistance from my part, but didn't know how I would use it. After some frustration research, I end up with some saran wrapped, drippy nails. It took me three goes to create the mani you see below from having to do and redo the drips; they would come out crooked, too fat or too chunky. This was an OK try but I actually liked the second one better didn't take photos of it but never mind, I'm happy with the result.


For my last attempt, I started with two coats of China Glaze in Sweet Hook, which has been used a lot in this blog, and let it mostly dry. I then applied one thin coat of Australis' Aqua (please don't judge, it was an early time for this blog) and saran wrapped it off while it was still wet. I then dotted a line of Butter London's Union Jack Black along the tips of the nails and two dots at different levels of the nails to create the drops' base. I let that dry for a few minutes before taking the Topshop Nail Art Pen in Black, tool that I have used almost to the bottom of its container, to smooth out the dotted lines and creating the neck of the drops. It turned out super chunky so I waited for it dry for a while before creating the highlights on the drops with the white Nail Art Pen from Topshop. Once all that was done, I finished with one coat of HK Girl top coat.


This nails were chunky on the tips, I could feel them and it bother me a little but I kept them on overnight. When I woke up, they were a lot smoother and looked nicer, unfortunately I had to go to work before the sun had come up so I couldn't take new photos (mostly from tiredness). When I finished work I had a tiny little bit of tip wear and was tempted to cover it and take new pics but the day got on the way and that thought went out the window. What I figure is that the thick tips protected this mani and allowed me to keep it for a few days before it peeled off in thick, black chunks.


The thing about this mani, even though not perfect, has shown me that I have come a long way in nail art. I used to get frustrated because I couldn't come up with acceptable stuff and would just take it all off without posting anything on this blog. This time, I had basic tools, knowledge of how to use them, better colour theory and most important of all, a lot more patience and persistence to create a funky mani (from afar, it looked better from afar). Who would have thought painting nails would have so many benefits?

Till next time, 

Laura


Monday, 17 December 2012

Dry Marble with Face of Australia Pastels


 Browsing through YouTube I came across this video from MissJENFABULOUS. I had actually seen it when it first came out back in June but I was browsing through her channel. Yes, I'm a fan of hers and she has some cool ideas.

So as a good 'Monkey See, Money Do'-er that I am, I brought out my lightest coloured polishes and created this mani.


Excuse the lobster-coloured hands and shiny cuticles, the colours of the polishes are the best I've captured and my cuticles have been way too dry from work. 

Polishes used: 
White (as a base): Rimmel London I <3 Lasting Finish in London Clouds


From left to Right: All Faces Of Australia from their Pastels Collection. After Dinner Mint, Boys 'N' Berries, Easy Peasy Lemon Squeezy and I'll Take You To The Candy Shop. 
Top Coat: Sally Hansen Insta-Dri

I'm really happy with the result and the technique is super easy. Including drying time and clean up, this mani only took me about twenty minutes. I also need to say, even though the formula in Face Of Australia polishes isn't generally great, I'm really loving these polishes for their slow drying time. Basically, it means that I can play around with them to create nail art (like this marble) and if I stuff it up, I can take it off without too much trouble. I'm seeing the positive on these polishes... Plus they were $1.65 each when I bought them. :)

What do you reckon? Would you try this technique? Maybe other colours? Oooh, I might try this with some metallics...

There's something really exciting (for me, at least) that I wanna show you guys in the next couple of posts. It might involve a long time lemming... Stay tuned.

Til next time, 

Laura

Saturday, 10 November 2012

Australis Aqua

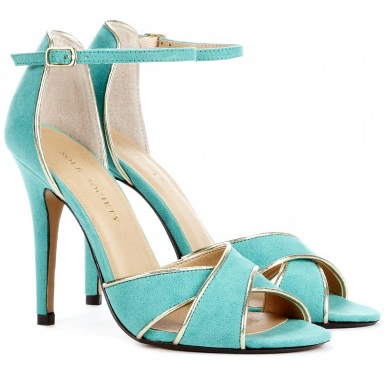
As we all may know, Pinterest can be such an inspiration for cooking, decorating, art, nail polish... So i jumped on it to get some sort of colour inspiration and long story short, I ended up checking out these shoes from Sole Society. I am a bit of an impulse buyer and almost, almost bought them but decided to wear the colours on my nails. After all that's the reason I jumped on Pinterest.


Aren't they pretty? I really wish I had lots of places to go to so I could justify spending money on beautiful shoes. So here's my interpretation.


I know, really straight forward but after all my failed attempts last week, this is rather enjoyable. The blue is actually an aqua colour but I don't seem to get the colours right with my camera sometimes. This polish is the happy medium between green and blue. 

Polishes used:
Blue: Australis Nail Colour in Aqua. If this isn't an original name, I don't know what is.
Top Coat: Sally Hansen Insta-Dri

The striping tape I got on eBay from this seller. I got 18 rolls of different colours for $2.60 ages ago. At the time of posting, the seller had similar offers for purchase. Mine came from China and took a little over two weeks to get here but the wait was worth the quality, quantity and price.

I'm gonna check out some more Pinterest pictures for future inspiration. 

Till next time, 

Laura

LinkWithin

Related Posts Plugin for WordPress, Blogger...