Showing posts with label Gold. Show all posts

Tuesday, 9 April 2013

Neon Saran Wrap Mani

Or since I'm in Australia, should I call it Neon Cling Wrap mani?

Whatever name you'd like to give it, here's my first successful saran wrap manicure. I've tried it a lot of times before but it always looked lumpy or I would take off the base with the wrap. I learnt to be a gentler and it looks like it paid off.

I used American Apparel's T-Shirt as a base for American Apparel's Neon Pink. I then layered B Collection by Bloom in Miami and gently applied pressure while still wet to create the effect . 


It was actually a bit bumpy after blotting the wrap on my fingers. At the moment, all my topcoats have either yellowed so much they change the colour of the polish, or are rock solid and no thinner would save them. I'm waiting to for my first Seche Vite to arrive in the mail but it's taking forever. I was itching to post. 

Anyway, instead of topcoat, I used OPI's Natural Nail Base Coat. It seemed to even things out a bit and give it shine but it took foreeeeeever to dry and, after a couple of hours, still has a rubbery feel. It also seemed to dull the neon colour a tad. Can you tell? 


This was originally going to be the base for some tribal nails. I have been trying to get some done but every time my hands seems to get shakier/completely-uncooperative and ended up with a terrible mess. They will not elude me!!! One day, I'll draw the coolest tribal nails and everyone will be talking about them. Haha! No, not that far. I'll just have postable nail art.

Is there anything that's you love but haven't been able to recreate?

Till next time, 

Laura

Tuesday, 27 November 2012

Cheaper manicure? Show Me


Since there's a minor achievement to celebrate, I wanted to show you a manicure with all my favourite things in a mani; gold, foil finish, bright cremes and the use of tape.


Polishes used: 
Gold: Max Factor Max Effect Mini Nail Polish in Ivory (isn't ivory usually off white?)
Orange: Ulta3 in Carrot Top
Top Coat: Sally Hansen Insta-Dri

I used three coats of Ivory for full opacity but I could have gotten away with two. The Carrot Top is a fairly good one coater, if it is carefully applied. I was inspired by Nailside's tape mani, which I'm sure a lot of us are familiar with. I swear this would have to be one of the quickest manicures I've done in a while.

The best thing about this mani, however, would have to be the price. 


The bottle of the left I managed to snap up for 72 cents at Big W a few weeks back and the Ulta3 I purchased about six months ago at Coles for a whole 95 cents. The grand total for both bottles comes up to $1.67. Not too bad for Australia.

Now, if there's someone out there with cheap manis, let me know. I would love to see them.

Till next time,

Laura

Wednesday, 21 November 2012

theBalm's You're So Hot and Gold

In the last post, I wondered how many other brands didn't capitalise their names. I didn't go out looking for them but I came across theBalm at David Jones, which I guess is half way there. I'm not a grammar Nazi or anything of the sort, but it makes me think brands are overusing the lack of capitals just to give their name an edge. Anyway, we're all here for polish so I'm gonna show you theBalm's polish I purchased on the weekend.


This one is called You're So Hot and Gold from the brand theBalm. It's basically small glitter (small, not fine) suspended in a clear base with a scattered holographic effect. It is soooo pretty and sparkly, even in low light. It can be used for layering but I like the way it looked on its own better. The formula was amazing and there was an even coverage of of the glitter without having to dab the brush on the nail. The swatches above and below are done with three coats. It dried rather gritty, which could be expected from a glitter polish, and needed two coats of top coat to give it a completely smooth finish. 


One blurry photo to show the holo effect...


I'm not a fan of just swatches so I stamped what I think is an abstract leaf pattern on my ring finger for an accent, excuse the dodgy stamping skills.


If I must show the holo effect properly, I need to show sun photos


Sunny, extra blurry photo to show the beautiful colours of the holo...


Polishes used:
Gold glitter: theBalm Hot ticket Nail Polish in You're So Hot and Gold (what a mouthful...)
White stamping: Konad Special Nail Polish in White 
Top coat: Sally Hansen Insta-Dri
Stamping plate: Bundle Monster in BM-204

And just in case you are wondering what the bottle looks like.


Now for some low-down on the brand. TheBalm is made in the USA, designed, distributed and marketed by a team in San Francisco, California. I'm not sure how long the company has been around but there it seems a most of the people working behind the brand have been working on the make-up industry for more or less a decade.

In Australia, theBalm has been exclusively sold by David Jones (not sure about e-tailers) from the beginning of August this year. I only came across it on the weekend and unfortunately their range didn't seem that catchy. It doesn't feel like there's too much to tell this brand apart from all the other million that pop up every week. I mean, I didn't really look at their lipsticks, foundations, etc., but the nail colour range seemed very safe. There were only six or seven polishes that were nudes, taupes, black, a base or top coat and this holo glitter. They also go for $13.95, which for me at least is a bit high for colours I can get somewhere else for cheaper. 

If you were to jump on theBalm website, you can see the range is a lot bigger and out there than what is offered at David Jones. Which is really a shame because I guess what give them the edge (apart from the lack of capital at the beginning of their name) is the quality. I'm glad I was in a impulse shopping spree and grabbed this colour. I'm so in love. 

I'm just gonna show you one last thing. When I started applying the polish, I really liked the way it looked with only one coat, as it was very subtle, everyday sparkle. The second coat still subtle but was way but sparklier. The third coat gave it almost full opacity. Check it out.

This is without top coat.

This is with top coat on. I felt the top coat brought out the sparkle on the glitter and didn't dull it at all, like it can happen with holo effect polishes, scattered and linear.


What do you reckon? Would you give it a go?

Till next time, 

Laura

Tuesday, 13 November 2012

essence A Piece Of Forever

This post is full of cheap goodness. Firstly, we may all know that essence is amazing at keeping up with trends at a very low price. In this occasion, essence has released a collection to coincide with the release of the latest Twilight movie, Breaking Dawn Part 2 (according to iMDb.com, the movie comes out on this Thursday, 15th of Nov. I'm not a fan so I'm not keeping up with release dates for these movies).

The collection has four polishes but the only one that really caught my attention was the yellow gold one that looked thick enough to be a one coater. To tell you the truth, I didn't even pay attention how much it cost when I first bought yesterday. However, I went to Target in the city today and bought another bottle because it's so good for stamping. I just checked my receipt and it turned out to be $3.95. Not too bad.

My other awesome purchase was a Max Factor Max Effect Mini Nail Polish from Big W for $.72. Yep, that is seventy two cents. There weren't that many colours available but I liked the blue enough. 

This was my little haul for the day.


And this is the mani I came up with:


Polishes used: 

Blue: Max Factor Mini in Candy Blue
Gold: Essence The Twilight Saga Breaking Dawn Part 2 in A Piece Of Forever
Top Coat: Sally Hansen Insta-Dri
Plate: Bundle Monster BM-218


It seemed a little to plain to have the same pattern on all my fingers so added an accent on my ring finger with the gold polish.


I didn't like how it looked so I stamped the blue onto the gold for this result.


I think I like it but I'm not sure. I'll let it grow on me, if not, there's always good ol' nail polish remover and endless combinations of polish colours and finishes!

Just a few notes on the polishes, Max Factor's Candy Blue was a dream to apply with a non-streaky, almost one-coater formula that dried fairly quickly and it worked well for stamping. In the above photos, I have two coats on but I could have gotten away with one carefully applied coat. Love it. The only bad thing I can come up with is that Big W's sale finishes tomorrow and they weren't great at stocking up their shelves with this awesome offer. Oh well. I guess I can do without those extra bottles of polish.

Now, the gold polish. To start with, the colour seems a bit odd, and even though I'm a sucker for gold polishes, the yellow gold hue that it has put me off a little bit. Yes, it is great for stamping and that's basically why I got it... Plus it's essence. Essence = Cheap. 

The other problem I have with it is that the application on the nail is S T R E A K Y. Every single hair of the brush can be seen on the nail, even when dry. You can't see it in the photos above (or can you?). I came across this post from Spektor's Nails, which in turn borrowed the idea from Polish Art Addiction, to avoid those streaks on metallic/shimmer polishes. So I applied a first coat, which would have been enough if not for the streaks, then sponged a second coat on. You couldn't see the streaks but because I used a new makeup sponge, bits of it got stuck to my nail. :(

What do you like better, gold over blue or blue over gold? 

Till next time, 

Laura

Saturday, 10 November 2012

Australis Aqua

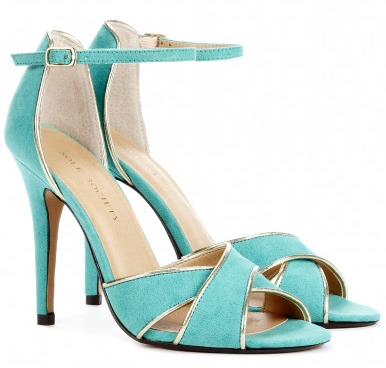
As we all may know, Pinterest can be such an inspiration for cooking, decorating, art, nail polish... So i jumped on it to get some sort of colour inspiration and long story short, I ended up checking out these shoes from Sole Society. I am a bit of an impulse buyer and almost, almost bought them but decided to wear the colours on my nails. After all that's the reason I jumped on Pinterest.


Aren't they pretty? I really wish I had lots of places to go to so I could justify spending money on beautiful shoes. So here's my interpretation.


I know, really straight forward but after all my failed attempts last week, this is rather enjoyable. The blue is actually an aqua colour but I don't seem to get the colours right with my camera sometimes. This polish is the happy medium between green and blue. 

Polishes used:
Blue: Australis Nail Colour in Aqua. If this isn't an original name, I don't know what is.
Top Coat: Sally Hansen Insta-Dri

The striping tape I got on eBay from this seller. I got 18 rolls of different colours for $2.60 ages ago. At the time of posting, the seller had similar offers for purchase. Mine came from China and took a little over two weeks to get here but the wait was worth the quality, quantity and price.

I'm gonna check out some more Pinterest pictures for future inspiration. 

Till next time, 

Laura

Thursday, 1 November 2012

The Gold Crackle

I'm sure I'm not the only one that got caught in the crackle fad and bought a heap of different colours because the black one was so cool and innovative. Well, now that phase has well and truly passed and I have don't-want-to-count-how-many bottles of crackle, I thought I start getting creative with them. 

I saw this video a few weeks ago and this is what prompted me to get the crackles out and work with them in a different way. I really loved how shiny the glitter in OPI Gold Crackle and decided to work with that one. First I tried to paint it on sticky tape a la The Beauty Department but I found, once dry, the polish was inflexible and would come off the tape. I tried cutting this dried polish into shapes but my hands and scissors were too big for the strip, so I just ended up crushing it and throwing it in the bin.

I also tried stamping with it but it was a major fail. Lesson learnt.

Today I came across this other blog, Konad Addict, where the crackle polish is sponged onto the nail with some rather amazing results. Yes, I am using other people's ideas but I really have no practical creativity, which I guess this blog may help me out with( I hope).

So here it is, my sponged-on crackle over pink. It is so sparkly and shiny in real life I can't stop looking at it. The combination of colours also reminded me of a Disney princess or Barbie colours. It is sooooo cool even though it looks like a normal glitter gradient. I didn't really crack either. There's only two minor ones on my index finger.

Polishes used:

Gold: OPI in Gold Crackle
Pink: OPI in If You Moust You Moust
Top Coat: Essence XXXL Shine Gel-Look and Sally Hansen Insta-Dri


The photos don't do the glitter justice on how sparkly it is and that pink, that pink is  impossible for me to photograph. I've tried every setting and light possible but to no avail. The middle photo would be the closest I managed to get it to the actual colour.

That's all from me today.

Till next time, 

Laura

Monday, 29 October 2012

End of Semester Manicure

Well... Technically the semester isn't over and still have about four pieces of assessment due in the following two weeks but I couldn't wait to post again. 


I've been wanting to do this fish braid technique for ages but I didn't find the time or I had disastrous attempts at it. As always, I found on YouTube on MissJenFABULOUS channel, and I loved it. Here's my attempt.


I got home on Friday night, after having three assignments due that day, and started making the braid on my ring finger which took  F O R E V E R and painted the rest of the nails on Saturday morning.  

Polishes used:

Purple: Dubai by B Collection by Bloom
Pink: Cologne by B  Collection by Bloom 
Gold: Goldie by Bloom Cosmetics
Top Coat: Rimmel Pro Matte Finish


I've also learnt the very important lesson of cleaning up the cuticles and how much better it can look when the polish is fairly even. I grabbed an old eyeliner brush and tried it out. It's OK but i don't think it will stand the polish remover for much longer. So it'll be my quest to find a good one.

I'll leave it short and sweet for today,

Till next time. 

LinkWithin

Related Posts Plugin for WordPress, Blogger...