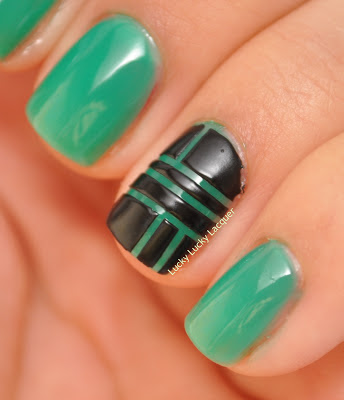
I had a bout of inspiration from browsing through my mother's fashion bookmarks this morning that went from one idea to another, to another and ended up looking like this.
I used three coats of American Apparel Sheer in Pacific Beach topped with Seche Vite as a base, waited for it to dry completely, then taped my ring finger and finally used this method to create the leather effect.
I'm really happy the way it turned out and was surprised how clean the lines were. All those failed attempts have paid off and have left me with some decent taping skills. Woohoo!
As I mentioned before, the original idea looks nothing like what I ended up creating. It went from contrasting textures with half moons to adding a colour and using chevrons to just using tape for an accent. I thought I'd show you the dress anyway, you may see the resemblance.
| Dress by Fatima Lopez, or Lopes? She's Portuguese and there are different spellings in different websites... Source |
One thing that I could do better was the clean up, especially because I used a PVA base coat and we all know what a pain in the ass it can be to clean up without leaving residue behind. I applied the three coats of Pacific Beach and should have cleaned my cuticles at this point. Instead, I applied a coat of Seche Vite and let it dry for about 15 minutes.
Once dry, I created the pattern I wanted with striping tape and used a one-coater black polish, in this case Ulta3 Black Satin, and let it dry without removing the tape.
 |
| Untidy edges and cuticles. I'm cringing so much! |
I predicted that the Rimmel Matte top coat would dampen the black polish enough for the lines to come out crisp when the tape was removed, which surprisingly happened.
 |
| I wish I could at least Photoshop those terrible edges out, but I don't know how to use it... or have Photoshop for that matter. |
I then pressed the sponge onto the polish making sure I got the edges to avoid those smooth lines from the original post. This is where I tried to clean up the edges but the PVA base started snagging and I almost pulled of the accent nail off before taking any proper photos.
 |
| Maybe if I squint and hold my hand as far out as I can, I'll be fine... |
At this point, I was happy to just ignore those terrible cuticles, hope the photos don't show the mess I made and learn from the experience start photographing to show you guys. What do you think? I'm actually quite proud of this creation but those cuticles are killing me!!! and it makes me wanna keep playing with the leather method.
Till next time,
Laura


Really love your leather look striping tape accent! I thought you had used Nails Inc leather effect until I read how you did it it. Awesome :)
ReplyDeleteThank you! I've been trying this method with most of my polishes and it's pretty cool. I just hope I don't get boring when every second post has a textured finish. :)
Delete