Thursday 31 October 2013

33 Day Challenge: Artwork With Favourite Brand

Like most lacqueristas, I cannot pick a favourite brand. They all have their qualities and that's why we have them in our stash, right? However, when I quantified the qualities of some of my polishes, I decided Topshop came out a winner. Their polishes last forever on my digits, they hardly chip, they are reasonable priced for Australia and they tend to keep up with polish trends, sometimes even invent their own to-drool-for colours. I think the main reason why I chose this brand is because Topshop polishes mean a holiday for me. There is no Topshop in my city so every time I get a bottle is because I'm somewhere away from home; as I have gotten them in small batches, each one has a special time an d memory attached to it. 

 
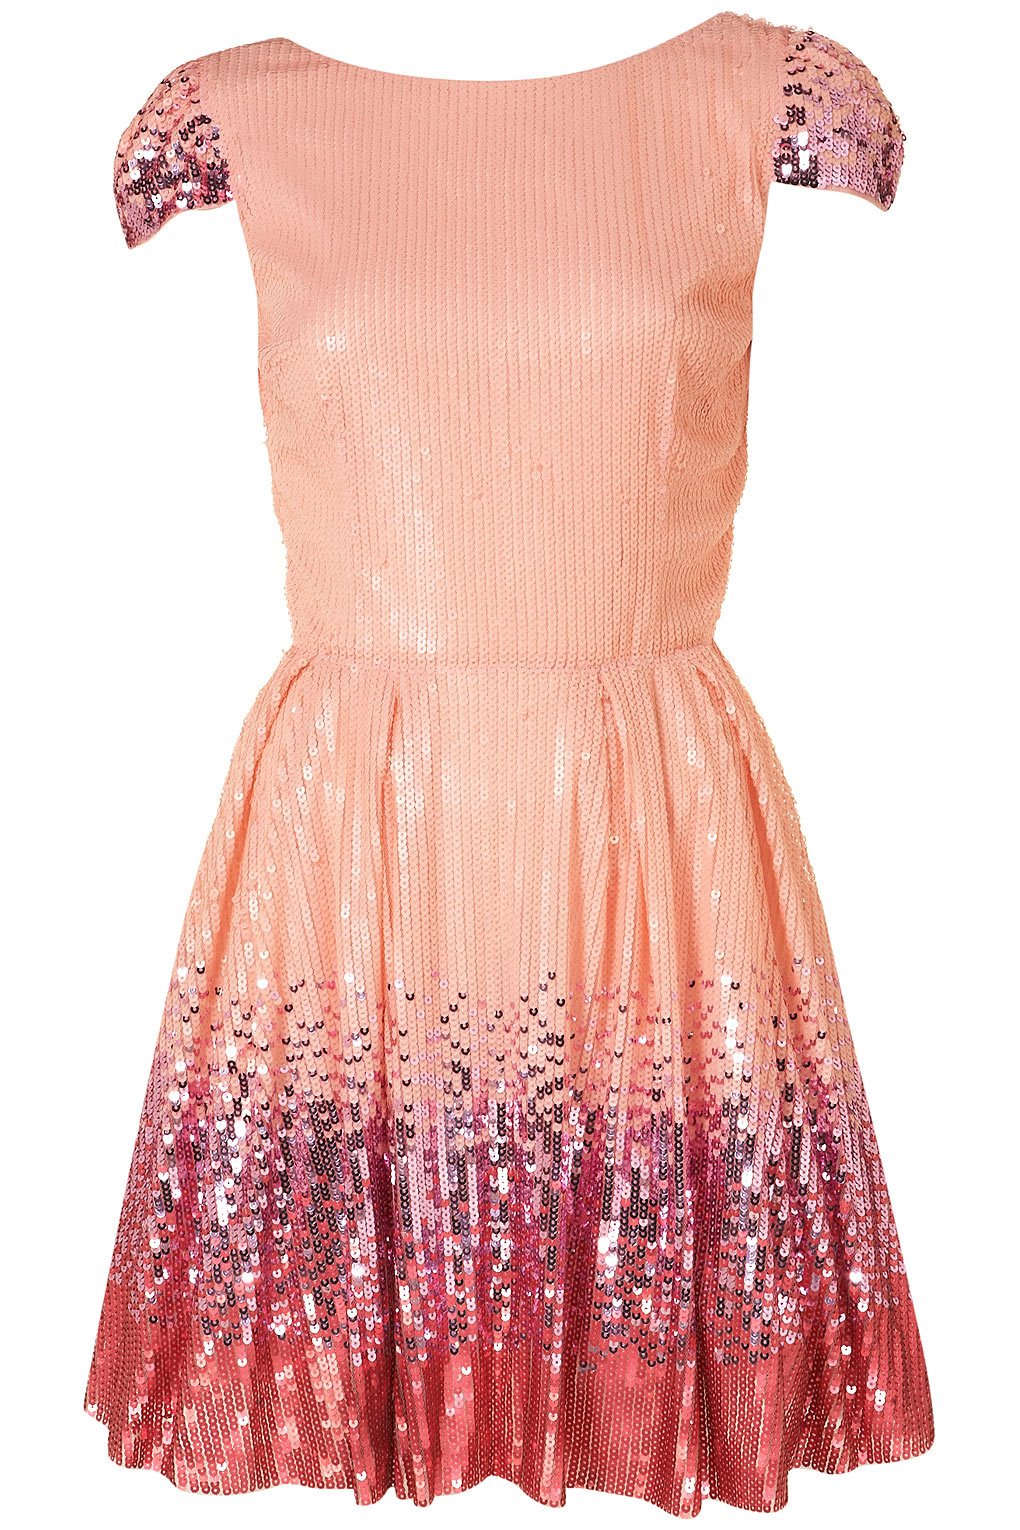
I am aware I'm a day late for today's challenge but c'mon, I prioritised my uni work over nails for once. I had to come up with something quick and settled to loosely base my mani on this dress from Topshop, just to keep going with the theme. I figured dressmaking and designing is art, right? So I'm still responding to the prompt for the challenge.

Source
I used High Voltage (pink creme) as a base, then put Plume (glass flecked purple) and Blitz (gold shimmery pink) on a sponge to create the gradient and slowly tapped it on my finger. I repeated the sponge on process three times on each finger. Sealed the gradient with one coat of Seche Vite.


As soon I was ready to take the photos, the sun hid behind some clouds. This gradient is ssssparkly so I waited about 15 minutes in my backyard waving my arms around telling the clouds to go away. I wish this was a joke but I actually did it *Laura looks away slightly embarrassed*. The sun came out for about two minutes so I had to take photos quickly. 


I was concentrating on getting the sparkle to show and not so much on the colour accuracy. The next photo is not flattering but it shoes a much better representation of the  light spectrum reflected from my nails.


I actually did the gradient on my thumb first to see how many coats Plume would need as it can take four coats of the polish on the nails to look opaque. I was quite happy with the way it turned out because generally my gradients turn out super thick and uneven; I guess using the sheerer polishes helped me out.


I really like this mani and I wanna keep it for a long time, it's so pretty and sparkly. I know I didn't show it very well on the photos but take my word for it. It also reminds me of the half moon/french tip trend that was happening at the beginning of the year and it was completely unintentional.


Random photo that I took when I was waiting for the sun to come out. Anyone know what flower this is?


Check out the other 33DC participants' manis. 


Till next time,

Laura

Monday 28 October 2013

33 Day Challenge: South America

I think this will be the shortest written post I've ever done. I'm exhausted and have no words left in me.  I actually planned ahead and did this mani on Friday because I knew I wouldn't have time to do a creative mani today.

Today's prompt for the 33 Day Challenge is South America and I went with a theme that is appropriate for every country on that part of the world. Soccer. I painted the uniforms from Brazilian player Pele and Argentinian Maradona, whom never played against each other as Pele had his peak a decade or so before Maradona. It's general consensus that they both have been the best soccer players to come out of their respective countries, if not in the world. There's obviously fans out there that will disagree but that's what I grew up so I'm sticking with it :). 

From what I've read Pele invented the position he played which was numbered 10, Maradona ended up playing the same position and that's why I have 10's all over my fingers.


Polishes used:

  • Ulta3 in Honolulu
  • Essence in Grumpy
  • Ulta3 in Soft Hydrangea
  • Models Prefer in Hickory Dickory
  • Daiso green striper
  • Topshop black and white striper
  • Seche Vite for quick drying 
  • Rimmel Pro Matte Finish as topcoat 


This is the shiny version but I wanted to imitate the semi-shiny fabric of the soccer jerseys, hence the matte topcoat.  


I was really happy with my idea and I think it's been executed OK (just look at how straight that striper-drawn 1 is on my ring finger!) but checking out the other ladies' manicures makes me think this is a bit rough. Hopefully, I can come up with something amazing with my favourite brand... Hold on, I don't have a favourite brand and neither do I want to choose one!!! They're all great!


Friday 25 October 2013

BPS Fox Studs Reviews AKA 33 Day Challenge: Animals

I'm killing two birds with this post mostly because the timing of my latest Born Pretty Store delivery could not have been better. I may have also singularised today's prompt of the 33 Day Challenge from animals to animal... Not a big deal, right?

A few weeks ago, I asked to review these beautiful fox studs from Born Pretty Store and I knew I had to use them for this post. I was eagerly hoping they would arrived before today and they did. Phew!!! I found it a bit challenging to think of what to do with these apart from just sticking them to my coloured nail polish. I ended up coming up with this mani that I would like to call 'Night Fox' (it's fun naming manis...). 


This studs are absolutely beautiful, just look at them. They're these dainty little detailed studs, 6mm to be precise, and because they're a sort of abstract fox face there's so much you can do with them. Another wonder about this is that they don't sit flat on the nail as they are so slightly bent so there's no snagging on clothes, hair, fluff, etc.


I think they are made of an alloy metal that is used for most studs as these are really sturdy but light. There are only five in the pack, not quite enough for a whole mani, but they are great for accent fingers. Looking at the photo above, I just realised one of the studs has silver ears compared to the white ears of the others. Hey, that's more variety for me from one pack!


I stuck the stud with clear polish but I'm pretty sure nail glue would have been better. It didn't stick very well with my method and it fell off after a few hours. They can be reused so it really depends whether you are planning to reuse them or not to choose your adhesive. 


Now for the polishes used in the mani, I started with two coats of Ulta3 in Black Satin, followed by one coat of Max Factor Nailfinity in Extra Frost, which gives the black that lovely night sky look without too much effort, and sealed the base with two coats of Seche Vite. I painted the grass with a green stripper before using Layla in Metal Chrome to stamp the moon and free hand the what-I-thought-looked-like stars. I dotted the paws and tail with the same polish before I finished the mani off by creating the tip of the fox tail with a white stripper. I decided not to topcoat the mani because I wanted to keep the texture on the grass and the fox tail. Oh yeah, I stuck the stud with some clear polish right at the end.


You can get the studs by clicking here for US$3.48. Don't forget to use our code to LUCKYG10 to get 10% off full priced products of Born Pretty Store site.


I'm pretty happy with the way the mani came out and I was surprised that the free-handing that I did was fairly quick. All that behind the scenes practice might be paying off. Check out the other talented ladies' manicures for today. 


Disclosure: 
Affilliate Link. 
Fox studs were sent by Born Pretty Store for honest review. 
All other products featured were purchased by me.

Wednesday 23 October 2013

33 Day Challenge: Abstract

Abstract: Thought of apart from concrete realities, specific objects, or actual instances.


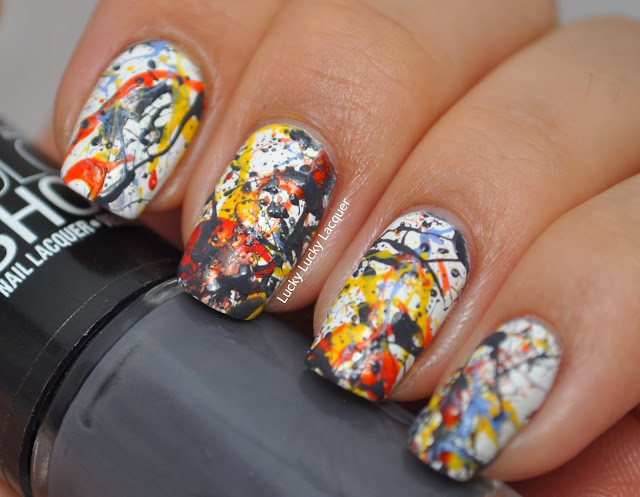
Well, that left the prompt for today on the 33 Day Challenge extremely open for interpretation. I had lots of ideas after I looked up the definition for this prompt on the dictionary. I knew what abstract meant and was aware of the heap of art/music/scientific models that are considered as such but there's something about looking up the meaning of the word to leave no doubt on the mind. I ended up going with one of my first ideas which was to recreate the abstract painting Blue Poles by Jackson Pollock. Or at least use the colour scheme and splatter the polish on my nails. 


There are a few reasons why I chose to base my manicure on this painting. Blue Poles resides in the National Gallery of Australia and was bought in 1973 for about $1.3 million, which at the time caused outrage. 

'How could you pay that much money for something that is not even art?' 

Jackson POLLOCK, Blue poles
Source

I've been wanting to go to the NGA for a while but Canberra, the city where the gallery stands, doesn't have much else to offer me at the moment and there are other places I'm saving up to go to. I will go soon and look at this 2.12m x 4.89m beauty. I might even cry a little... from happiness of course. 


Another reason is the technique Jackson Pollock used to paint his canvas by laying them on the floor and dripping the paint with various instruments. This is said to reflect the realms of unconscious experience but also respond to contemporary life. I'm quoting him here, 'The modern painter cannot express this age, the airplane, the atom bomb, the radio, in the old forms of the Renaissance or of any past culture'. To me that's a way of looking forward, a point of view that acknowledges the past but recognises the need to move on. I'm guessing saying that while everyone criticises your 'art' either takes a lot of confidence... or arrogance. I find it all so inspiring either way. That's why I would cry from happiness when I stand in front of it. *shakes off the emotion a little*


Back to the nails, the last reason why I wanted to have a little Blue Poles in my nails is that I have never done a splatter manicure before. I have tried but using a straw never gave me any splatter, it only gave me blobs of paint onto paper not my nails. I came across this Spanish-speaking Mexican beauty Youtuber, Yuya, that did a splatter manicure with a bobby pin and it seemed a little more controlled. *Edit* I originally couldn't find the video where she showed the splatter manicure but thanks to Brethil from Druid Nails, I have searched high and low and found it. Click here to watch the video. The splatter manicure starts at about 2:30 and Yuya recommends blowing into the bobby pin as if you wanted to blow bubbles *Edit*.


I gave it a go with this manicure and I'm happy with the way they came out. Mind you, the paper I had underneath my nails ended up with more polish than I did. 


Have I mentioned what polishes I used? Started with a two coats of Sally Hansen in White On and the splattered the coloured polishes in the following order:
  • Maybelline Color Show in Impeccable Greys
  • Maybelline Color Show in Fierce N Tangy
  • Ulta3 in Crazy
  • Essence in Absolutely Blue
I finished it off with one last splat of Impeccable Greys to have a closer representation of the painting. I had a mess all over my hands so I grabbed a cotton round and cleaned them up with pure acetone. I managed to clean up around my cuticles with the cotton round and I'm thinking this was easier than sticky taping all my fingers and then trying to remove it. 

I smudged my middle finger and tried to patch it up with extra grey splatter but it's jut making look messy.


I'm happy with this splatter mani and I hope I have made some justice to the painting. Please check out the other ladies' abstract manicures.


Monday 21 October 2013

33 Day Challenge: Chinese

It's day 13 of The Crumpet's 33 Day Challenge and here I am, still sticking to it. For today's prompt, Chinese, I was inspired by so many things but unfortunately I had no time to execute any of them so I went for something simple that stuck to the theme. I also want to start using my ever growing collection of nail art supplies. I've stalled my polish shopping lately but now I've moved on shopping on eBay and Born Pretty Store for anything that can be stuck to my nails.

To tackle the challenge and start using some of these supplies, I came up with this mani. 


Which was roughly based on this vase. I googled Chinese vases and this one screamed out at me. I'm not sure of the authenticity of the claim that this is Chinese but it seemed to look like other Chinese pottery I have seen.

I started with two coats of Essence in Grumpy over a base coat and once dry, I stamped over it with Essie's Penny Talk using one of the new Bundle Monster Plates, BM-404. I got some eBay-bought flower water decals ready and started layering them on the blue and gold base but they were too see-through to show up on the darker blue base. I quickly painted my ring finger an thumb with two coats of Sally Hansen in White On and applied a coat of Seche Vite on all my fingers. I could just have applied it on my ring finger to get the white drying quicker but I thought I might as well do them all at that time.


Once that was all dry, I started overlapping the flowers and leaves on the white base and applied one final coat of Seche Vite to seal in the decals.

I really like how my thumb turned out but I didn't want to show another awkward thumb photo, so I tried two thumb poses. I like this one better...


... but this shows a lot more detail. I think. What do guys reckon?


You can sort of see the blue base on my ring finger under the white. I also managed to bump it on something so the blue flower looks  somewhat shapeless. 


Considering my past experiences with water decals, none of which have been documented in this blog... thankfully, I'm pretty happy with the way this mani came out. It makes me wanna play with all the new sheets I have just received. Stay tuned.


Check out the other talented ladies' manicures.


Till next time, 

Laura

Friday 18 October 2013

33 Day Challenge: A Pattern In Your House

Well... Day 12 of the 33 Day Challenge called to use a pattern in your house to do some nail art. I looked around mine and all I could see were the plain bright or earthy colours but no patterns, even the towels and sheets are all one single colour. I found this pillowcase that colourful that I bought ages ago at the back of the cupboard and saw the manicure for today straight away. 


 The polishes I used are: Sinful Colors in Hazard, Sally Hansen Xtreme Wear in Pacific Blue and White On and finally China Glaze in Sweet Hook. Topped it all off with Seche Vite before letting it all dry for the next step. I hadn't shown striping tape in a mani for a while so I decided to do the smaller stripes of the pillowcase with it. I have 20-ish rolls of this tape and I'm sure that's almost a life time supply; I guess I better start using it.  


The execution and clean up wasn't great but it served its purpose. This mani reminds me of a school sports shirt or flag, at least the three middle fingers do. Maybe if I could reuse the polish base for another mani... 


Here's the pillowcase. I just realised I should have turned the pillow around so the colours would correspond to the ones on my nails but you get the idea. 


Check out the other talented ladies in the challenge.


Thursday 17 October 2013

Versatile Blogger Award


Woot! Woot! I've received two nominations for The Versatile Blogger award by Natalia from The Polished Polyglot and Brethil of Druid Nails. Thank you so much ladies!!!

The Rules:
  1. Thank the person who nominated you.
  2. Include a link to their blog.
  3. Select 15 new blogs/bloggers that you've recently discovered or follow regularly.
  4. Nominate those bloggers for a Versatile Blogger Award, leave a link to their page and let them know they've been nominated.
  5. Tell the person who nominated you 7 things about yourself.
The hard part for me is coming up with things to tell about myself so I'm gonna borrow Natalia's idea of idea of putting a theme to each fact.

Past: I studied Japanese for four years in high school and I got to a point where I was starting to understand Jap movies on TV. I wish I had stick to it so I could speak three languages today. 

Never Done: Skydived. Very unlikely to ever do it even for a million dollars. Actually if someone offered me a million bucks, I'd considered it.

Favourite: I love salt and vinegar chips and double coated Tim Tams. I could eat whole packets of each in one sitting and not feel sick. It takes a lot of willpower to not do it every weekend when I go to work at the supermarket!

Shame: I listen to cheesy Mexican 80's and 90's pop constantly. It's my daily guilty pleasure.

Cool: A few years back, I was on the top 20 fastest checkout chicks in one of two supermarkets chains in Australia. I've lost my touch now...

Personality: I have a very calm nature. It can be a good thing in most situations as I don't stress easily but it can also leave me doing assignments or arriving places at the last minute.  

Dreams: I love bush walking and would love do work as a park ranger in heap of places in the world but it doesn't pay enough. Next best thing would be to walk the all starting with the Inca Trail, Appalachian trail and Walls of Jerusalem. This is my time to dream!


Now the fun bit. I love looking for new blogs all the time so it wasn't too much of a problem coming up with a list of 15 (it's actually 16, hence the doing points, not numbers... Shhh.) blogs to nominate. I tried to make sure they hadn't received this award yet so the love could be shared with as many people as possible.
Hope you enjoy these blogs as much as I have. 

Till next time, 

Laura


Wednesday 16 October 2013

33 Day Challenge: 3D

Oh yes! Day 11 of the challenge has come. I love sticking stuff to my nails and when I came across this manicure at the beginning of September, I knew I wanted to recreate it. And recreated it I did. Everything minus the zebra nail. I also did this a couple of weeks ago, which means I won't be late for the 3D prompt. Yay!


I used two coats of Sinful Colors in Blue By You and one coat of Seche Vite as a base. On the ring finger, I applied one coat of Ulta3 in Clear and got myself sticking differently shaped rhinestones at random. I made sure the 6 or 7 colours I used were distributed on the nail and that I didn't end up with the same colour rhinestone adjacent to each other.


I got really picture heavy in this post but there is another version of the manicure after the break.

Tuesday 15 October 2013

33 Day Challenge: Flowers

I'm sooooo late for a lot of things in this blog! I'm gonna try to tackle a few on one post see how I go. I must say the last three weeks of uni have taken over my life!!! Rant over. Back to the blog...

First, my 100th Post Giveaway has ended, a week ago to be exact, *looks down to the ground in shame* and both winners replied within a few hours of emailing them. Congratulations to Kirsten on getting a $30 Ninja polish voucher and to Roshwill for being the winner of the $30 Born Pretty Store voucher! Thanks to everyone for sticking around after the giveaway finished. I've seen followers disappearing after giveaways are done on other blogs so I was really glad the number of people that are still willing to see my nails has still pretty much stayed the same *warm and fuzzy feelings to everyone*.

Now to the challenge. I'm late by one day in Australian Eastern Time but the plus of being on this side of the world is that there are still 22 hours on Tuesday before Monday is finished somewhere in the world. Mwahaha! Technically, I'm still on time.

I opted for a quick manicure due my lack of time so I looked through my nail art supply stash saw these silicone flowers that I got from Born Pretty Store a few weeks ago. As most of my posts at the moment relate to the challenge, I thought today would be a good day to take them out for a play. Looking at the white flower, I realised I had never done a white and black manicure. In this blog or ever. So here it is, my first black and white mani. 


I know, I know. Black and white is not the theme of the challenge but a white flower on a black base sort of is. I started with one coat of Ulta3 in Black Satin on all my fingers and used Sally Hansen Xtreme Wear in White On to dot some half moons. On the ring finger, once Black Satin had dried, I applied a coat of nail foil glue and let it dry. Once it became clear, I stuck the silicone flower. 


I had originally tried clear polish to stick it on but it fell off after I washed my hands, completely random, right?  I tried washing my hands after I applied the glue and the flower hasn't come off. Shouldn't glue wash off and not polish? I'm not sure what happened there but I'm sticking to the glue for now on. 


The silicone flower was really easy to work with and its flexibility is really great for not snagging it on everything. If you've ever worn large flat 3D nail, err..., items (is there another word?) you would know what I'm talking about. Did I mention they are super detailed. Check this out.


Another plus, they can be reused. This is what it looked like after I carefully peeled it off the nail glue. 


Born Pretty Store is having a 20% off everything sale for two days, 15th and 16th Oct,  and the flowers are currently retailing at $1.99. If you haven't found a discount code for BPS, you can use LUCKYG10 to get 10% off.


These type of mani is not something I would wear everyday, even though I'm very much in love with it. The flower is very out there and big but that's the fun part of it. I would wear this instead of a ring on a night out... I f I had time to go out.

Check out the other timely ladies that have participated in today's (yesterday's?) challenge. 


LinkWithin

Related Posts Plugin for WordPress, Blogger...